Showing posts with label #christmastree. Show all posts

Tuesday, December 28, 2021


Clay Tree Luminaries

These are perfect for Christmas and also wintertime decorating.  Place a tea light candle underneath for some gorgeous mood lighting on the upcoming frosty nights.  I recommend battery operated lights.


All you need is:

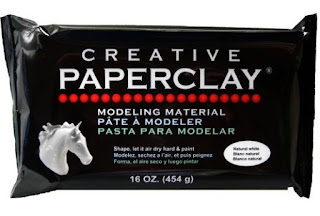
Creative Paperclay or Delight

Acrylic paint - green (Or whatever color you want your trees to be!)

Knife

Rolling pin

String

Pencil sheet of paper

Drinking straw or other circular hole cutter


Wrap the string around the pencil and hold it tightly then hold the other end of the string in you other hand at one corner of the paper.  Draw a half circle on the paper to create a tree template (The longer the string the larger the tree).

Take about 1/2 of a package of Delight and using your rolling pin (You can substitute a drinking glass if you don’t have a craft rolling pin) flatten out the clay.  


Once the clay is flattened as thick as you would like your tree to be use your tree template and knife to cut it out.  (note if you use Delight it does seem to really like sticking to paper so don’t press down hard on your template when cutting it out or else you will get clay stuck on your paper).  


After cutting the tree out use a straw or other cutter to cut out holes in the tree for the light to shine through.  I created more holes lower and less higher.  Be careful how close to the sides you put holes since you will need to blend the sides to create the final 3D freestanding tree shape.

Now lets make our molds into cones by rolling and taping them (and putting wax or other nonstick paper on them if you are using Delight).  Next using the cones as a base create a cone with the clay and press down to seal the trees in their 3D shape.  Now is also a great time to make any needed adjustments so that the trees will sit flat on their bases.


Let them dry out for a day or two!  


Now grab your paint and paint them!  Don’t forget to get in the holes so you don’t see the white shining through.


Once the paint is dry it is time to try lighting them up and enjoying the magic!


I would love to see all your trees!  Comment your photos below.


Cheers until next time!

Kelly Martin

www.Instagram.com/PaperHibiscus

www.PaperHibiscus.etsy.com 

Thursday, December 12, 2019

Paddy O'Malley the Christmas Mouse

It's Second Friday and time for another tutorial.  Sharing some tips and tricks.  

Paddy O'Malley the Christmas Mouse is ready to make an appearance this Christmas.  He loves to help out with the decorations.  


SUPPLY LIST:
Creative Paperclay®
Paper Mache' box or wood box for drum
Acrylics paints
assorted paint brushes
basic clay tools  
tinsel
small ornaments
18 gauge wire
tin foil
masking tape
glue
small wooden skewers 
small bowl of water
2" and 4" foam ball
fine grit sandpaper

Follow this link for a video of the sculpting process and well as the still pictures below with text.  


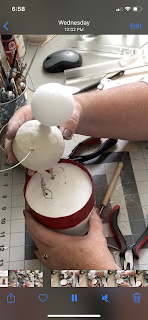
I started by painting the box to look like a drum and decided where I wanted the mouse to stand and poked a couple of holes in the top to secure the legs.  The larger ball is the body, with 2 wooded skewers as the legs.  

18 gauge wire passed through the body where you would imagine shoulders to be.  Another skewer placed where the neck would be and the smaller foam ball placed on top as the head.  Adjust to where you like it.  


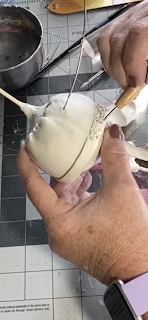
I work on the body and head separately in the beginning.   Here I have covered the body in  Creative Paperclay® and while it drys I'm working on the eye sockets of the head.  just pressing a ball tool in the foam or use your thumbs.  

making small loops for ears and pressing them into the foam.  Kinda Mickey Mouse ears.   Cover with masking tape and then clay.  


I cover foam with masking tape because there is less cracking of the clay as it dries.  I find the foam absorbs the moisture quickly and causes the clay to have more cracks, thus more repair work to do.  

Start adding clay to the bottom of the skewer and add little fun toes.  


Roll out some clay and start to construct a santa like coat.  I made three separate pieces.  One across the back and one for the right and left side of the jacket front.  At the bottom I used a straight tool to add texture.  Making is look like fur lining.  


While the jacket dries I move on the the head.  This takes some time and everyone will have a different look.  Just have fun with it.  

Adding that tin foil to the arm wire.  This adds strength and gives the clay something to hang on to.  Pose the arms the way you like.  I knew I wanted him holding the garland, so I made sure I had the arms arranged in a way that it looked natural.  


Cover the arms with clay, add texture and seams.  


Finally he will need a nice fur collar.  So add a snake of clay to circle the neck area and add the texture.  

Add a hat if you want. I created a tin foil hat and covered int he same fashion as the jacket adding the fur around the base.  

And you're done!   Let him dry before sanding and painting.  Spruce up the drum by adding your design.  

I hope you enjoyed this tutorial.  You can see other things I create by visiting my various social media sites and my Etsy store and website.  If you have questions you can always shoot me an email.  


Contact: Susiewhc@gmail.com
Facebook and Instagram search @artbysusiek
https://artbysusiek.com Here you can sign up for my Creative Breakfast Club
www.artbysusiek.etsy.com
https://www.pinterest.com/susiewhc/


]


Monday, November 5, 2018

Creative Paperclay® Christmas Trees

Hello!
Welcome to another tutorial using Creative Paperclay®. I decided to make these cute Christmas trees and decorate them using stencils and Plaid Acrylic Paint. They are super simple to make so the little ones can join in too.


Here's what you need:

  • Creative Paperclay®
  • A cardboard template of a Christmas tree
  • A rolling pin
  • A craft knife
  • A sharp tool to make a hole (or a skewer)
  • Gesso
  • Plaid Acrylic Paints -see below
  • Stencils
  • Water
  • A makeup sponge
  • Paint brushes
  • White Glitter
  • Sandpaper  
  • Toothbrush
The Plaid Acrylic Paints I used are:

Please follow along in the video below.
</>


I do hope you enjoyed this tutorial. You can share your creations with us on our Facebook page. We would love to see them! For more inspiration have a look around the blog. There are tutorials for many levels using Creative Paperclay®. You can also visit my blog www.papermachepatch.com.


You can find Creative Paperclay® online at Creative Paperclay Co and also at Michaels, Hobby Lobby, Dickblick and Amazon. 

Thanks for stopping by!

Suzette