Showing posts with label Black Hole Art Studio. Show all posts

Tuesday, October 22, 2013

Barbara's Tips for October

Hello everyone, and welcome back.  Well, Halloween is almost upon us, and before you know it, the hustle and bustle of the holidays will be in full swing.  However, this will be my last post as a design team member for Creative Paperclay®.  My term is up and, boy, did it go fast.  I have really enjoyed my short time here, and I hope I have been able to inspire you to play with clay along the way.  The new design team is going to be awesome, so be sure to come back and see what great ideas and projects they have in store for you.

That being said, I have a few last tips to share with you before I go.  

When rolling out the Paperclay® between two layers of wax paper, I discovered that you need to roll the clay in two directions from the middle, first one way, then the other. This will prevent the clay from becoming thick in the middle of the piece.
The second thing I discovered was that part of the reason it was forming this thick part in the middle is because the clay was sticking to the wax paper, which was not allowing the clay to move freely between the two wax layers.  So, in addition to working in two directions, I would also occasionally lift the wax paper and free it from the clay to allow the clay to spread out evenly again.

The wax paper is still quite helpful because my roller is not sticking to the clay as I work, and the Paperclay® removes from the sheet quite easily.  The wax paper does cause some wrinkles in the clay, but this is easily remedied by a wet finger rubbed over it, or texture added from a stamp or texture plate.  I always keep a large spray bottle filled with water nearby so that I can mist my Paperclay® as needed.

The next thing I discovered is, this technique will also work in your clay-dedicated pasta machine, if you have one.  Just free the clay from the wax paper, and insert the whole thing through the opening in the rollers, and give it a go.  Do this each time before decreasing the thickness, and you shouldn't have any problem.

Did you know that if your clay is sticking to your molds, you can mist water onto the mold to form a release?  It allows the clay to be removed from the mold without ruining the clay.  I was using these push molds and the clay would not come off of the mold, even after pushing it through the cutter.  So, I know that water, when misted on clay molds, will release  polymer clay, so why not try this technique and see if it works for Paperclay®.  Much to my amazement, it DID!  I was once again a happy camper.
As you can see in the photo below, the clay remained on the craft sheet, not the mold cutter itself, even though I had to press into it to get the embossing.  
I hope you find these tips helpful.  The more I work with Paperclay®, the more discoveries I make about the product.  It truly is easy to work with and quite versatile.  I hope you will continue to visit the Creative Paperclay online store and blog for the new team's  upcoming creations.  It should be fun and inspiring.  

As for me, you can always find me at Black Hole Art Studio.  Please stop by every now and then and say hello.  I am about to embark on another exciting journey, and I would love for you to follow along.  More details about that to follow.  Thanks so much for stopping by today, and as always, have a wonderful week, and keep on claying!!!

Barbara


Tuesday, October 8, 2013

Fall Candle Ring

Hello everyone, and welcome back to the blog.  I am so glad you stopped by today.  I think Fall is finally in the air, and today, I wanted to share something with you that was quite easy to make and would make wonderful gifts for the upcoming holidays.

I knew I wanted to make a "wreath" like piece, but not so big as a wreath.  So then I got the idea for a candle ring.  Yes, that is perfect, not too big, not to little, and would be so pretty to display for this time of the year.  I even found a pillar candle in my stash and decided to decorate that to match.


Supplies Used:

Creative Paperclay® modeling material
Corrugated cardboard
Circle cutter
Leaf Molds (Makin Clay)
Leaf Cutters, Sunflower Cutters (Lisa Pavelka)
Acrylic Paint:  Burnt Umber, Sunflower, Light Avocado, Tomato Red, Yellow Ochre
Helmar 450 glue
Burgundy 3" fluted pillar candle

Directions:

Cut a 4" circle from corrugated cardboard.  Cut the center out, leaving about 1/2" along the perimeter.
Paint the chipboard with Burnt Umber.
Mold several leaves and sunflowers and allow to dry partially.
You can also speed up the drying time by hitting the clay gently with your heat gun.  At this point, I did not want it completely dry because I still need to be able to manipulate the flowers, and particularly the leaves.
Make seed pod indentations in flower center with rubber tip tool
Adhere the sunflowers and some leaves to the candle using Helmar 450 glue.  Normally I paint my pieces before putting them together, but I was afraid to paint them while my clay was  still damp.  So I painted them after application.
I painted the sunflowers after applying them to the candle.
I placed the chipboard ring around the candle so I could better see how I wanted to place my leaves around it.  I painted the leaves, front and back, before adhering to the candle ring.  I began by gluing and bending the leaves in a pleasing manner to the chipboard.
side view
side view
I hope you enjoyed my project today.  Wouldn't these make great gifts for your friends and family?  Or make one for yourself for a festive holiday table setting.  So visit the Creative Paperclay® blog and online store for more fun seasonal and inspirational projects from the rest of the team this month.  

Happy Fall to one and all!

Barbara

Tuesday, September 24, 2013

Barbara's Tips and Techniques for September

Hello Creative Paperclay® fans, and welcome back to the blog.  Yesterday was the Autumnal Equinox, signifying the end of Summer and the beginning of Fall.  I am really looking forward to Fall, with that crispness in the air and cooler temperatures.  How about you?

The more I work with Creative Paperclay®, the more fun things I discover, from how to paint it, to how to mold it.  It never occurred to me, until recently, that the thinner I roll out the clay, the more flexible it is when dry.  I also discovered that it is quite strong and does not break or crack, like you might think.  This is a real asset when you want a piece of clay that is paper thin and will wrap around your project, or just be flexible for whatever purpose you choose.

So, don't think you have to roll out your clay thick, like 1/4" thick or so, unless you need it to be.  Think of it as making your own paper out of clay.  It is, after all, paper in clay form.  See my previous post where I made honeycomb so thin, the holes remained intact.  Or how about the "sheet" of music I made to add to any project, pun absolutely intended.

You can roll it out thinly on a texture sheet, a rubber stamp, or even a piece of lace or burlap fabric, to get a ton of various textures.  You can even mold items without filling the mold to get thinner pieces, if you want it to be flexible.  You are always only limited by your imagination.  So, unless you need something stable and strong, then have some fun making "sheets" of Paperclay®.

REMINDER ALERT

Don't forget that we are having a Halloween blog link up on 5 October, combined with a design team call.  What better way to showcase your work and share it with the world!!!  And you never know, you could win one of the prize giveaways.  So go ahead, give it a try.  Create something with Creative Paperclay® products and link up to the blog to enter to win!  And if you would like to try out for the design team, check out the information here.
I am so glad you stopped by today, and I hope you enjoyed my tips.  Please check out the Creative Paperclay® online store, and visit the blog for more inspiration.  If you have any questions about the link up, please feel free to ask me.

Have a wonderful week, and play with some clay for the link up!

Barbara


Tuesday, September 10, 2013

Birds and Bees Coaster Tiles Wall Hanging

Hello Paperclay® fans, and welcome back.  It is so hard to believe that the Summer is almost over and Fall is just around the corner.  It is plenty hot here, so it still feels like Summer to me.  And there are plenty of bees buzzing around, so I wanted to do something cool (no pun intended) with the honeycomb pieces I showed you how to make in my last post.  If you missed it, you can click here to see it.  This project is so easy to make, "even a caveman can do it".


Supplies Used:

Creative Paperclay® modeling material
Delight™ air dry modeling compound
Three 4"x 4" square coaster tiles
Six 4" x 4" squares print paper (Close To My Heart-Buzz and Bumble)
Push Molds (Mod Podge)(Premo)
Flexible plastic texture sheets - Music Background, Honeycomb (Carolee's Creations)
Distress ink (Wild Honey, Black Soot, Vintage Photo, Tarnished Brass, Brushed Pewter, Antiqued Bronze)
Acrylic Paints (Folkart Yellow Ochre)(Ceramcoat Charcoal)
Twinkling H20's (Mandarin Citrine, Golden Monarch, Ginger Peach, Mystic Blue, Iridescent Blue, Key Lime, Golden Jade, Rose Petal, Jasmine, Wild Plum)
Cropadile
3/8" gold metallic eyelets (8)
4 large jump rings, 2 small jump rings (Tim Holtz)
Decorative hanger (Melissa Frances)

Directions:

Make a 4" x 4" template from a scrap of printer paper, fold in half, and punch a hole through both halves near the edge, as shown.
Use this to mark placement of your holes for hanging your three coasters together, as shown in photo.
Cover each coaster, front and back, with the CTMH print papers, reversing the patterns, as shown.  (TIP:  Re-punch your holes each time you add the paper so you can find them easily.)  Now is a good time to distress ink the coaster edges.
Add eyelets to each hole, not only for strength, but to also finish off the holes.

Paint the honeycomb pieces first with Charcoal paint, then hit the tops with Yellow Ochre.
For the music background, spread a very thin layer of Paperclay® over the texture plate, the same as done for the honeycomb.  Allow it to dry before removing from the plate.
I was going for an old parchment paper look, so I added a very watered-down wash of Yellow Ochre, dabbing with a paper towel to get the color variations desired.  
Hit the high spots (the music notes) with Charcoal.
Next, I had made quite a few embellishment pieces using the Delight™ modeling material and various push molds.  Delight™ dries more flexible, even when it is a bit thick, so I used it for my embellishments in case I needed the flexibility.  So I laid out my three coasters, arranging my tiny pieces to see how I want to place them.  Nothing is glued down at this time.  
Color the various pieces to your liking.  I had a blast coloring these, and my inky fingers were a testament to that fun.  I colored the pieces using not only the acrylic paints, but also the distress stains and Twinkling H20s.  If my colors were too bright to my liking, I added a light coat of Vintage Photo distress stain.  That always tones down the brightness of colors.  And if you look carefully, you can see that the bird on the branch is so delicate and it broke apart into three pieces.  I am still going to use it and I am going to show you later on.

Now the fun of seeing your piece come to  life begins.  Adhere your Delight™ pieces in a pleasing arrangement, as shown on each of the three tiles below.


Add your jump rings through each of the eyelets, as shown below.  The larger jump rings go through the eyelets, then a smaller jump ring is used to join them.
Here are some close-up views of the pieces.  Don't you just love this little bird nest?
My cute little bumble bee.
And how about the rusty look on this key?
I was going for a bit of a rusty wrought iron look on these flourishes.
And remember the broken branches on this piece?  Normally, this would be my little secret, but I really wanted to show you to never give up because so many things in our art work can be "fixed" or "covered up".

Here is an example of where I layered one piece on top of another.  I love how the tiny pink flowers add to the piece.  I used them as fillers to bring all three coasters together.

These flowers and leaves were a bit too bright for me, so this is an example where a light coat of the Vintage Photo distress stain toned down the brightness.
Whew, I know this is a long post, but I have to admit, I had a blast making this piece.  I absolutely love working in mixed media, and Creative Paperclay® and Delight™ are certainly going on my list of mixed media to use for my altered art.   So, what will you make with it?  Well, you have a chance to show us.  

We are having a Halloween blog link up on 5 October.  What better way to showcase your work and share it with the world!!!  And you never know, you could win one of the prize giveaways.  So go ahead, give it a try.  Create something with Creative Paperclay® products and link up to the blog to enter to win!  
I am so glad you stopped by today, and I hope you enjoyed my project.  Please check out the Creative Paperclay® online store, and visit the blog for more inspiration.  I would also love it if you could visit my blog at Black Hole Art Studio.

Have a wonderful week, and play with some clay for the link up!

Barbara

Tuesday, August 27, 2013

Barbara's Creative Paperclay® August Tips and Techniques

Hi everyone. Barbara here with my monthly tips and techniques to share with you. Today's tip is also a bit of a technique, and I actually made this discovery while trying to fix a boo boo. Funny, but I think a lot of ideas come from the need to fix something that did not quite work out. Reminds me of that old saying, "Necessity is the mother of invention".

 So, here is what happened. I was teaching a group of ladies how to use Creative Paperclay®, and we were using all different sorts of things, like molds, texture sheets, stamps, or our own creative imaginations. I opened a brand new package of Creative Paperclay®, which was very moist. We were rolling out bits of Paperclay® onto various texture sheets and removing the clay to air dry. Some of the texture sheets were finer than others, such as this honeycomb texture plate. Needless to say, one person got overly anxious and did not wait until the clay had time to dry out a bit before removing it from the mold. What happened next? Well, she pulled up the clay and left the design in the texture plate.

 Here is where necessity took over, in my mind. The way I saw it, I had two choices: 1) take the texture plate and a stiff brush to the sink and, under running water, scrub away the clay; or 2) roll another piece of clay over the same area and see if it will stick to the clay already "stuck" in the texture plate. I chose to try number 2. Because the clay was so moist, it worked. (If the clay was a bit more dried out, then I would have added, or spritzed, a bit of water between the two layers to get the same effect. Remember, water is like glue to Creative Paperclay®.)  Well, much to my surprise, it worked!!!
However, I made yet another discovery during this process. As I said, I left the clay to dry in the mold and, where I had not covered the "stuck" clay, some of the open design from the texture plate pulled off, too. Here is the result, shown in a couple of close-ups.  I was so amazed to see that even the open parts of the clay came up, too.

 Now, guess what I want to do next? I want to see if I can get an open honeycomb design by spreading a thin layer even with the surface of the texture plate. After allowing it to dry thoroughly on the plate, I want to see if I can remove it without breaking it into a million pieces.  You can see in the photo below that it is thinner in some spots than in others, but you can see the texture of the plate coming through.  I knew it was not going to be completely open, but it is all about experimenting.
Oh my goodness!  It worked again.  You can see in the photo below where I was able to get more open design area from a much thinner application.  And much to my surprise, it is very durable, and even more exciting, it is extremely flexible, unlike my piece above, where I spread it about 1/4" thick.  After all, it is paper in clay form.  How cool is that?
Well, you can imagine the ideas running through my head with my new discovery.  I know, some of you more experienced Paperclay® artists may already know this, but, just in case, I had to pass it on.  I am so excited to share this with anyone out there who does not know this.  I can see so many possibilities and cannot wait to see what else I can discover about this wonderful product.

So, please stay tuned to see what I have in mind for all these honeycomb pieces.  It should "bee" a real treat.  In the meantime, I hope you will visit the Creative Paperclay® online store and blog for products, updates, and more inspiration from the rest of the Design Team.  I also hope you will take a moment to visit me at my blog at Black Hole Art Studio.

Thanks for stopping by, and have a wonderful end of Summer!

Barbara Rankin
Creative Paperclay® Design Team Member

Tuesday, August 13, 2013

Bird on a Nest Inspiration Piece

Hello Creative Paperclay® fans, and welcome back.  As some of you may know, I really love birds.  I think they are cute little creatures and simply fascinate me.  So, I wanted to try to see if I could make a bird out of Creative Paperclay®.  Well, I am no sculptor, but I think I made a pretty good effort with this, and I can tell it is a bird and not some other strange blob unknown to man.   Just more proof that Creative Paperclay® is a fabulous product to work with and very easy to manipulate.


Supplies Used:

Large wooden spool (2" tall)
Fast Grab Tacky Glue (Aleene's)
Clay/Metal embossing mold 
Acrylic paint (Greenscape, Tahiti Blue, Straw. Coral Blush, Classic Green)
Distress ink (Vintage Photo, Dusty Concord)
Acrylic paint dabber (Lavender Sachet) (Ranger)
Gilder's Paste (Cream)(Baroque Art)

Directions:

I first rolled out a ball of CP® about the size of a golf ball, maybe a bit smaller.  You can always add or remove some, if necessary. 


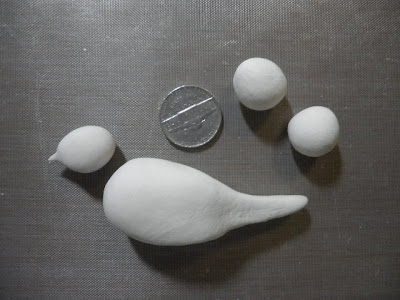
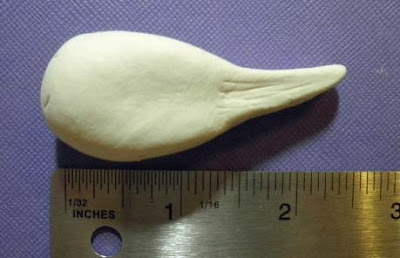
 I made three more balls of CP® as shown in photo below, one for the head, two for the wings.  Next, I made the body shape, flattening from the top and bottom, and pinching one end to bring out the tail feathers portion.  I also flattened the sides a bit to attach the wings later.


Use a straight edge to make "feathers" in the bird's tail portion of the body.


Flatten two of the smaller balls with your fingers to form wings.  Pinch the ends to bring out to a point.  Keep these fairly flat while working on them.  Also, remember to mirror image them so they will  sit in the proper direction.  Otherwise, one will be backwards.  


Lay the wings on top of each other to check for size.


Use a needle tool or straight edge to make the "feathers" in the wings.  


For the head, pinch one end to bring out the beak portion and manipulate it until you like it.  Before it dries, I punched a tiny hole on either side for eyes, and drew a line between his beak for his "lips".  


Set all of your pieces aside to dry.  The body is rather thick and may take several days to dry completely, so plan ahead for this project.  


To determine the circumference of the wooden spool, simply wrap a piece of paper around the spool and mark where the paper meets, in this case it is 4".  This will be the length of CP® you  need to roll out.  


The height of the CP® is simply the inside measure of the spool between the top and bottom edges, about 1-5/8" in this case.  These measurements do not have to be precise now, because the CP® can be trimmed and manipulated as you work with it onto the spool.


Ink wooden spool edges with Vintage Photo.  This gives the wood a nice brown, aged effect.


Roll out a ball of CP® approximately 1/4" thick, wide enough and long enough to go around the spool.    I made a paper template to size to make it easier to see where to cut my CP®.  


Cut out around the template and dry fit it around the spool.  Here you can see I am a bit shy, so I gently rolled my piece a bit more just to stretch it in length only.


Ahhhh, just right.  Now I can use my fingers and a bit of water to smooth out those edges where the CP® meets.  


I spread if bit of tacky glue over the back of the CP® to make it stick to the wood while I work on it.


Next, I rolled the clay-covered spool over a border mold to get this wonderful design.  Just take your time and press the spool into the clay as you roll it.  


I used a plastic clay tool (use whatever you have) to refine the mold border edges that formed when I rolled the clay over it.


While the clay on the spool is drying, I painted my bird pieces with acrylic paints.  


Glue the bird's body parts together with the quick grab glue.  Set aside for the glue to dry.


Paint the molded images on the Paperclay®.  It is okay to go outside the lines because it will get covered up in the next step.  Allow paint to dry.


I used the lavender paint dabber to cover most of the outside of the spool, being careful not to color the flower images.  As you can see in the photo, this color is not strong enough to cover the dark colors underneath.


Using my finger to apply the Cream gilder's paste gave the coverage I needed and left a bit of the lavender color showing through.  


I further distress inked with Dusty Concord to bring back even more of the purple color and bring out that beautiful crackle effect.


Run a thin bead of gold pearl pen along the ridges made in the Paperclay®.


The bird nest is made from small 2" squares of natural burlap, pulling all of the threads apart and balling them up into a circle.  


When you get it shaped the way you like, glue it down to the top of the spool.


Add tiny black beads to the eyes and glue the bird on top of the burlap bird nest.


Voila!  Is that not cute?  I love my bird on a nest spool.  This is going to be an inspiration piece for me, and it will always take me to a happy place when I look at it.


I hope you have been inspired to try making your very own inspiration piece with Creative Paperclay®.   It is a fabulous product, and it accepts so many different mediums, which allows you, the artist, to try out all of them.  

Thanks for stopping by today, and please be sure to visit the online store and blog for more information on this wonderful product.  I would also love for you to visit my blog to see some of my other creations.

Have a wonderful, creative week!

Barbara