Showing posts with label birds. Show all posts

Monday, July 10, 2017

Birds and Butterfly Wall Hanging Featuring Creative Paperclay®

Hi Friends:  Are you looking for more ways to use Creative Paperclay® in your home decor?  Here's a fun Birds and Butterfly wall hanging using Creative Paperclay® on the canvas backgrounds and as the focal image on each panel.

Here's a picture of the full wall hanging:

Birds and Butterfly with Creative Paperclay


Here are some detail images of each panel:


Supply List:
Creative Paperclay® Modeling Material
Inkadinkado Mindscapes Clear Stamps (Amazon)
Inkadinkado Gem Stone Insects Clear Stamps (Amazon)
Inkadinkado Clear Stamps - Gem Stone Birds (Frantic Stamper)
Prima WIRE NET Finnabair Clear Stamp (Amazon)
Prima Marketing Art Alchemy-Sparks-Mermaid Sparkle (Amazon)
Prima Marketing Art Alchemy-Sparks-Iris Potion  (Amazon) 
Prima Marketing Art Alchemy-Sparks-Fairy Wings (Amazon)
Prima Marketing Art Alchemy Acrylic Paint, Metallique Steampunk Copper (Amazon)
Prima Marketing Art Alchemy-Metallique Wax-Bronze Age (Amazon)
Prima Marketing Art Alchemy-Metallique Wax-Aged Brass (Amazon)
Prima Marketing Art Alchemy-Metallique Wax-Vintage Gold (Amazon)
Prima Marketing Art Alchemy-Antique Brilliance Mystic Turquoise (Amazon)
Prima Marketing Art Alchemy-Opal Magic Wax-Turquoise Satin (Amazon)
Prima Marketing Art Alchemy-Antique Brilliance Lucky Emerald (Amazon)
Prima Marketing Art Alchemy-Antique Brilliance Amethyst Magic (Amazon)
Prima Marketing Art Alchemy - Metallique Wax - White Gold (SSS)
Prima Marketing Finnabair Mechanicals - Tin Hearts (Amazon)
Viva Decor Inka Gold (Amazon): Gold
Tim Holtz Ideology - Foliage (Amazon)
Faber-Castell GLASS BEAD GLITTER GEL (SSS)
Glossy Accents (SSS)
Aleene's Tacky Glue (Amazon)
Beacon 3-In-1 Advanced Craft Glue (Amazon)
E6000 Glue (Amazon)
Other:  small canvas panels, ribbon, word charms, jewelry pieces, gems, fasteners

Please see my video tutorial for full instructions to recreate this project:


I hope you enjoyed my project and learned some new ways to use Creative Paperclay® in your home decor. Thank you so much for stopping by the blog today. Have a great, creative day! -Patti


Tuesday, April 21, 2015

Spring Birds by Linda Hess & her 2nd grade students

Hi all!  Spring has sprung in a big way here in Virginia.  The trees are out, the birds are singing, the allergy eyes are itchy!  All of this has me creating wonderful Spring projects with my art classes.

A few weeks back (just before Easter) I made pinch pot birds with my 4th graders.  We used earthen clay that goes into the kiln to cure.  Sadly I had a few students who trapped air in their bird sculptures...the result of this is EXPLODING birds in the kiln.  Sadly, when they explode they not only destroy that creation, but they take out a few around them as well :-(  For that reason, when I decided to create birds with my 2nd graders I wanted to simplify the process and remove the possibility of the creations meeting an "untimely demise".  Naturally I pulled out my go-to airdry Creative PaperClay.

To create these birds you only need a few materials:
Creative PaperClay (obviously)
a small bowl of water
a damp paper towel
tools: plastic knife, pokey tools (a pencil or pen will work for this!)
acrylic paint & a brush

That's it!  Now to create.
1)  For my 2nd graders I cut each package of Creative PaperClay into 6 equal pieces.  Each student received a piece of clay and a damp paper towel. 
2) The piece of clay was torn in half.  One half was placed into the damp paper towel to keep it moist (lay out the paper towel, place the clay on one side, an then fold the paper towel over).  The other half was rolled into a ball and then into an egg shape. 
3) The egg shape was flattened to create a bird body (no thinner than a pencil).  Wasn't that easy??  Now, time to add details!

NOW any of you who work with children know that they all go to their own beat when creating.  You can tell them "We are creating birds", but they will come up with other options..."Can I make a bunny?" "Can I make a snake?" "Can I ...?"  You get the idea.  So of course when I started to demo the details, the questions began.  The bunny option got a yes...the snake option, a no...and so on.

4) "Remove the extra clay from your paper towel.  This will be used to create wings, beak, eyes, and any other details you wish to add." 
5) For a beak, roll a ball of clay.  Flatten slightly.  Pinch one end to form a tear drop.  Dip one finger in the bowl of water and rub onto the bird shape where you want to place the beak (the water forms a glue between the 2 pieces of Creative PaperClay). 
Press beak into place.  Edges can be smoothed and beak lines can be added.
6) For the wings, repeat the beak steps, but with larger balls of clay. 

Again, dip one finger into the water and rub it onto the bird body.  Press wings in place.  Detail wings if desired.
7) Eyes are SUPER easy...just 2 small balls rolled and pressed into place above the beak (using the water "glue" of course). 
8) Add additional details and then set the bird aside to dry. [NOTE: Clay can be "speed dried" by placing into your oven at 275 degrees for ~20-30 minutes]
9) Once dry, paint with acrylic paints.

That's it!  I hope you have enjoyed this Spring project and the simplicity of using Creative PaperClay.  Here are the birds that my 2nd graders designed.  As you can see a few of them go to the beat of their own drum, but that is what makes my job so rewarding...seeing and experiencing the creative souls that surround me on a daily basis.  I never know what will emerge from those pint-sized brains and I love the surprises :-)


Friday, September 5, 2014

First Friday Fan Day Aug. 2014 with Rachel Whetzel

Hello, once again, Blogiverse! Rachel Whetzel here! It's SEPTEMBER. I am so NOT ready for Fall to be here. Seems like we barely started our Summer vacation, and suddenly the kids were headed back to school! Have you felt the time flying as much as I have? This month, I have been browsing the web, looking for creations from YOU using Creative PaperClay®!
I hope you hop over to the links I'm sharing with you today, and let your fellow Creative PaperClay® lovers know you saw what they shared too! 
FACEBOOK On Facebook this month:
Tori West shared her newest BIRDHOUSE creation with us!
Lindsay Hartwell tells us she was happy with how well Creative PaperClay® worked for the TINY FINGERS on her newest fluffy creation
Blake Alexander showed us some pretty awesome sculpting and a wicked PAINT JOB
Jo James of The Cart Before the Horse, stopped by to tell us she is still loving Creative PaperClay® in her ADORABLE works of art. (((waving to Jo)))
Craig Councell shared a WORK IN PROGRESS

PINTEREST Check these pins out!!
Stacey Mead pinned her Wintery RABBIT.
Get your Halloween AND Christmas on with this Nightmare Before Christmas JACK.
Debbie Saenz pinned these BIRDS to get you flying.

TWITTER
Amy Lassiter tweeted an instagram pic of some FACES she's putting on an art journal! 

HELP ME FIND YOU!! 
Use the hashtag #CreativePaperclay on all your social networks. Be sure, when using Facebook, that you make your posts and images using the Creative PaperClay® hashtag are set to public, otherwise, I won't be able to find them. You can also share your projects to the Creative PaperClay® FACEBOOK PAGE. Each month, I'll browse the interwebs looking for projects from YOU, that I can share here! Be featured next month! START SHARING NOW!! 

In OTHER NEWS!! 
Get your HALLOWEEN READY!! 
We're hosting another Halloween Hop! Can't wait to have you with us! 

Thanks for reading! If you'd like to keep up with me, and see more of what I'm up to, I'd also love it if you'd visit MY BLOG and Subscribe! You can also find me on FACEBOOK!

Tuesday, August 13, 2013

Bird on a Nest Inspiration Piece

Hello Creative Paperclay® fans, and welcome back.  As some of you may know, I really love birds.  I think they are cute little creatures and simply fascinate me.  So, I wanted to try to see if I could make a bird out of Creative Paperclay®.  Well, I am no sculptor, but I think I made a pretty good effort with this, and I can tell it is a bird and not some other strange blob unknown to man.   Just more proof that Creative Paperclay® is a fabulous product to work with and very easy to manipulate.


Supplies Used:

Large wooden spool (2" tall)
Fast Grab Tacky Glue (Aleene's)
Clay/Metal embossing mold 
Acrylic paint (Greenscape, Tahiti Blue, Straw. Coral Blush, Classic Green)
Distress ink (Vintage Photo, Dusty Concord)
Acrylic paint dabber (Lavender Sachet) (Ranger)
Gilder's Paste (Cream)(Baroque Art)

Directions:

I first rolled out a ball of CP® about the size of a golf ball, maybe a bit smaller.  You can always add or remove some, if necessary. 


 I made three more balls of CP® as shown in photo below, one for the head, two for the wings.  Next, I made the body shape, flattening from the top and bottom, and pinching one end to bring out the tail feathers portion.  I also flattened the sides a bit to attach the wings later.
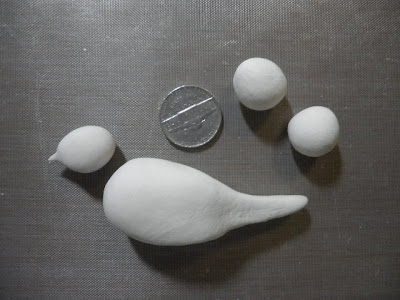


Use a straight edge to make "feathers" in the bird's tail portion of the body.
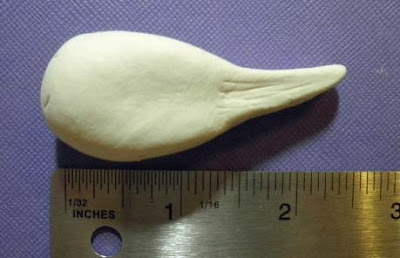

Flatten two of the smaller balls with your fingers to form wings.  Pinch the ends to bring out to a point.  Keep these fairly flat while working on them.  Also, remember to mirror image them so they will  sit in the proper direction.  Otherwise, one will be backwards.  


Lay the wings on top of each other to check for size.


Use a needle tool or straight edge to make the "feathers" in the wings.  


For the head, pinch one end to bring out the beak portion and manipulate it until you like it.  Before it dries, I punched a tiny hole on either side for eyes, and drew a line between his beak for his "lips".  


Set all of your pieces aside to dry.  The body is rather thick and may take several days to dry completely, so plan ahead for this project.  


To determine the circumference of the wooden spool, simply wrap a piece of paper around the spool and mark where the paper meets, in this case it is 4".  This will be the length of CP® you  need to roll out.  


The height of the CP® is simply the inside measure of the spool between the top and bottom edges, about 1-5/8" in this case.  These measurements do not have to be precise now, because the CP® can be trimmed and manipulated as you work with it onto the spool.


Ink wooden spool edges with Vintage Photo.  This gives the wood a nice brown, aged effect.


Roll out a ball of CP® approximately 1/4" thick, wide enough and long enough to go around the spool.    I made a paper template to size to make it easier to see where to cut my CP®.  


Cut out around the template and dry fit it around the spool.  Here you can see I am a bit shy, so I gently rolled my piece a bit more just to stretch it in length only.


Ahhhh, just right.  Now I can use my fingers and a bit of water to smooth out those edges where the CP® meets.  


I spread if bit of tacky glue over the back of the CP® to make it stick to the wood while I work on it.


Next, I rolled the clay-covered spool over a border mold to get this wonderful design.  Just take your time and press the spool into the clay as you roll it.  


I used a plastic clay tool (use whatever you have) to refine the mold border edges that formed when I rolled the clay over it.


While the clay on the spool is drying, I painted my bird pieces with acrylic paints.  


Glue the bird's body parts together with the quick grab glue.  Set aside for the glue to dry.


Paint the molded images on the Paperclay®.  It is okay to go outside the lines because it will get covered up in the next step.  Allow paint to dry.


I used the lavender paint dabber to cover most of the outside of the spool, being careful not to color the flower images.  As you can see in the photo, this color is not strong enough to cover the dark colors underneath.


Using my finger to apply the Cream gilder's paste gave the coverage I needed and left a bit of the lavender color showing through.  


I further distress inked with Dusty Concord to bring back even more of the purple color and bring out that beautiful crackle effect.


Run a thin bead of gold pearl pen along the ridges made in the Paperclay®.


The bird nest is made from small 2" squares of natural burlap, pulling all of the threads apart and balling them up into a circle.  


When you get it shaped the way you like, glue it down to the top of the spool.


Add tiny black beads to the eyes and glue the bird on top of the burlap bird nest.


Voila!  Is that not cute?  I love my bird on a nest spool.  This is going to be an inspiration piece for me, and it will always take me to a happy place when I look at it.


I hope you have been inspired to try making your very own inspiration piece with Creative Paperclay®.   It is a fabulous product, and it accepts so many different mediums, which allows you, the artist, to try out all of them.  

Thanks for stopping by today, and please be sure to visit the online store and blog for more information on this wonderful product.  I would also love for you to visit my blog to see some of my other creations.

Have a wonderful, creative week!

Barbara


Tuesday, May 14, 2013

Garden Basket of Flowers Shadowbox

Hello everyone, and welcome to the blog.  I am Barbara Rankin.  This is my first post as a new design team member for Creative Paperclay® and I could not be more excited to be here.  My first project that I want to share with you is a fun little garden basket full of flowers.  I had so much fun making this, and I love how it turned out.


Supplies used:

Creative Paperclay® air dry clay
Silicone Molds (Martha Stewart)
Garden Basket rubber stamp (Impression Obsession)
Secret Garden 8x8 print paper pad (Graphic45)
5-1/2" x 8-1/2" wooden shadow box (Dollar Tree)
Glue n' Seal (Ranger)
Acrylic Paints (Ceramcoat Purple, Tahiti Blue, Spice Tan, Lt Ivory) (Folk Art Spring Rose, Pure Orange, Sunflower, Basil Green, Leaf Green, Glazing Medium)
Peeled Paint Distress ink (Ranger)
Glue gun
Moss embossing powder

I like to first work the clay into a ball and push it into the mold  Allow it to dry a bit, maybe 30 minutes, before removing it from the mold.

In some instances, I prefer to work the Paperclay® into an oval shape, as I did for this leaf mold.  It seems to make it easier to push the clay into the mold and get better coverage.
Next, I inked up the basket stamp with archival black ink.  It is not necessary to ink your stamp first, but if you do, I recommend using a waterproof ink so it will not run.  I rolled out a piece of the Creative Paperclay® to approximately a 1/8" thickness.
I then stamped into the clay.
Using a craft knife, I cut the excess Paperclay® away and returned it to the package.
Here is what it looked like after trimming.  I used my fingers to smooth the edges and my fingernails to make tiny indentations along the bottom.
I wanted my basket to look more realistic, so I allowed it to dry over a piece of sponge.
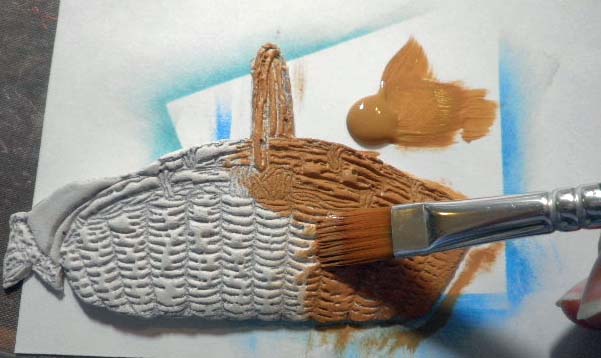
Paint basket with tan acrylic paint.  Allow to dry.
Make a charcoal acrylic paint wash and cover basket.  Allow to dry.  Dry brush tan acrylic paint over basket, just hitting the high spots.
I continued molding flowers, leaves, birds and butterflies, and here is a picture of my desktop filled with  Creative Paperclay® goodness.  It is so easy and so much fun to play with Paperclay® that I could do this for hours.
I painted each piece of Creative Paperclay® with a mixture of acrylic paints and glazing medium.  This helped blend my colors, as well as making the paint more translucent.  
The reason I wanted my paint more translucent is so that my second layer of paint would not completely cover up the previous color.  It would, instead, go into the crevices and darken the nooks and crannies perfectly. Then, after that dried, I could come back and hit the high spots with a dry brush technique.  

With all of my pieces painted and drying, I found a small wooden shadow box I had purchased from the dollar store.  I sanded it a bit, then painted the sides of box, inside and out, with my acrylic paint mixture of Basil Green, Light Avocado, and Glazing Medium.  When the paint was dry, I sprinkled Moss embossing powder here and there on the sides of the box and heat embossed it.   Then I sponged a bit of Peeled Paint distress ink on top of that to bring out the color variations.

I found just the right paper to use for the background, i.e., the Graphic 45 Secret Garden from the 8"x8" paper pad.  It fit perfectly inside the box with just a bit of trimming off the top and bottom. 
I then adhered printed Secret Garden paper to the inside bottom of box with glue n' seal.

Now that all of my Paperclay® embellishments are ready, I simply arranged them inside the box and glued them using a hot glue gun.  Oh my goodness, this was such a fun project.  Here are a few closeup  photos of the Paperclay® and the dimension I easily achieved with this product.


Thanks so much for joining me for my first project post for the Creative Paperclay® design team.  I hope you have been inspired to try out this fabulous and fun product.  There are so many ways to use it, and you will be amazed at how much fun you will have "playing" with this product.  So, I encourage you to visit the Creative Paperclay® blog often, because the other designers have so many wonderful creations to share with you.

Until my next post, I hope you will find some time to visit my blog to see how I continue to use this product.

Have a wonderful week, and happy crafting!

Barbara