Showing posts with label Santa. Show all posts

Saturday, December 7, 2019

A Santa Ornament


Hello, welcome to another blog post! Today I am doing a recap of my Facebook Live show, Clay Talk, that aired on December 5th. In this episode, I did a live demonstration showing you how to make this adorable Santa ornament.


It is quite an easy project for any level of sculptor and you do not need a lot to get started. You will need Creative Paperclay® which is very affordable as well as some craft paints. I recommend Plaid Craft Paints and Mod Podge Sparkle as a varnish. A full supply list is below:


The links to tutorials for the sculptures that I discussed in the video are below:


Thank you so much for stopping by!  If you have any requests for Clay Talk please leave a comment below. Don't forget to join us on the first Thursday of every month at 8PM EST on Facebook.

You can share your Santa ornaments and all your other creations with us on our Facebook page. We would love to see them! For more inspiration have a look around the blog. There are tutorials for many levels using Creative Paperclay®. You can also visit my blog www.papermachepatch.com.

You can find Creative Paperclay® online at Creative Paperclay Co and also at Michaels, Hobby Lobby, Dickblickand Amazon. 

Thank you for stopping by!

Suzette


Friday, November 8, 2019

Santa Gnome Ornament


Hi I'm Susie Krichbaum of Art by Susie K and new design team member at Creative Paperclay®.  Join me every 2nd Friday starting November 11th, 2019 for tutorials, tips and tricks using Creative Paperclay®   and    DelightTM air dry modeling compound to create the fun and unique.


A little bit about me: I'm located in sunny  SW Florida and in my studio is where I spend most of my days. I create peculiar characters that tell a story - from the oddly sweet to the peacefully zen.  I pull inspiration from me Irish Roots, the allure of nature, fascination with strange tales and a love for Halloween.  I have been published several times in Art Doll Magazine and Prim Magazine and have exhibited my art at Spirits in Sanford Art Show in Orlando, FL, Hauntizaar Halloween Art show in St. Petersburg, FL and Heart of Halloween Art Show in Cumming, GA.  

I have been using Creative Paperclay® modeling compound since 2009 and it’s become my favorite clay to use.  For this tutorial I am using both Creative Paperclay®   and    DelightTM air dry modeling compound to create this almost feather light Christmas ornament.  I hope you enjoy browsing the pictures and have fun creating your own unique Santa Gnome.    Just for kicks I included a fast motion video at the bottom of the page, one of the sculpting process and one of the painting and embellishing process.   Sometimes it’s fun to watch the hands work (even though I go out of frame a few times, but I’ll get better at that)


Supplies:
Creative Paperclay® and DelightTM air dry modeling compound  (I used both / option to use one or the other is fine)
18 Gauge wire (I buy at a hardware store like Home Depot)
Foil
Masking tape
Small cup of water
Paper towels
Tools for cutting the wire
Clay tools (optional)  fingers work very well
rolling pin or large dowel, smooth bottle etc
Lace or doily
 White and red paint
Antique medium
Varnish or sealant  (here I'm using a brush on so it stays sticky for the glitter)
Red glitter
Clear glitter
Small piece of garland or ribbon

The most import thing on the list is to have fun and make it your own, add your own twist and see what you come up with. 


  Creating the Armature


Cut a piece of 18 gauge wire about 20" long and make a soft fold or loop joining the two ends together.  Start to twist the wires about 6" from the top. 

You end up with a little fish with the body roughly 5" long.  Everyone will have slightly different measurements.  No Gnome is the Same :)

Pull off about a 10" sheet of foil and start to form it to fit in the middle of your "fish" shape

Setting inside the wire and keeping it to about 1" wide from front to back.   Using the armature gives strength to the piece as well as helping you use less clay and have a lighter piece.  

Secure the foil in place with masking tape.  Tape also give the clay something to hang onto during the modeling process.

Now you look like you've created a bug with long antennas, here in Florida it's the making of the worst kind of bug we have, la cockroach!!

Adding the Clay


I started with the Creative Paperclay® air dry modeling compound.  Taking ball about the size of a ping pong ball and started rolling it out on a flat clean surface.  Flattening to about 1/4" thickness.  Pull the flat pancake of clay off the surface and lay it back down, dip fingers in some water and get the top surface damp. I prefer not to over wet the clay.  If you see a lot of cracks then adding more water is a good idea.  Working with clay too wet or too dry makes me a sad gal.   


Start to wrap your clay around the masking taped area of your piece.  Trim off the extra and with wet fingers work the clay into a nice smooth piece.  
Marking and making a small indention where I want the nose to be.  Also placing a line just above the nose to mark how far the hat will come down.   The is when I start to use the DelightTM air dry clay.  I model right over the first layer of clay that serves as a sturdy base.  
Wet the area where you want the nose to go and place a small ball of clay in place.  You can go any size you want, his nose is his only form of expression so you can be creative here.  
Roll out some logs of DelightTM clay to start to form the beard.  I started the beard from the line where the hat will meet all the way down to the bottom of the piece.  Have fun with the design here, I gave him a wavy beard, but a straight beard you work just as well.  


Starting to swirl like an ice cream cone.

I decided to leave the back plain for a signature or maybe dating the Christmas year or a simple Christmas message.

Adding some texture to the beard. Use a sharp point, even a straight pin or tooth pick will work well. Adding texture is an important step in making your piece pop with details.  We will be adding a stain to the entire piece and this is when you will really see some definition take place.  


  More clay and texture for the hat

The hat needs some life.  So Adding a generous 1/4" thick piece of DelightTM clay to the hat only. I cut one edge of the pancake in a straight line to form the bottom edge of the hat.  Wet one side of the clay and place the straight edge of the clay where the line was drawn just above the nose and beard lines.  

Wrap the clay around the hat area and trim off the excess.  

Yay!  more texture.  I am using a doily here to press in some interesting impressions onto the clay.  This is a fun technique to use and super easy.   Do as much or as little as you want.  

There he is all ready to dry overnight.  In the morning he will get a good ole' sanding and paint job.  

Sand, paint, glaze and embellish

Using a fine grit sand paper start to gently smooth out the rough areas, but don't sand away all the texture details.  Use a damp cloth to remove the clay dust.

Using gesso or a white full body acrylic paint, coat the entire piece with paint and let dry.  Don't forget to paint the nose.  I used a flesh tone mixed with red. 

Start by painting the hat.  I used red, but any color will do.  The paint extended right to the bottom edge.  We will be adding a little white trim after it dries.  

After all the paint has dried it's time to add some antique medium.  I start by doing this in sections, starting with the beard or white section start to quickly cover the with the medium and be ready to start wiping it off with a damp cloth or paper towel. 

Using the paper towel to remove 99% of the medium, but allowing it to sink into the texture and around the bottom of the hat like a shadow.

I also use Q tips to get into the small spaces.

Repeat the antiquing for the hat.  


Allow everything to dry before adding a glaze.   I used a brush on glaze so it would remain tacky to allow glitter to stick.  

I started with the hat and glazed only the red.  This way I can shake some red glitter on the hat and it won't get stuck in the beard or white fur around the hat.  

Tadaa!  Little red sparkle hat and I couldn't resist adding a touch of glitter to the nose.  


Repeat for the beard and hat fur and add white glitter.  Loop the wire in an attractive way and cut off any excess.    

Add a sprig of holly or tinsel.  Personalize by painting the date, name etc on the hat.  Make it your own and have fun with it. 
Click here to see the video for the sculpting process


Thank you all so very much for visiting and taking a look at this tutorial.  I hope to see you again in December.   
I invite you to visit my website and other social media platforms to see what I'm creating for the holidays.  

Happy Thanksgiving,
Susie Krichbaum

Contact: Susiewhc@gmail.com
Facebook and Instagram search @artbysusiek
Website :  https://artbysusiek.com Here you can sign up for my Creative Breakfast Club
ETSY: www.artbysusiek.etsy.com
PINTREST: https://www.pinterest.com/susiewhc/

Friday, December 5, 2014

December First Friday Fan Day with Rachel Whetzel

Happy Holidays, Creatives!! Rachel Whetzel here! It's First Friday Fan Day, and we appreciate you sharing all your creations using Creative PaperClay® with us! This will  be my last First Friday Fan Day post for a while, as I'm taking a break from working as a Designer for Creative PaperClay®.
I hope you hop over to the links I'm sharing with you today, and let your fellow Creative PaperClay® lovers know you saw what they shared too!


FACEBOOK
Hazel shared her first experience with Creative PaperClay®, and she is hooked! 

PINTEREST
These adorable Mermaids just melt my heart! 
And this Angel too!! 
Of course, it wouldn't be a true Christmas Season without a round little Santa to share! 

WORLD WIDE WEB
The Holiday Queen has TOO MANY adorable projects to share... just VISIT HER BLOG, and take your pick!! 

HELP OTHERS FIND YOU!!
Use the hashtag #CreativePaperclay on all your social networks. Be sure, when using Facebook, that you make your posts and images using the Creative PaperClay® hashtag are set to public, otherwise, people won't be able to find them. You can also share your projects to the Creative PaperClay® FACEBOOK PAGE
START SHARING NOW!!

Thanks for reading! I have loved every second of my two years here as a Designer for Creative PaperClay® and I hope to be able to return in the future!! In the mean time, if you'd like to keep up with me, and see more of what I'm up to and keep up with me, I'd also love it if you'd visit MY BLOG and Subscribe! You can also find me on FACEBOOK!

Sunday, December 1, 2013

Santa Candy Box Tutorial by Diane

Hello, all you Clay*sters. How was your Thanksgiving? Ours was wonderful and I sure have enjoyed those turkey sandwiches the last few days. With Thanksgiving behind us, I'm ready to really get serious about Christmas. I was thinking that a decorative candy box filled with candies would make a great gift for friends and neighbors.


I have always been inspired by the old vintage candy containers and the decorative vignettes sprinkled with mica flakes. So, today I am going to show you how I made this cute Santa Candy box. This little box serves as both, a vignette and candy container.

This is how I made it.


Materials needed:
Package of Delight Modeling material
Package of Creative Paperclay®
3" Round Paper Mache' Box
1 Red Striped Paper Straw ( wooden dowel is okay)
Tin Foil
Florist Tape (masking tape is okay)
Sculpting Tools
Straight pin
Paintbrushes
Scissors or sharp knife
Terri Sproul Mixers "Smoky Quartz"
Assorted Acyrlic Paint
I used:  Folk Art "Linen", Folk Art " Metallic Gold", Folk Art " Metallic Silver sterling", Burnt Umber, Black,White, Bright Red, Folk Art "Light Skintone" Apple Barrel " China Blue
Mod Podge Dimensional Glaze or Decoupage
Mica Flakes
All of these supplies you may already have around your house. If not, they can all be purchased at Hobby Lobby or JoAnns Fabrics with the exception of the mica flakes. I purchased the mica flakes off of Ebay. You can search Mica Flakes. Also, the Mica Flakes are optional and glitter may be used as you will see later in the tutorial.


Step 1.  you will cut your straw in half. With one of the halves, measure 1" and cut.
You will now have 3 straws. With your tin foil wrap around your longest straw to form a tree. Then, repeat with the other two straws. In the above pic it shows the measurements. They don't have to be exact, just approximate.


2. Snugly wrap trees with florist or masking tape.


3. Okay, now reach into that wondermous black package and get yourself a nice ball of Creative Paperclay®
Flatten your clay about 1/4" thick and cut  3 triangles, one for each of the trees and the Santa.
You can lay your tree next to the clay and eyeball it when cutting your triangle.


4. Moisten your clay and the taped foil. Begin to roll your clay around the armature. Smoothe out the lumps,bumps and seams whiling keeping your fingers moistened with water as needed.


5. With a ball sculpting tool or the eraser on the end of a pencil, create little circle indentations. I like to dip the ball in the water then do my indents. Now set your trees aside to dry.


6. Roll three clay snakes as in above pic.


7. For your Santa, moisten around the bottom edge of of his coat and wrap the clay snake around.  Press it in as you go round to make sure it has a good seal.This is the fur trim on Santa's coat.  With a straight pin  Draw a line up from the bottom just above the fur to the middle of the Santa. This is the opening of Santa's coat. With your flat tool or orange stick press in and slightly under toward the line you made, this will create a  flap.


8. Make more indentations around the bottom fur.
 Using the flat top of your straight pin create buttons on Santa's coat, by pressing inward .
 Now roll four balls of clay as seen in above pic. Flatten and form to a egg shape and add to the Santa , making sure the surface is moistened for a good seal. Lightly press down and shape.


9. With flat tool or orange stick create an eye socket. Pushing in , then pulling up. With your ball tool or end of pencil make a divet for where the nose will be placed. Then add your small ball for the nose. Have fun shaping his nose.


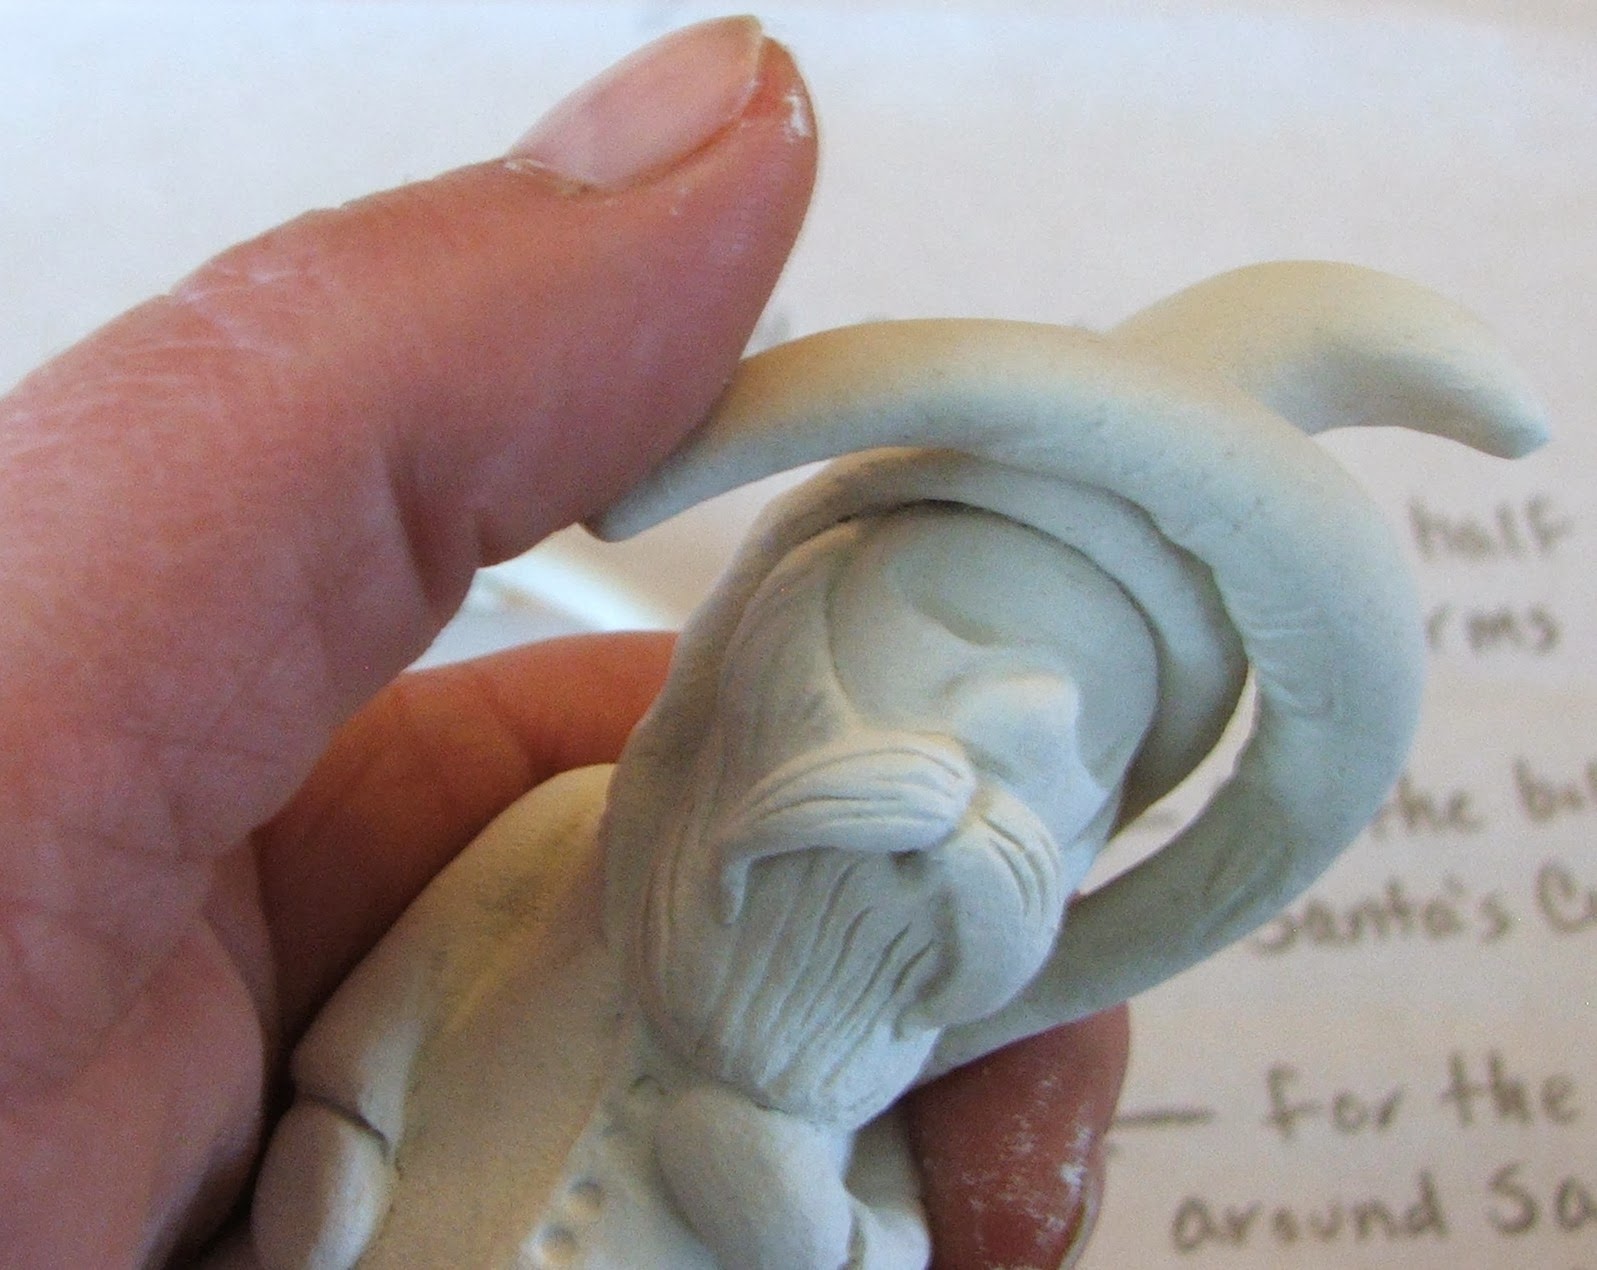
10. Form the beard in your hand then  attach to Santa's face. Use your straight pin to make lines in the beard and a wet paintbrush to smooth between the lines. Add mustache and lines.
Next add your arms . Be sure to moisten the area you will be attaching your arm to.
 In the pic I already have the arm attached, but you can see how I wrapped it around. Blend the shoulder into the back of his coat.
When I'm sculpting a body, sometimes I will refer to pictures of people in magazines for guidance in creating my lines and forms on a sculpt.


11. Using your last clay snake, moisten edge of hat and wrap your clay around. Press down and mold , keeping your fingers wet. Once again, add round indentations in the fur using your ball tool.


12. Allow to dry. I baked mine in the oven at 200 degrees for  one hour. Then I shut the oven off, but left the pieces in the oven until morning.


13. You may want to paint your candy box in another palette of colors.  When choosing the palette for this Candy box, I wanted to give it and old vintage look. Beige,golds, browns and mercury glass with a splash of red. To achieve this look I gave all the pieces a base coat of Linen.


14. To age my pieces, I used burnt umber watering it down to a very thin consistency. This is called a wash or antiquing. I painted  all the pieces generously,then with a damp cloth I wiped away the excess.
You want to work quickly on this step to prevent wash from drying on your piece.


15. Above is the sample and names of my paint palette. I wont go into detail except that on the trees and the fur of Santa's coat in the circular indentations I used the pure gold. Then I loaded my brush with white paint and wiped it a couple times on newspaper then proceeded to dry brush the trees in downward strokes.
To resemble the color of mercury glass that I adore so much I mixed Terri Spoul Smoky Quartz mixers with the metallic silver sterling paint. I just LOVE her mixers. After it was dry, I gave it a coat of plain metallic silver sterling. Finish the rest of the Santa by painting his beard,face and eyes. Then paint your box. Spray with a sealer.


16.  To finish the Santa candy box, take some Delight modeling material and form around the top of the lid draping down the side of the lid. Arrange the trees and Santa  where you would like them placed, then push in. Now remove the pieces until the Delight is dry. Return the pieces to their little spots with a little glue. I like E-6000.
Allow to dry 1/2 hour, then paint on dimensional glaze where you want the mica flakes to stick. Just sprinkle with mica flakes and wallah, were done!
Some of you may prefer to add less Mica flakes or none at all. Some of you may prefer glitter. It's all in the creative look you want. I plan on making several with candy boxes in traditional colors with a light dusting of glitter.


The Santa Candy Box.
 I hope you enjoyed this tutorial and will want to give it give it a whirl. 
It is actually a time friendly project and would be fun to make several at a time.
If you have any questions please leave a comment and I will do my best to answer your questions.
I wish you a wonderful Holiday season. When your out and about in blog land, I'd like to invite you to visit me over at my blog.
Happy creating!
~Diane