Hi, it's Ann from annmakes and the Design Team here at Creative Paperclay® with my newest project:
It is intended to be inserted into a plant to give as a present. It would also make a great prop to hold over someone's head while taking a picture!
To make this, here is what I used:
Creative Paperclay® modeling material
Craft acrylic paint in green (Plaid)
Micro glass beads in gold and green (Dollar store)
Chop stick (recycled from take out)
Brown ribbon (recycled from gift)
Green foamy clover (Dollar store)
Plastic green Leprechaun hat (recycled cake decoration)
Glue (Tombow)
1. Mix a handful of Creative Paperclay® with a generous amount of green acrylic paint. the moisture from the paint will allow you to have more time to work with the clay. Now the white Creative Paperclay® is a mottled green.
2. You will need a mould in the shape of a hat. I used a former cake topping decoration, I have also seen very similar ones at the Dollar Stores. Set aside a small ball worth of the new green mottled clay. Fill the mould with the green Creative Paperclay® and smooth it down. Let it set for a while.
3. Once the product is slightly harder gently tap the newly formed hat out of the mould.
4. With the amount of green Creative Paperclay® set aside, use that to adhere the chop stick to the back of the hat.
5. Cover the hat with the glass micro beads, pressing them down into the clay. Let this dry overnight.
6. Take one of the self sticking foam clovers, remove the backing exposing the sticky side. Cover the clover with some gold glass micro beads.
7. Once the hat is dry glue the ribbon and clover to the hat with a strong glue.
I had fun making this project and I hope you will enjoy working with this fabulous air drying Creative Paperclay®. Thank you for stopping by. Please stop at my blog and check out my other projects (http://annmakes.blogspot.com).
Showing posts with label St.Patrick's Day. Show all posts
Showing posts with label St.Patrick's Day. Show all posts
Friday, March 13, 2015
Friday, February 20, 2015
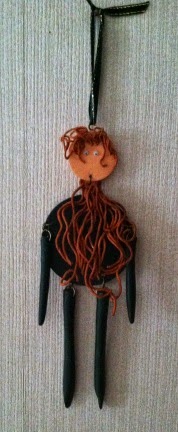
Kid's Project: Creative Paperclay® Leprechaun
All our Valentine's are done and delivered. Now, moving on to St. Patrick's Day. Chloe and I created a cute leprechaun to hang in our kitchen.
We started by making the individual pieces that we'd need—two legs and arms, a body, and a head. We used cookie cutters for the body and head. The arms and legs were long snakes of clay. We shaped the hand ends of the arms to form a cone. We flattened one end of the legs to form a foot.
Before our leprechaun was set aside to dry, I pierced five holes on the body piece where the head, arms, and legs would be attached. I also pierced holes through the tops of each arm and leg, and one at the bottom of the head for attaching to the body.
We decided that he needed something more to give him a bit of character, so we made hair and a beard using the clay extruder.
When the pieces were thoroughly dry and before painting, I coated each piece with an acrylic medium to seal them.
Chloe painted the green body, legs, and arms while I did the head, hair, and beard. Painting tip: Don't overwork the paint. Two thin coats are much better than one thick one.
When the paint was dry, we moved on to assembly. Depending on the age of the child you're working with, this could be an adult job, as it was in our case. Chloe handed me pieces and jump rings, but I did the assembly work. Assembly tip: When opening jump rings, use two pair of pliers—one is each hand—to grasp the jump ring on either side of the opening and use a twisting motion to open the ring.
A bit of a haircut and googly eyes completed the face. Here he is!! Hanging in our kitchen.
And here's Chloe admiring her work.
|
|
||||
| Table Cell | Table Cell |
Subscribe to:
Posts (Atom)


