Showing posts with label kids. Show all posts

Tuesday, February 21, 2017

Making Magic!


Earlier this month one of my crafty friends sent pictures of some wands she created.
I was so inspired that I thought I'd try making my own wand with clay.

To make the wand you will need:

Creative Paperclay®modeling material
3/16" x 12" wooden dowel
small screw-eye
drill
white glue
trinkets, yarn, or other embellishments
acrylic paint
sandpaper
rolling pin
craft knife


Start by drilling a small hole in the center of one end of the dowel and inserting a screw-eye just far enough to hold it firmly.  This will be what you hold on to while sculpting, and what enables you to hang your wand to dry.


Using sandpaper, taper the other end of the dowel and round off the tip


Coat the entire dowel with white glue, thread a piece of string through the screw-eye and hang the wand to dry.


Roll clay slab to approximately 22" x 14" and 1/16" thickness.  The dowel should be able to fit as shown.


Cut clay along the edge of wand, then into a triangle with curved edge as shown.


Dampen the dowel and place it at the edge of the triangle.  Pull clay up and smooth/attach it to the dowel.  Roll the clay around the dowel.  When the triangle is rolled onto the dowel, wet fingers and smooth as desired.  I chose to leave mine with an irregular spiral along the length.


Hang wand to dry.


While the wand is drying, gather up some embellishments you might want to use for your wand!


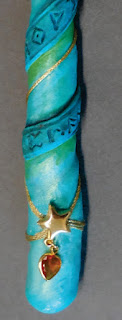
After my wand dried, I decided to add another spiral of clay wrapped around the wand with runes drawn into it.

If you choose to do this, cut the strip of clay, attach one end to or near the bottom of the wand by wetting the dry clay then pressing the wet clay onto it.  Continue wetting the dry clay and adding the strip a little bit at a time all the way up to the tip.  The runes were pressed/drawn into with a toothpick AFTER the strip had been attached to the wand.


Paint and embellish as desired.


I used layers and washes in several shades of blue & green, walnut, and iridescent blue, then added a simple gold cord and star drop earring.


Thanks for joining me here again!  As always, play, experiment, and have fun


Tori
Find me on Facebook, or peruse & ponder pics with me on Pinterest


Tuesday, January 17, 2017

Art Dice - Inspirational and Educational


I am lucky enough to be my youngest grandson's art teacher (I may have mentioned this one or two times before ☺) While researching project ideas for his lessons, I was inspired to create these art dice from the book "Tinkerlab - A Hands on Guide for Little Inventors" by Rachelle Doorley.   As she explains in the book "Art dice games are a creative way to jump-start drawing.  Every toss of the dice becomes an opportunity to explore and expand art vocabulary, drawing skills, color recognition, and shape identification."  Of course I don't see any reason they have to be just for kids, I think they can also be a way to practice or try something new in creating my own drawings as well - throwing one or all of them - could be a great way to try a limited palette or try a new style.

Or, you can make dice for any game you choose -  Some suggestions for other types are at the end of this post.

To make the dice you will need:

Creative Paperclay® modeling material
sanding block with coarse or medium grit sandpaper
file or emery board
cardboard
craft knife
ruler
pencil
paints
varnish

plan or pattern - the themes for these dice are:

  • Shapes- square, circle, oval, heart, rectangle & triangle)
  • Lines - vertical, diagonal, zigzag, wavy, spiral, and dots
  • Colors - blue, red, green, yellow, purple, orange


My dice are 1" square, so the instructions will be for those proportions.  If you want larger or smaller dice adjust accordingly.

Begin with a 1/8" thick, flat, dry sheet of clay (for my instructions on how to make a flat sheet click here)

Measure and mark the grids for your die or dice.  If desired, carve a design or indentation into each side.

Cut the squares apart.  Measure and mark cardboard - for each die you will need two 2" square pieces of cardboard with a one inch square cut out of the center


Using the sanding block, sand each side of each square towards the center at any angle greater than 45° (this goes pretty quickly with coarse grit sandpaper, so make sure you don't sand too much off the edge!)  Go as close to the edge of the square as you can though, without losing the edge.


Now test fit four of the squares into your cardboard square form as shown -


If they all fit, wet the connecting sides of each square and place in the form.  Add the second square of cardboard over the first.


Now re-wet an inside corner and apply a roll of clay


Press the clay firmly into the corners to join the pieces, and repeat with remaining corners.  Pull the second piece of cardboard up to the top of the clay square and set it aside to dry.


When the clay is dry, remove the cardboard forms, clean off any stray bits of clay and file the inside corners at an angle (if needed).


Now test fit the top and bottom squares.  You will most likely have to file the edges of these down a bit and increase the angle of the interior of the square to get them to fit within the cardboard forms again.  When you've finished adjusting the top and bottom pieces, make a mixture of clay and water to the consistency of thick paste.  Wet the top rim of the square and the edges of the piece you are adding.  Place a heavy layer of your paste mixture along the inside of the cube then place the top section on and press firmly.  Repeat with bottom piece, then place the entire cube back into the cardboard form to hold the cube together securely while it dries.


When all is dry, remove from the form and sand any rough spots or clean up as necessary.  Paint as desired.

To play with the dice, throw one or all three, then draw a picture using the elements shown on the dice.  It's up to you and the other people you are playing with as to how strict you want to be with the elements - just suggestions? or perhaps you want to play with a timer and each person HAS to use all three of the elements in his or her drawing.  

Blue, Triangle, Diagonal Lines, Go!


Some other suggestions for creative dice making:
  • Animal dice - each person would have to act like that animal, make a noise like them, or say a fact.
  • Story dice - make dice with different pictures pasted on them and the players have to make up a story about what comes up - or, paste pictures of family and friends on the die or dice and then their photo comes up they have to tell a story (about themselves, or, make something up)
  • Monster dice - one or two dice with the names of body parts - eyes, legs, antennae, teeth, etc. one with numbers, and one with colors.  Players make a picture of a monster with whatever they roll, for example, green monster with 6 eyes.
The possibilities are limitless!  The author of "Tinkerlab" suggests textures, emotions, movements, etc.

Thanks for joining me here again!  As always, play, experiment, and have fun!

Tori
Find me on Facebook, or peruse & ponder pics with me on Pinterest


Tuesday, December 20, 2016

Tori's Tip - Cookie Decorating Fun for Kids of All Ages


For my tip this month I'm reminding you that Delight™ Air Dry Modeling Compound retains color well when mixed with acrylic paint, it is very light weight, and can be easily rolled out and cut with cookie cutters!

For a fun way to make ornaments,  mix up a batch of gingerbread or cookie dough colored clay, cut out shapes with cookie cutters and allow the pieces to dry.  When the clay pieces are dry, decorate them with puffy "shiny"fabric paints to create the look of icing.

This will be my last post of the year, so I'll wish all of you a HAPPY NEW YEAR! - looking forward to the new year ahead and creating more projects with Creative Paperclay® and Delight™


Thanks for joining me here again!  As always, play, experiment, and have fun!
Tori
Find me on Facebook, or peruse & ponder pics with me on Pinterest

Tuesday, June 7, 2016

Summer Sun Marble Run


Here's something to do with the kids on a hot summer day - make a marble run!  It's fun to make, and fun to use, very relaxing, and a good "tilt table" for fidgeters.  You can use my pattern or create your own, make a maze, or try writing out a name.

For this project you will need:


  • Creative Paperclay® modeling material
  • foam core, wood, or cardboard in the size and shape you want (my pattern calls for a 16" x 16" square)
  • a marble
  • pattern
  • pencils
  • tracing paper for transferring pattern
  • stiff round brush; a stencil brush will work well
  • rolling pin
  • plastic wrap
  • paint

If you are making your own pattern, you will also need

  • dial calipers - OR circle gauge - OR toothpicks, tape, and a ruler
  • paper large enough to draw out your pattern


If you are using my pattern, skip ahead to the pattern transfer picture.

If you are going to make your own pattern, first measure the size of your marble.  Use either the gauge, calipers, or toothpicks taped to a ruler lifted to the midway point of the marble as shown,

Write down that measurement, then tape two sharpened pencils to a scrap of cardboard so that they match that distance.  I'm using two different colored pencils in the photo so you can more clearly see how drawing the pattern works out.


Draw your pattern either freehand or over a sketch, using these two pencils as a guide to indicate how much room the marble will need.  Try to hold them straight up and down while drawing, to keep the lines the same distance apart.

This would be the first step for a maze - beginning, squiggly path, and end.

Add more lines, without crossing over any of the ones previously drawn

Once you are happy with your pattern, cut a piece of cardboard, foamcore or wood to the desired size.

Cover board with a thin layer of clay on both sides and on the edge; set aside to dry.  When the clay is dry, sand if necessary and then transfer the pattern you've chosen.


Roll clay out to about 1/8" thickness and cut into 1/2" wide strips.  If you have a strip of wood or cardboard in that thickness, you can use that as a guide.


Leave the strips in place and only work with one at a time, keeping the remainder under wraps so it will stay moist until needed.

Brush water a few inches along one of the pattern lines, then brush some water onto the edge of one strip of clay.  Apply that edge of the clay strip to the moistened pattern line by holding it in place then pushing down with your thumb and forefinger as shown.  Repeat this process a little bit at a time along your pattern line until you have about 6" applied then, using a wet brush, blend both sides of the clay onto the board.


Use your marble as a guide to make sure you have applied the clay walls properly.  Smooth clay with wet finger or sculpting tool to make a smooth path for the marble.

When you've finished adding clay to your pattern, allow the marble run to dry completely, then test it out, sand or add clay as necessary until the marble rolls smoothly, then paint as desired.


Thanks for joining me here again!  As always, play, experiment, and have fun!

Tori
Find me on Facebook, or peruse & ponder pics with me on Pinterest


Friday, February 19, 2016

Kid's Project: Whimsical Owl

Chloe and I have been having lots of fun creating this whimsical owl wall hanging.

We started by rolling out a ball of clay about 3/8" to 1/4" thick. We made the pieces in a variety of ways—some we molded, some we cut following a pattern, some we free hand cut. For the body and the tummy piece, we cut around mixing bowls that were the right size. For the wings, we used a tart mold as a cookie cutter, then cut the clay piece in half lengthwise for the two wings.

The two circles for her eyes were molded. The head, beak, and feet were cut free hand.
Eyes

Beak and feet

We added different textures to the head, wings, and body using embossing folders and clay texture sheets.

Here are all of our owl pieces laid out to dry.

When the pieces were completely dry, we painted them with acrylic paints and glued them together using E6000 adhesive. We added a jewelry bail to the back of the head for hanging and adding her bow.

This owl wall hanging brightens any place she perches.

Carole

Chloe

Table Cell Table Cell

Friday, October 24, 2014

Kid's Project: Gilded Leaf-shaped Bowls

The autumn weather is definitely here in Ohio!! This project takes advantage of all those beautiful leaves laying on the ground. Chloe and I gathered leaves on one of our walks. We looked for the largest leaves that we could find.

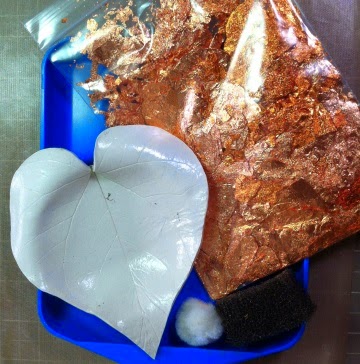
To begin the project, we rolled out a ball of Creative Paperclay® to a thickness of 1/8", and a little larger than the leaf we were using. Place the leaf vein-side down on the clay. With one motion, roll the rolling pin over the leaf, using plenty of pressure to capture the veining. I started at the base of the leaf and rolled all the way to the top without stopping.


Next, gently peel away the leaf. Use a craft knife or scissors to cut around the outer edge. To cut down on finishing sanding, at this point I smooth the edges by dipping a finger or artist brush in water and "painting" along the edges of the clay leaf.

I used bowls that I already had as molds and supports for the clay leaves. I made a donut ring out of plastic kitchen wrap to support the clay leaf while it dried.

Lay the clay leaf into the bowl, and gently form the well of the bowl. I let my leaf bowls dry longer than usual before turning them over. I didn't want to risk the bottoms collapsing by flipping them over too soon.

After the pieces were completely dry, I began the gilding process. The first step was to seal the clay surface with matte PPA. Next, was a coat of Duo adhesive. Duo goes on a milky white liquid, but when it dries clear, it provides a very tacky surface for the gilding. I followed the steps in this short video to gild each of the bowls.

Gilding is a very forgiving process. Here you can see that I missed applying the Duo adhesive to a spot. No problem—I just painted Duo over that area, let it dry, and gilded again. I gilded the top and bottom of the bowls in two step, because you want to avoid touching areas that are coated with Duo.

Hint: Since the Duo is milky white, it's hard to see just where it has been applied when you're gilding white surfaces—like Creative Paperclay®. I found a way to avoid missed spots in the future. Just add the tiniest spec of acrylic paint to the Duo. Now you have tinted Duo, and you can see were you've applied it. 

Here are the finished bowls. The smaller ones are about 5" long and 4 3/4" wide. The larger ones measure 7 1/4" long and 5 1/2" wide.


Carole

Chloe

Table Cell Table Cell