Monday, December 5, 2016

Shari's Tip of the Month for December- Finding Paperclay Tools

Good morning!

The Holidays have arrived!
 I have my tree up and decorated, the family visits have begun, and holiday goodies are baking in the oven.

So much time last week was spent in the baking isle at my local craft and hobby store. They have the best baking tools. There are so many fun candy and fondant molds too.  The cutting tools alone will help you make some decorating magic.

Come to think of it, working with fondant is similar to working with clay.


Because they had buy one get one half off on all baking items at the craft store, I bought one set of tools for baking and one for clay. Brilliant!

 Hope this tip helped inspire you to look outside the box when creating with clay.

Happy Creating,
Shari

Sunday, December 4, 2016

Tips For Working With Creative Paperclay


I love working with Creative Paperclay product for many reasons, but mostly because I love making one of a kind projects for my friends and family, and for myself too!  Yet there are times when something doesn't turn out quite as I wanted it to look!!!  

  • When you need something to be completely flat - try to put it in the oven instead of letting air dry!
  • Make pieces ahead of time, so you can simply grab things and create!  
  • Take your time in planning things out - and as your are making, use plenty of water to smooth things out as you go!  
  • Recycle products as you can to give a firm base for what you are creating!  I love to use recycled things you normally would throw away for other things!  
Not everything is going to turn out perfect - spend time and enjoy simply creating!  The project above didn't turn out "perfect" - but it did turn out the exact way I wanted it to turn out!  
Thanks for stopping by,
Lynda Jeffs
Memories in Tyme and 
Creative Paperclay Design Team 2016

Friday, December 2, 2016

December First Friday Fan Day


Need some inspiration for your next Creative Paperclay® project? Check out what folks are making with Creative Paperclay™.


Paperclay and Cork Christmas Trees (great kids' project)
Embossed and Colored Angels
Paperclay Snowman
Inspiration: use Creative Paperclay® in place of rocks

Build a Papercaly Snowman

HELP US FIND YOU!!
  1. Use the hashtag #CreativePaperclay on all your social networks.
  2. When using Facebook, be sure the your posts and images using the #Creative Paperclay hashtag are set to public, otherwise we won't be able to find you.
  3. Share your projects on the Creative PaperClay® Facebook page.
I'm always trolling the web, looking for great Creative Paperclay® projects. If you find something, post it on our Facebook page.

GOT QUESTIONS???

Find the answers to your paperclay questions. See what other folks are creating. Stop by our Facebook group and say, "Hi!" Creative Paperclay Q&A
Carole

Wednesday, November 23, 2016

Figure Sculpting with Creative Paperclay (part 1 of 3)

1/9 scale female figure cardstock armature
1:9 scale female armature
1/9 scale male figure cardstock armature
1:9 scale male armature


In our last article we looked at sculpting animals using a paper craft armature.  In this series, we are going to take it one step further by sculpting human figures based on a simplified paper craft armature.


I have drawn out a male and a female model that you can download, print on card stock, cut out and assemble to make a very basic 3D armature.


The figures are about eight inches tall, making them approximately 1:9 scale.  Feel free to print them larger or smaller to fit the scale in which you want to work.

8 inch figurine sculpting armature
female armature cut out and taped

You can use glue to assemble them, but to save time, I just use bits of masking tape.


As you can see, the figures are not complete and have gaps between different parts, but they will suit our purpose, which is to show proper scale and location of details.


We will fill in the gaps later with paper clay once we decide on a pose.


8 inch figurine sculpting armature
male armature cut and asembled


In traditional sculpting, it is more common to use a wire armature, but I find that by using a card stock armature, I can draw on any details I want to include.


If you would prefer to use a wire sculpture, David Neat, a British artist, has an excellent article with downloadable drawings here. 


strengthen armatures with Paverpol
love is everywhere...
the figure on right has
been coated with glue


The next step is to reinforce the armature so it is solid enough to add clay.  The easiest way I have found is to coat all sides with Paverpol or wood glue, which when it dries, becomes quite firm.


Once the glue is dry, you can add a thin layer of clay.  This first layer is just to give the armature more strength and depth.


Don't worry about how you will position your figure yet.  After the first layer of clay is dry, it will be much firmer.


When dry, you can decide how you want to position your figure.  This is a fun part, because you can try all sorts of ideas.


Even after you settle on one, remember it is easy to change your mind, even after the clay is dry.
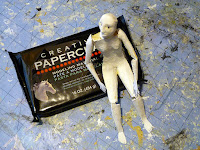

female figure after first layer of paper clay
female figure after first
layer of paper clay
In the next part, we will add the second layer of paper clay, which will bring together all of the elements of our figure and make it look more human and less cartoonish.


This first part was making the armature and preparing it for sculpting.  The next step gives you total freedom on how you want to express your view of the human condition through your art.


Click here to go to part 2.


link to kevin whitham saatchi art online


You can visit me on Facebook.

Tuesday, November 22, 2016

Change Your Mind Tips

Sometimes we change our mind. Maybe it is the concept behind the piece of art, we couldn't execute the vision we saw in our mind or ???? With Creative Paperclay®, it is easy to remove the clay if our project doesn't work out. In this case, I had added a fennec (Saharan) fox on my art piece but changed my concept for the piece. I needed to remove it so I could continue on with my painting.

SUPPLIES

Dried Creative Paperclay®
Water
Paper Towels
Metal Palette Knife/Scraper


I covered the clay with very wet paper towels and leave on until the clay softened.


Then I scrapped it off. If some of the clay is still hard just reapply the wet paper towels again.


When all the clay is removed, I can continue to work on the piece. The playing never stops.

Dream in Color.

Monday, November 21, 2016

Shari's tip of the month for November- Unexpected Paperclay Molds

Good Morning!

I was recently shopping for some new mixed media elements. I was ready to recycle the plastic form trays that they come in when I realized they were an  exact mold of the original. 


I found another to make keys. I started thinking even more outside the box and found a plastic mold off of my cupcake papers that will work too!


 I would suggest that you lightly spray the mold with cooking spray before adding your paperclay. Let the clay dry partially before removing it from the mold. 


I was really excited to share this tip with you. I am now looking at everything I purchase to see if I can use it as a mold. I love the fact that I not only have great molds but I reused something that would have normally been tossed or recycled.

I would love to hear what interesting items you have used to make a mold.

Happy creating,
Shari

Sunday, November 20, 2016

Photo Magnets - Creative Paperclay Style


I don't spend a lot of time with family - we don't live in the same state they do, and we just simply don't get along really!  So when we do get a chance to spend time with them - the memories we make are priceless, and deserve to be showcased!!!  My mom and sister (who live in a different state than I do) came to see those of us who live here, which is 5 of her grandchildren and me!  I wanted to make something for her this Christmas that would be unexpected - and bring back those memories of that special week spent here with all of us!  I love making magnets too, smaller one's made out of Creative Paperclay, stamps, paper flowers, molded flowers, and paint - this is the first one (not the last) made with photos, I hope you enjoy!  
 
Supplies needed:
Creative Paperclay - flattened
White and yellow paint
Ribbon, rick rack, bakers twine
Bling
Paper flowers
Molded flowers
Magnet strip's
Chipboard saying 
Scissors 
Hot glue gun

**TIP - this is where I have said it really saves time to make up things ahead of time, for use later on!  When you have the inspiration, you can easily create something in relatively little time, compared to larger projects!**


Directions: 
Step one:  Taking your flattened Creative Paperclay - make the bases for the magnets the size you want for the photos you are using.  
Step two:  After pieces have been fully dried - sand and paint them.  I used a white paint for the bases - paint 2-3 coats.  
Step three:  After the paint has completely dried - you can start to create the frames.  Cut down the photos to size, adding if you do not have any ribbon, etc to add.  
Step four:  Add the ribbon, rick rack, or bakers twine you are using to wrap around the frame if you are using them.  After you are done with this - make sure to add the photo if you haven't in the last step.
Step five:  Add the bling - the flowers - the extra's to the rest of the piece finishing it off!


I can't wait to get more magnet strip's to make more magnets for my own use this time!  Sometimes it is harder for me to create something for me, rather than making it to sell or as a gift!  This project, was one from the heart for sure, I hope my mom feels the same way!  Thanks for stopping by, 
Lynda Jeffs
Memories in Tyme and
Creative Paperclay Design Team