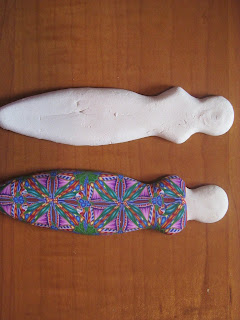
Hi all! I have been busy at my clay table this week flowing with ideas after a class with the wonderful Polymer Clay artist Carol Simmons. So while creating bracelets and earring components from my polymer clay canes I thought "Why not use the canes along with Paperclay in a design?" I ran downstairs to the studio and pulled out my materials and began to create.
Materials:
Creative Paperclay
Art Doll mold (www.bestflexiblemolds.com)
polymer clay canes (polymercreations4u@msn.com)
glass tile
straight blade
parchment paper or deli wrap (plastic wrap or wax paper can be used, but may leave a texture behind)
optional: inks, paints, powders, heat set crystals, beads, odds & ends, PrismaColor markers
I began this project by making a few doll blanks out of Creative Paperclay. Press a bit of clay into the art doll mold.
Slice off excess clay with a straight blade and then remove doll by flexing the mold (she should pop right out). Smooth any wrinkles or crinkles on the surface with your finger, give her a softer curve to the waist, round out any rough edges, then place her on the glass tile. If desired a face can be added to the doll using the same mold. (Note: If the face doesn't want to adhere to the body a bit of water on the back of the face will act as "glue" OR it can be attached later with tacky glue) Repeat process for additional dolls.
Being the impatient crafter that I am, I placed the glass tile in my oven and baked the dolls at 275 degrees for about 10-15 minutes. Let cool. Now the fun begins.
**If you are new to polymer clay, be sure to work on a glass surface, flexible cutting mat, or acrylic surface. DO NOT work directly on your good wood table or the finish will be "eaten"off!**
Polymer clay canes come in many different shapes and patterns. For this lesson I am using a square cane for its ease in matching designs. Polymer clay canes can be found on a variety of online sites....or you can come straight to me :-) You will need a clean straight edge blade for cutting (Note: If this is the blade you used for cutting your Paperclay [as I did] just rinse any excess Paperclay off the blade and dry thoroughly before cutting your polymer clay cane). Cut thin slices (number of slices will depend upon how large your cane is and how much of the art doll is covered).
Once cut, place the slices side by side to form a sheet of patterned clay. Cover with parchment paper and use your finger to rub over the seams, smoothing them together without disturbing the pattern or leaving fingerprints behind. Remove parchment paper and check to see if all the seams have come together. Use straight blade to remove clay from your work surface and place over baked Art Doll.
Smooth the clay around form, pressing any air bubbles out from underneath as you go. Once covered, carefully slice away excess clay (set aside for another use, if desired).
Place Art Doll into the oven and bake at 275 degrees for 20 minutes. Remove from oven and let cool.
I decided that a crown/hair was in order. I went to my stash of odds & ends and found the perfect piece: the flatten top off a Christmas ball! A bit of super glue to hold it in place works perfectly. the face can be left natural or colored with a bit of paint or alcohol ink or PrismaColor marker (Note: For this example I used the PrismaColor marker in Goldenrod).
Looking at the back (compared to the front) it looks very unfinished. I have a couple of easy fixes for this: 1) Trace around the original art doll shape on a piece of scrapbook paper. Cut out the shape and glue in place when the doll is completed. OR 2) cover the back with a thin layer of polymer clay and rebake. If using this choice, cover the back of the art doll with a bit of tacky glue BEFORE adding the clay backing...this will be much less frustrating than trying to affix the clay to bare Paperclay :-)
And you are finished! That is unless you are a possessed artist like me. If you fall into that category drill a couple of holes in the shoulder area and add beaded arms OR drill a hole at the bottom and add multiple fibers OR draw on a face (if you haven't used the face cabochon) OR....as you can see I can get a bit carried away!
Have fun creating! And CLAY ON!!


1 comment:
What a fun idea. Love your art doll, and you are right, she would look great with beaded arms or dangles. Great ideas!
Post a Comment