Showing posts with label Delight™. Show all posts

Sunday, June 18, 2017

Tip of the Month: Coloring Delight™ Air Dry Clay

Did you now that paperclay.com also sells another type of clay called Delight™? This clay is much lighter than Creative Paperclayand air dries to about half the weight! It is still durable and can be colored with water-based media before you sculpt with it. Isn't that exciting! 


In this mini-tutorial I demonstrate using four different types of media to color Delight™ Air Dry Clay:

  1. chalk pastels
  2. watercolor paint
  3. acrylic paint
  4. Dylusions Spray Ink
As a bonus I show you how I use this clay to make flowers which can be used in scrapbooking, mixed media, or your next crafting project.

Supplies include:
Silicone Mold (optional)

Luminarte Silks Acrylic Glaze (optional)


Paintbrushes (optional)


Thanks for stopping by!  For more inspiration visit me at www.papermachepatch.com.

Happy crafting!
Suzette

Sunday, February 19, 2017

Working with Creative Paperclay and Delight Products


I have been on the design team for the past 3 years, and simply have learned so much working with everyone that has been on this incredible team!  I scrapbook and stamp, so I use both Creative Paperclay and Delight in various ways for my scrapbook pages, my cards, and paper crafts galore!  I am working on organizing my space, Creative Paperclay is a part of the spaces I am organizing!  Magnets made with stamps and molds, make my space look inviting and happy!!!
Yet part of working with this incredible stuff, is being able to learn from others on my team and the things they have done as well!  Going in to the next few months, here are a few tips whether you are working on a gift, your own creative space, or your space outside:

  • Take a look at the past projects -we have Easter coming up, Mothers Day, outdoor projects - find something you want to do and get the supplies started for it!  Planning things out a bit, really helps to make sure the
    finished project is PERFECT!  
  • If you want your project to be a bit heavier, use Creative Paperclay!  It hangs better on with a magnet on the back, than does the Delight!  
  • Plan your projects out on paper - before you start to tackle them in real life!  This way, those larger projects you want to be "perfect" will be PERFECT!  
  • If something is simply not working the way you want it to be - start over!  The best part of working with the Creative Paperclay and Delight products - is being able to reuse it if you don't wait too long!!!  
I am working on my designs for a fun fairy garden (thanks to the design team), and a fun angel girl that will sit by my desk (thanks to a past blog post)!  I am designing on paper first - finding the items I need to recycle...(boy do I use a lot of creamer), and by the time May hits - I will have a fun fairy garden for my patio, my angel girl done, and more magnets made for my creative space!  
Lynda Jeffs
2017 Creative Paperclay Design Team


Sunday, February 5, 2017

Totally "Delight"ful

So, I have a file cabinet that I truly can't wait to be able to paint it and make it pretty again...I am thinking a chalkboard paint in a color to match the rest of the space I am working on!  I also needed something where I could hang paper on to be able to get to easier as I am working, or I just get inspiration for something!!  Since I work at home, I need a space that functions for various things (for the moment) - thus the notes!
  
I recycle my printer paper - as I print something out, if it isn't something I need to cut out or use at all, I put it in a file so I can use the backside of the paper for the notes.  When I get enough papers, I simply cut them down to 4.25 x 5.5 notepaper size, so when I need a sheet of paper, then I have one available!  As I was working on my entire space - I knew I needed something that I could add to that file cabinet, and at least for the moment, will make it look a bit better!  
As for the rest of my creative space, I have been recycling a lot of shoe boxes and shipping boxes and putting a lot of my items in them!  I can't wait to get the rest of the stuff put together!!!

Supplies needed:
Delight product 
Molded flowers 
Ribbon
Clip
Paint for flowers
Paint brush
Ruler 
Knife or straight edge 
Magnet pieces
Hot glue

Directions:  
Step one:  Flatten out the brick of Delight product.


Step two:  Take your ruler and knife or straight edge (I used a smaller ruler) - straighten up the edges of the Delight product.

Step three:  Using the pencil - start to roll the top of the product - and the bottom of the product...let dry completely

Step four:  Using your favorite flower mold - start to mold the flowers you want to use - using the extra left over from step two.  Allow to dry.  After flowers are dried, paint them - and allow to finish drying.  

Step five:  Start to add the ribbon to the top part - and then the bottom part of the creation.  At the top of the piece, add the clip for the papers.  Make the bows for the bottom as well as the bow for the top.  Add the flowers to the middle of the bows.  


Step six:  Finish off by adding the magnets to the back - I used 3 strip's one at the top, center and bottom of the piece! 

I love how this one turned out - much lighter than the other one I made, and really just perfect!  My file cabinet will be painted black, and the rest of the space will be black, white, and accent color of pink!  I have enjoyed organizing - and creating things with the Delight product!  I can't wait to get the rest of the items done that is on my list - and my space finished up!
Thanks for stopping by,
Lynda Jeffs
Memories in Tyme and 
2017 Creative Paperclay Design Team  

Thursday, January 14, 2016

Delight(ful) Stamps

I woke up in the middle of the night with the thought of making stamps with Delight. No doubt not a new idea but that possibility had never dawned on me. So I got out of bed, went to the studio and started making them. One of the things I learned was that if you want straight edges, it is better to cut it before the Delight sets up. Tip is to coat them with matte medium so they don't stain and allows you to wash them off without reconstituting them. And, no, they won't last forever but in a pinch it is a great fun!

SUPPLIES
Delight
Scissors (optional)
Anything that can give you a texture.

I started with a regular rubber stamp. You get a reverse or negative image of the stamp. On all of these, I rolled the Delight flat with a rolling pin before stamping into it.


I have large sheets of rubber stamps without the wood backing. This one has grunge edges because I wanted to see how that would look. Plus I prefer more grunge than perfection.


Next, I brought out the Indonesian wood block. This one has a real graphic pattern to it.


Next, the stencils came out for a creative play day.


Dream in Color,
Darlene Olivia McElroy


Thursday, November 26, 2015

Fun with Texture and Delight


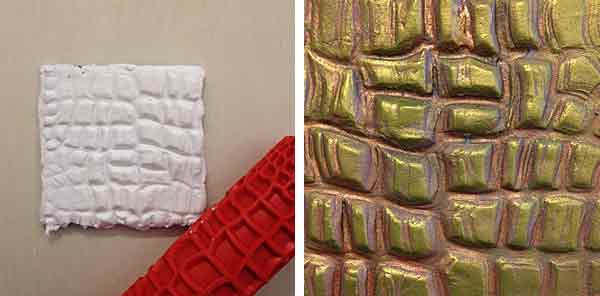
I like being prepared and one way I do it is to create 4" x 4" masonite boards with different textures. I do these when I have a break in time and I am not working on a specific project. These are texture ideas for future pieces of art.

SUPPLIES
masonite boards
Delight (or Paperclay)
found objects
texture rollers


I used a textured roller to achieve this alligator skin look. When the Delight was hardened, I applied a metallic bronze paint to the surface. When that had dried, I rubbed a green metallic rub. I felt in love with this sample.


When through my kitchen drawers and found this silicone hot pad that I thought would make a great texture.
I started by stamping the Delight with a stain of light brown then did a wash of silver when the brown had dried.


A scrap of lace also made a great texture on the Delight. This had a wash of red oxide paint on it.


I used a volcanic rock from my yard to get this real natural moonscape type texture on the Delight. When it hardened I painted it grey then did a wash of bronze. I dripped alcohol on it while it was wet.


Years ago I picked up some laser cut plexiglas that I use with spray paint and decided to try it with the Delight. I applied red oxide paint then did a blue metallic rub when it had dried.


Reticulated metal also makes a great for Delight or Paperclay. Multiple washes were applied.

So get out your textures and have fun.

Dream in Color and have fun!

Darlene Olivia McElroy


Sunday, August 16, 2015

Cat Paw Print Wall Hanging


Last month I showed you a recycled box, with my cat's paw prints (each of them) - on the front of the box!  It is on my ledge in front of my sink in my kitchen, to hold all of their cat treats and things in, instead of all over my counter and house!  This sparked another fun idea - a wall hanging - with the same paw prints, only adding photos to this one!!  Great idea you can recreate for a fun gift, using a favorite pets picture and paw prints!   


As you can tell, our cats mean the world to us!  Our mamma cat Tygress, will be 15 on 9/5 - the boys will be 10 on the same day!  I wanted a way to keep their paw prints - without having to ink them to keep them!!!  This was the BEST thing I could do - and easy enough for me to do with the cats!  Ty won't be alive forever, I didn't want to loose her without having something of just hers!   


Supplies for this project:
Delight product for the ornaments
Brown cardstock
Cricut cartridge - Ashlyn's Alphabet
White ribbon
11 x 14 photo matt with space for 6 photos
Frame (optional)

Directions:
Step one:  Using the Delight product - roll out enough product to let your cat (or dog) walk on it, giving you the paw prints you need.  *Make a few extra - for use later on)  
Step two:  Using a circle of some sort - cut out the paw prints individually, as well as add a hole at the top for the ribbon to feed through.   Repeat step one and two for enough cats (or dogs) you have, labeling which pet it is on the back with a permanent marker after it has dried.  
Step three:  While the Delight product is drying - cut out the alphabet letters you need for your photos and projects, add them to your photo matt.  
Step four:  Cut 3 3.5 x 3.5" squares for 3 of the squares, set aside.  Cut 3 photos to the same size to place in the squares.  
Step five:  Take 1 of the photos, add it to the top using tape to keep it in place.  Put another photo at the bottom in the middle, and another at the top right - again, using tape to secure it.  Add the brown squares in the other squares, taping ONLY to the bottom. 
Step six:  Using a hole punch of some sort (I used a Silent Setter with the middle hole punch for my creation, it worked best), add a hole to the top middle square, bottom left and far right squares at 1.5" - all at the top of the squares. Feed through the ribbon before you tape the squares off.
Step seven:  After the Delight ornaments have dried, feed the ribbon through, tying a knot at the top.  Also add a small bow to the top where the hole is to conceal it!   

**Tip - if you do not have specific supplies, such as the die cut machine, feel free to substitute...stickers can also be used!    
  
This project was so much fun to make, and with my cat being as old as she is - a great way to add something of "hers" to something I will keep forever!   Thanks for letting me share this project with you today!  I hope you will make one of your own, and share it with me! 
Lynda Jeffs
Creative Paperclay Design Team


Sunday, August 2, 2015

Lynda's Monthly Tips


Hello there!  I have loved bringing you beginner projects for you to start out with, especially scrapbook embellishments for you to use with your paper craft projects!  After checking out my own personal calendar for the next few months - I have decided I best get things done early!  In order to get things done, here are a few tips to help you:  

  • Mold things that you like to use on your projects ahead of time!  That way, it saves you time from having to let the piece dry!  
  • Have a container to put all of your supplies in!  That way, you can pull out one thing, and have everything in it you will need!  
  • Also have a container you can take with you if you are going to be waiting for an appointment!  The Delight product won't make your hands TOO yucky, but keep a small container of baby wipes/hand wipes with you!  
  • Learn to look at your calendar for the upcoming months, (once a month challenge on my blog, link below).  That way, you can get things done earlier - and work the bugs out if you have any!
  • Check out some of the fun ideas on Pinterest or this blog!  Tweak them for what YOU want to make!   
I never realized all the fun things I could do with Creative Paperclay and Delight products!  I am so glad to be on this amazing team of people!  So, join me each month at Memories in Tyme, where you will get that challenge once a month to look at your calendar I talked about!  The best thing about that - you don't have to scrapbook to join THAT challenge!  See you in a few weeks with a few fun ideas, and at my other blog!!
Lynda Jeffs
Creative Paperclay Design Team


Monday, January 12, 2015

Sixty-Eight Days Till Spring!

Hi!
This is my first project as a designer for Creative Paperclay®.  I am looking forward to showing you all the fun projects you can make with Paperclay, along with some tricks and techniques that will help your creativity soar!


I am so ready for spring to come! 


 Here is a little bit of early spring that I created for my studio.


Supplies

Creative Paperclay® modeling material
Delight™ air dry modeling compound
Acrylic paint pen (white, purple, black)
American multi-surface paint (iris, cerulean blue, cobalt teal, sprout green, ebony)
Gesso
Re-purposed tissue covered foam ball
Re-used Fabric covered cardboard bird
Thin cardboard or cardstock for bow
Dowel
Sm clay pot
Florist foam
Yellow glass head pins
Punched paper flowers
22 gauge cloth stem wire
Excelsior (chestnut brown) 
Weld bond glue
Hot glue

Let's get started

I started out painting my clay pot and dowel and set them aside to dry.
 
  Next I detached the wings of the bird. I covered the body with Creative Paperclay® in small sections smoothing with water along the way. I did the same with the wings. I set them aside to dry. When they were both completely dry I attached the wings using Creative Paperclay®.To do this I used a little water on the bird and the wing, added small amounts of the clay on the inside and outside smoothing the wing and body together. Set aside and dry. 

When dry you can smooth even more by sanding with a fine sanding paper. Paint with Gesso. When dry paint your little birdie with your favorite colors.


 To create the bow I cut a thin piece of cardboard in a rectangular shape. I folded it in half width way, and cut out a cat eye shape.  Open it up,take the two outside points, bring them to the center and glue in place. Roll out a rectangular shape of Delight™ air dry modeling compound and cover the outside. Trim off excess. Add small pieces on the inside to cover, smoothing with water as you go. Roll and cut out 2 shapes for the bow ribbon and add to the back of the bow. Roll a cylinder shape for the bow middle and attach in back as well. Let dry and then paint.

 I used Delight™ for the bow because I wanted a really lightweight piece to add to my dowel.


I worked on the styrofoam ball next. Since it was already decorated with the tissue paper all that was needed was to punch out little flowers with a paper punch and attach them with yellow glass head pins.


For the first bird leg I used 3 pieces of 22 gauge cloth stem wire and twisted them together. I punched a hole in the bottom of the bird and shoved the wire into the hole. I used Weldbond glue to secure it. The second leg I used 4 pieces but left one piece longer for pushing into the ball. 


I assembled it all by punching a small hole in the bottom of the ball, forcing the dowel in the hole,  filling the clay pot with florist foam, pushing the assemblage into the foam, adding excelsior around the top of the foam, hot gluing the bow on, adding the bluebird on top with Weldbond.


 Thank you for checking out my first project! I hope it inspires you to create a little spring for your favorite spot using Creative Paperclay®.

Shari

Friday, March 28, 2014

Bunnies Everywhere!!

Hi, there!! Carole here with a great new product to tell you about that you can pair with Creative Paperclay materials. It's ComposiMold, a mold-making material that can be re-melted and re-used.

To begin, anchor your original piece in a mold box. I used a one pint deli container as my mold box, and used a strong glue dot to anchor my original. I liberally coated the original piece and the interior of the mold box with a mold release agent, then sprayed everything with a bubble reduction agent. Both of these agents are available in the ComposiMold online store.

Next, I melted my ComposiMold in the microwave in 30 second intervals until it was completely liquefied. I used a wooden craft stick to stir the ComposiMold between each microwave session. Then, I slowly poured the melted ComposiMold over the original. I found that pouring slowly down the side of the mold box helped to reduce bubbles. Here's my partially filled mold.

Now, you have to wait a bit for the mold to solidify. Here's a picture of my completed mold with the original removed.

I cast my little bunny using both Creative Paperclay® and Delight™. After sanding, I finished the Creative Paperclay® bunny by painting with white pearlized acrylic paint. I used mica powder to tint the inside of the ears. and a dot of black acrylic paint for the eye. 

I finished the Delight™ bunny by tinting the inside of the ears with mica powder, painting the eyes with a dot acrylic paint, then coating the entire bunny with USArtQuest's Duo Adhesive. Duo dries clear, and is just tacky enough to hold the glitter that I coated it with. I think it looks like a sugary peep ;) 

Here's my whole litter of bunnies—just in time for Easter!!