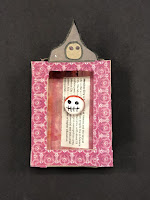
First up, Day of the Dead Shrines that I created with my 8th graders. This project took 3-4 weeks (1hr class periods) to complete.
Class 1: Students began the project by creating a box bottom (with tabs) from thin cardboard (cereal box, breakfast bar box, etc.). An Altoid tin was used for sizing. Once the base was completed, decorating the inside of the shrine began. Students used scrapbook paper, recycled book pages, washi tape, and other materials to decorate the inside and give the figure an interesting backdrop.
Class 2: Delight Air Dry day! Students were given the same amount of Delight Air Dry Modeling Compound to create the figures for their shrines. They were shown how to dab the surface with watercolor markers and mix the color into the clay to add color where desired. Many of the students left the clay white since they were creating skeletons, but look closely at the projects and you will see color details (a rose, a hat, a bow, etc.). I have only chosen a few examples to share. Other details (eyes, facial details, mustaches) were added to the figures with ultrafine Sharpie after the pieces dried.
The figures were set aside to dry until the next class period. Then students continued work on bases and began creating the lid (or top) of the shrines with any remaining class time.
Class 3: Students completed the shrines: Finetuning the details, gluing figures in place, gluing the lid onto the tabs, and adding glitter glue details (is there anything better than bling?!). I was thrilled with the results and all of the students seemed pleased.


I lied...had to share all of them 😉


Is there any wonder why I couldn't share just a few?? I love the humor that many students added to individual shrines (please notice that even Star wars made an appearance).
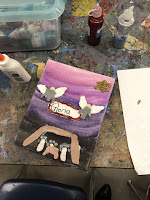
Next up, my 6th graders created Nativity scenes featuring the Holy Family. These students completed the project in three 45 minute class periods. They began by painting canvases using watercolors. Once complete, we sprinkled salt onto the wet canvas and set them aside to dry until the next class. Next class, they were given Delight Air Dry clay and directions for adding color (just like the 8th graders). With that, they were off and running!


I forgot to mention that some of the students added "sand paint" to the bottom of the canvases. What is sand paint? Literally, sand mixed into the paint. Students used a popsicle stick to spread it onto the bottom of their canvases to give added dimensional detail to the finished pieces.
The final touches came in the 3rd class as students completed the scenes, glued figures to the canvas, and added glitter glue star details (you knew the bling had to creep in somehow).


Final class to share: My Kindergarteners
For the Kindergarten project, we took four 35 minute class periods to complete! In the first class, they created value paintings using white and one other color of their choosing. We had blue, black, purple, and red skies! Value painting started with the students painting a white moon somewhere towards the top of the canvas. Then the brush was dipped into the darker paint and mixed into the white before painting around the moon. The step was repeated until the whole canvas was completely painted. As you can imagine, some got it while others just enjoyed the process of painting.
Class #2, the students were given popsicle sticks to color and glue in place to form a stable. I love kindergarten technicolor stables! Not a brown wood stable anywhere to be found.
Class #3, the kindergarteners were given Creative PaperClay. I chose Creative PaperClay for them because I thought mixing colors into the delight would end up with "mud" rather than individual colors. It also allowed focus on fine-motor skills of rolling, shaping, and squashing. Pieces were left in place on the canvases to dry.
Class #4, the dried figures were taken off the canvases to paint and then glued back in place. Of course, glitter glue stars were added.


No comments:
Post a Comment