Showing posts with label Viva Las Vegastamps. Show all posts

Saturday, May 5, 2012

A Crown fit for a Princess!


I am so fascinated by Fascinators!!!  Since the Royal Couple are celebrating their first anniversary I thought it would be appropriate to create my own CROWN! This crown would be perfect for a "princess" party! ONLY IN PINK!
I took about a quarter of the Creative Paperclay® from the bag and worked it a little.  Then by hand I spread the clay out on transparencies.  Once it was pretty thin I used the rolling pin and shims to get a smooth surface on the Creative  Paperclay® to work on.  About an 1/8 of an inch. Making sure it is long enough for the pattern. 
The crown is pattern I cut measuring 11 inches in length.  Lay it on the Creative Paperclay® with a cutting tool carefully cut around the edge of the pattern.    
Randomly stamp the crown with swirls gently to give the crown some decorative dimension. This set of stamps are from Viva Las Vegastamps! Swirl Plate# 1333

With a little water create  slip on the two edges of the crown that need to be joined. Gently work the Paperclay® together at the seam. To help keep the round base I set a cup in the middle of the crown while it dried.  Let it dry overnight, up to 48 hours depending on humididty.

Mix Sakura Crystal Lacquer and Terri Sproul Mixers - Gold then paint the crown set aside to dry about a half an hour then give it a second layer!  While the lacquer is still wet lightly sprinkle with Terri Sprouls Gold Glitz Vintage Glass Particles.  Add a few Robins Nest Dew Drops and a large gem on the highest rise of the crown. 
You can see how small the crown is in my hand.  This will be attached to a headband ready for any "princess" to wear!

Saturday, January 21, 2012

Creative Paperclay® Time Flies!!!

What I love most about Creative Paperclay® is... if I cannot find an embellishment for a project be it a card, assemblage, wall art I can always make it from Creative Paperclay®!

First create molds using mold putty from found objects then cast the Creative Paperclay® and allow to dry.  For this project I made: pocket watch, column and a frozen Charlotte.

Supplies:
Creative Paperclay®: molded Frozen Charlotte, column,
pocket watch
Molding Compound
Book - tools to cut pages
Tissue
Stamps:
   Viva Las Vegastamps! Eiffel Tower
   Viva Las Vegastamps! Tree
   Viva Las Vegastamps! Flying Bird
   Cavalini - Paris, stamped in clay
   Stampin UP Print Pattern
Stewart Superior Memories Black Ink
Stewart Superior Memories Mist Silver
Stewart Superior Memories Mist Iridescent
Versafine Olympia Green Ink
Memento Rich Cocoa Ink
Gold Paint
Paper Ephemera
Tim Holtz Letters
Tim Holtz - spinner and bradStickles
Tacky Glue
Fixtive
Embellishments: 
Dice with alphabet 
Doily
Clock faces
Plastic Eyelashes for wings

Believe it or not... this book is a found item. The pages had already been cut out when I found it!  Lucky for me.  The cut pages were wired together, which made it easy to work with. I white washed the back inside cover with a light coating of gesso, then spritzed with Stewart Superior  Memories Mist: Silver and Iridescent. 
Stamped background images on tissue and adhered to the back of the book.  
Adhere the pages to the back cover of the book and painted a little gesso around the outside edges of the pages.
The Creative Paperclay™ column was aged with brown ink, then place  in the window box. Stamped the border of the window box with the print pattern and added a bit of paper ephemera.
The Creative Paperclay® pocket watch was painted gold and the the clock faces and spinner with brad were added.
Final touch to the pocket watch are the plastic eye lashes for wings, adhere to book.  Distress the alpha dice with Memories Black Ink and adhere!
Add the bird on tissue to the border, a little bit of cut doily and the word "flies" using Tim Holtz letter.  Add a dash of blitz with Stickles on the doily.
Touch up with gold paint around the pages, a bit of gold distressing on the frame, Paris clay piece and my  Creative Paperclay® frozen Charlotte. 


February 1st 
be sure to join our Blog Hop
Creative Paperclay® and Amazing Mold Putty 
are joining to create
an AWESOME blog hop 
LOVE CAST IN CLAY!

Wednesday, January 18, 2012

Good Luck Charm

Good Morning
Today I am going to show you another project using Creative Paperclay® and a stamp.  A while back we were given an opportunity to order some stamps from VivaLasVegas Stamps and I went a bit overboard. I love stamps and of course using it with the clay opens another new world.


I rolled out my clay at about 1/4 inch thickness and stamped the dartboard image onto the clay using a black ink.
Then I trimmed the access around the image before
it dried.  I wanted just the image
After the clay piece was completely dried, I placed
it on a measuring cup inside another cup and poured
a mixture of the Amazing Clear Cast over the top
This will give it a shiny and sturdy coat so I can toss
this inside of my dartcase as a good luck charm.
See how shiny it got?  And now the resin cast
will also protect the clay piece.

I hope you can get a chance to get yourself some Creative Paperclay®.  There are so many things you can make with it and you can purchase it at Hobby Lobby, Michaels and online here.  I also hope you can go out and check out the Viva Las Vegas Stamp site and check out all the fabulous stamps that are available.

Tuesday, December 27, 2011

Delightful Eggs with Viva Las Vegastamps!


Link
This month, Creative Paperclay® Modeling Material has had the chance to play with Viva Las Vegastamps! When I was picking out my stamps, I had a mixed media piece in mind, with a chicken theme. I have to admit, it just didn't turn out how I planned, so I made a fun card with my own egg embellishments.

I used the Children with Cat and Chickens stamp. I love how it looks like a vintage photo, but it really is a stamp! To make my eggs, I rolled out some Delight™ Air Dry Modeling Compound into an egg shape, let it dry a little bit, and then, sliced the back off so it would lie flat on my card.
I colored the eggs with Distress Stains, and after that was dry, covered them with Sakura Crystal Lacquer. These eggs could be really fun for your spring and Easter projects too! The Delight™ really is a delight to work with - it's very light weight, snow white and clean to mold. I love working with it!

I think it's cool when one idea doesn't work out the way that you think it will, but it leads you to something new on your creative journey.

Friday, December 23, 2011

Christmas Collage Using VLVS

By Amanda Marks


Materials:
Frame
Brown Spray Paint (Rustoleum)
Creative Paperclay® Modeling Material
Cereal Box
Viva Las Vegas Christmas Collage Stamp #5157
Fabric Ribbon
Red Awning Red Glitter Robin's Nest Paper
Acetate
Gold Metallic Mica Powder
Paint
Brushes
Gold String
Snowflake Embellishment
Irridscent Gel Medium
Snowflake Stencil


1.  Roll out and create petals for the poinsettia (7 for the base - 5 for the 2 layer - 2 for the top).  Put the petals together one layer at a time.  Add little balls of clay for the center.  Allow to dry for 24 hours.

 2.  Spray paint frame Brown.  Use spray mount to adhere paper to the glossy side of the cereal box.

 3.  Add ribbon with Tacky Glue® to the frame.  Cut Acetate to fit inside the frame.


4.  Roll out more Creative Paperclay® and stamp into the clay.  Allow to dry for 24 hours.

  5.  Add gold Mica Powder while the clay is still wet.  It can also be added after the piece is dry.  Add Paint.

 6.  Use stencil and stamp the snowflakes on the background paper.

 7.  Add ribbon and music notes with the mica powder.  Using a gold string I attached the stamped piece to the background.  Using Tacky Glue®  everything else was mounted together.


Wednesday, December 21, 2011

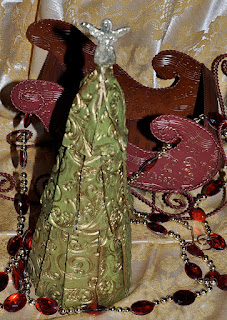
Creative Paperclay® Christmas Tree with Viva Las Vegastamps!

You may have noticed our team was challenged this month to use Creative Paperclay® with Viva Las Vegastamps!  I love rubber stamping so this was a fun challenge for me. 
Here is the Christmas tree I created using both Creative Paperclay® and Viva Las Vegastamps! The stamps I used are from the Swirl Plate #1333!
I gathered my supplies (see list below).  The base of my tree is a Styrofoam cone. To plan the sizes I needed I precut paper into three layers for the size of cone I was using. Using straight pins to help, I pinned each player to the cone. Make sure to have a little extra length on the top layer to create the point at the top.


I roll my clay out on transparencies, this way I can leave them on the sheet and move them around easily. The Creative Paperclay® was rolled between spacers, about 1/8th of an inch thick and cut to a 4-1/2 inch strip for the bottom of the tree (depends on the layer working on). Then carefully stamped with swirls over and over until the piece of clay is filled with swirls. Then cut the clay into strips.  There are: eleven 4-1/2 x 1-1/2, nine 4 x 1 and seven 3 x 1, finally on angel. Set aside the clay to dry, usually 24 hours, maybe more depending on humidity.  
While waiting for the clay to dry give the Styrofoam cone a quick coat of paint.  Once all the clay pieces have dried paint each one green. Set aside to dry.
After the first coat of paint is dry cover with gold paint be sure to get it in all the crevasses, then wipe the excess with a rag or paper towel. Set aside to dry.
Now liberally apply tacky glue to the back of each strip of Creative Paperclay® attach to the Styrofoam cone, overlapping the strips and  holding in place with straight pins.  When you get to the top layer you will need to trim the top so the strips are tapered.  Use a rubber band or twist tie to hold the top together at a point. Add the angel, cover with gold Stickles. Allow to dry overnight or longer.
Touch up an edges that may be exposed with gold paint. Now you are ready to add your tree to your holiday decor.

Supplies:
Styrofoam cone - 10 inch
Roller
Transparencies
Craft Paint - green and gold
Paint Brush
Tacky Glue
Ruler
Paper to create demo
Angel Cookie cutter
Straight pins
Stickles for Angel - Gold


Visit me at Dreaming of Castles!

Here is 
wishing you and yours a 
VERY MERRY CHRISTMAS!
Lyneen