Showing posts with label acrylic paints. Show all posts

Saturday, December 23, 2023

Their Love Blossomed


Time to celebrate with a gift for friends in love. For some reason I kept changing my mind about color, theme, etc. But I want you to know that it is just fine to do that and the art may come out better. Working on this art project has given me ideas for future projects. So, I have a lot to look forward to.

SUPPLIES
Creative Paperclay® 
Stamps
Acrylic Paints
Hand cut gold paper
Ring
Wood panel


I started by rolling the clay out flat on a wood panel. I then used a ruler to make tile shapes. I am not a perfection kind of girl so my tiles aren't perfect but I like it. I always look for that happy accident.


Next, I stamped and made marks in the clay. Originally, I was going to put a star burst in the middle but that changed as my "story" changed. It was originally for a family member that just had a baby but then I found out about an upcoming wedding.


The background was painted multiple times as the colors never seemed righ. My color changes ranged from warm to cool and then I added a touch of gold leaf and a dark wash. I was open to color changes until the very end.


The next step was to roll out a sheet of clay, stamp it with my heart stamps then trim the heart shapes from the clay. After it was dry, the edges were sanded.


The hearts were painted with red acrylic paint then a deep red acrylic wash was applied after the first color dried. This color sank into the low points of the clay and showed off the detail of the stamps. One of the hearts is raised from the surface with a small block of wood, giving it depth.


It was missing some "pop" so I added some metallic gold paper that was hand cut and glued down a faux diamond ring I found in my box of old jewelry parts. These really completed the story and made it special.

Remember, changes are always OK to make.

Dream in Color!

Darlene Olivia McElroy

Friday, February 23, 2018

Making Creative Paperclay® Look Like Metal

I found a new product that I hadn't known about - foil spray. This week is experiment with foil spray week and this is just the start. I created a little animal with Creative Paperclay® on my plastic covered work table. Note: If left to dry on the table, it won't warp.

SUPPLIES

Creative Paperclay®
Krylon Metallic Foil Spray
Polymer Medium
Dimensional Paint (for dots)
Burnt Umber Paint


I added dots with dimensional paint in a bottle. Any brand will work. This was added so I could see how foil works with texture. When the dots dried, I coated the dog shape with polymer medium in order to seal the surface. The foil will absorb into the clay if it is not sealed and loses the foil look.


Krylon Metallic Foil Spray canister.


Metallics are difficult to photograph so you will have to trust me that this looks like real metal.


To age the piece, rub burnt umber paint on it. If you put too much on and can't get it off just slightly spray with alcohol and wipe excess off with paper towel.

Not sure which I like better. Aged and not aged have interesting looks.

Dream in Color.

Darlene Olivia McElroy


Thursday, February 15, 2018

Mosaic HeART Journal


Hello Creative Friends! Jenn here with a new Creative Paperclay® project to share with you. This mosaic heART journal was so much fun to create.

For the tiles, I used both Creative Paperclay® Modeling Material and Delight® air dry modeling compound.
Additional supplies used:
Several rubber stamps in various patterns
Hot glue gun and glue
Clay shaping tools
Rolling pin
Cutting utensil
Acrylic paints in teal, fuschia, and green
White Gesso
Plain notebook or journal hardbound
paintbrushes

One of the many great things about Creative Paperclay® and Delight® is the amount of detail you can achieve by stamping into it. This is how the tiles are created. Using a rolling pin, roll out clay to desired thickness and cut into various sized tiles. Next, use rubber stamps to press into the clay and create the patterns.

Use a hot glue gun to adhere them to the cover of the journal. Roll out a long piece of clay to cover the outer binding. Press a pattern into this strip as well. Once all of the tiles are in place, allow the clay to dry overnight. Cover with white gesso and let dry.

Finally, paint the tiles using an array of bright acrylic paints as shown.

To add a little flair to my cover, I molded a heart using Creative Paperclay®, painted it to match, and adhered to the front!

Both Creative Paperclay® and Delight® are amazingly easy to work with and can be used for a wide variety of projects.

Thanks so much for viewing my post today! I hope it inspires you to get creative!


Delight® Air Dry Modeling Compound and Creative Paperclay® can be purchased in the online store here.

Creative Paperclay® products are also conveniently available at


Tuesday, January 24, 2017

It is all in the Details

Storytelling is a very important aspect of my art as a narrative mixed media artist. Creative Paperclay® helps me tell my stories by being able to cast objects or create stamped shapes. Although I paint the clay, I really love the beauty of it in the raw stage.

SUPPLIES

Art surface
Creative Paperclay®
Acrylic Paints
Molds
Stamps
Foil & Adhesive optional


One wing symbolizes in search of completion. I think we spend our life searching to fill in our stories. Next comes the painting of my clay areas. I start by coating them with polymer medium when they have dried. On the body I applied a gold rub over the blue. The wing was painted then I applied holographic foil to it using adhesive size. That it what the white areas are on the crown.


Next step was to cast more objects. Once they are dry I will clean them up with either my dremel or SandIts then paint them.

Dream in Color

Darlene Olivia McElroy


Tuesday, December 27, 2016

Simplicity of Nature in Clay

I like to have a personal touch on any gift that I give. One easy way to create personalized hang tags with Creative Paperclay® using nature as my stamp. These were given to a friend who has a passion for anything blue. I used these as hang tags but they could be converted to wrap around a napkin or hang from a window/

SUPPLIES
Creative Paperclay®
Blue acrylic paint
Raffia
Leaves & flowers
Brayer


I started with two wads of clay that I had flatten. I placed the flower and pine needles on top of the clay then brayered them flat.


This is how they looked when I pulled the flower and needles off the clay.


I placed a glass over the clay making the circle cutout and then made little holes for the raffia.

After removing the clay outside of the round shape, I smoothed the edges of the circle shape with a little water on my fingers.

I like simple things that have multiple uses. Plus this is a kid's perfect project.

Dream in Color.

Darlene Oliva McElroy

Tuesday, December 13, 2016

Lost & Found Drama with Creative Paperclay®

Mixed media artists and their friends are scavengers. A friend found a bunch of frames in the trash. They were good condition and ready to become an art project and what could be better for a mixed media painting but a mixed media frame. Easy, breezy, beautiful.

SUPPLIES

Creative Paperclay®
Stamps
Texture plates
Gold paint
Red oxide paint


Started by applying Creative Paperclay® to the frame by hand then brayering it flat before adding texture. I worked in sections.


Added final details.


The Holbien mat gold matched the frame perfectly. I could have left the frame painted gold but ....


I ended up apply a wash of red oxide paint. A wash is paint diluted with water. This wash sank into the recessed areas giving the frame's texture depth.

Dream in Color!

Darlene Olivia McElroy

Saturday, September 17, 2016

Guest Post!

Welcome, I'm glad you stopped by! 

My name is Donna Budzynski, I was a DT member a while back and I have some news I would like to share!

I love working with Creative Paperclay® and continue to work with it. I want to share with you that I have been published in Somerset Studio magazine.

I was so happy to be chosen to have not 1... but 4 of my pieces shown!

I have pictures of 2 of the 4 to share with you and the other 2 I never took a photo of  because I wanted to make the deadline for the call. So you will have to take a peek if you get the chance!
They were Frankenstein and his bride wall plaques.


 Here is the first project! She is a wicked witch and she was sculpted right onto the wood.
I had so much fun with her!

Here she is in the next stage with paint. I used acrylics for her. On her eyes I used the same but I used a extra glossy varnish to make her eyes look wet.


Here she is finished with alpaca hair and I think she will look wicked cool hanging in the Witch Hall of Fame. What do you think?


This is my crazy witch want that I sculpted on top of a vintage wood thread bobbin!


 Super fun to display around the house!

 I just want to encourage you to try sculpting with Creative Paperclay® it is very forgiving and easy to work with. I also want you to share your work! Don't be afraid to send it in for a magazine call, you never know when you just might get published!

I just got word that I will be in the Stampington magazine Prims with another Creative Paperclay® creation. So exciting!

Thanks for joining me for this guest post!

If you want to follow me on my journey, you can do so by visiting my
blog at Donna J Designs.


Tuesday, August 23, 2016

Aged Creative Paperclay® and Found Objects


As a mixed media artist, I love combing found objects, paint, collage and Creative Paperclay® to tell a visual story.


SUPPLIES

Creative Paperclay®
Acrylic paint
Salt
Stamps
Water
Art Surface
 I start by applying Creative Paperclay® to my art surface using a brayer to have a flat border. I prefer to work on cradled wood panels. The paper clay was stamped, sanded with SandIts then cut out the shape of this beautiful escutcheon at the Flea market.


When the clay was dry, I coated it first with polymer medium. When that dried I painted a base coat of Red Oxide acrylic paint.
I then coated it with Irridescent Bronze acrylic paint.
Next, I added washes of Micaceous Oxide and Red Oxide acrylic paint. Salting each layer and letting dry before repeating with another color. Yes, good old table salt. The salt will stick to the paint and give the surface a gritting, old look.

Dream in Color!

Darlene Olivia McElroy


Thursday, June 9, 2016

Changing the Story with Creative Paperclay®


As a narrative artist I find that I am always adjusting the stories around me. This clay mask has been hanging around the studio for years. It has been cast, been in videos and I felt it was time for a facelift. Because it was clay, I knew it would take Creative Paperclay® very well.

SUPPLIES

Object
Creative Paperclay®
Acrylic Paint


I started by slightly dampening the surface with water then building up the butterfly shapes with the clay.


Next I added texture with a variety of tools from a wood skewer, ceramic mark making tools and something I do not know the name of. Maybe for cooking (not my specialty). Finished by smoothing the edges with a little water.


Next I applied a wet brown paint, I immediately blotted it for a stained effect. This was just my base color.


Since I wanted it to look like it was part of the original mask I added a wash of titan buff and grey paint. While wet I salted the paint to give it the feel of the mask.

Play with Art, and Dream in Color!

Darlene Olivia McElroy

Thursday, April 21, 2016

Walk By Inspiration

Years ago I saw a wonderful show by glass artist, William Morris. He does monumental glass work but he also had a 30' x 8' wall of small glass pieces. I fell in love with them and they have remained with me. Last week while gallery hopping, I came across a wall of ceramic faces that struck me the same way. One is interesting, two hold our interest longer but a whole wall is incredible. You can be endlessly lost in all the unique shapes. Plus there is the organizational beauty of a grid with the variety of the shapes. The world is full of eye candy and inspiration.

 SUPPLIES

Creative Paperclay®
Your imagination

Have fun with art and dream in color.

Darlene Olivia McElroy

Thursday, November 26, 2015

Fun with Texture and Delight


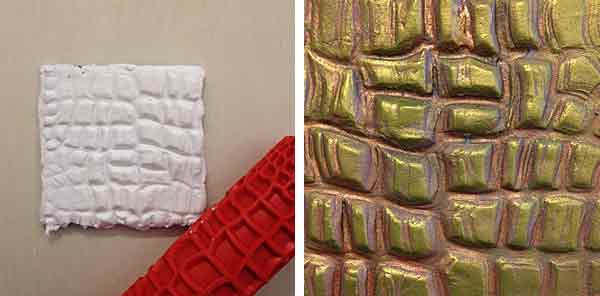
I like being prepared and one way I do it is to create 4" x 4" masonite boards with different textures. I do these when I have a break in time and I am not working on a specific project. These are texture ideas for future pieces of art.

SUPPLIES
masonite boards
Delight (or Paperclay)
found objects
texture rollers


I used a textured roller to achieve this alligator skin look. When the Delight was hardened, I applied a metallic bronze paint to the surface. When that had dried, I rubbed a green metallic rub. I felt in love with this sample.


When through my kitchen drawers and found this silicone hot pad that I thought would make a great texture.
I started by stamping the Delight with a stain of light brown then did a wash of silver when the brown had dried.


A scrap of lace also made a great texture on the Delight. This had a wash of red oxide paint on it.


I used a volcanic rock from my yard to get this real natural moonscape type texture on the Delight. When it hardened I painted it grey then did a wash of bronze. I dripped alcohol on it while it was wet.


Years ago I picked up some laser cut plexiglas that I use with spray paint and decided to try it with the Delight. I applied red oxide paint then did a blue metallic rub when it had dried.


Reticulated metal also makes a great for Delight or Paperclay. Multiple washes were applied.

So get out your textures and have fun.

Dream in Color and have fun!

Darlene Olivia McElroy