Showing posts with label butterflies. Show all posts

Monday, July 10, 2017

Birds and Butterfly Wall Hanging Featuring Creative Paperclay®

Hi Friends:  Are you looking for more ways to use Creative Paperclay® in your home decor?  Here's a fun Birds and Butterfly wall hanging using Creative Paperclay® on the canvas backgrounds and as the focal image on each panel.

Here's a picture of the full wall hanging:

Birds and Butterfly with Creative Paperclay


Here are some detail images of each panel:


Supply List:
Creative Paperclay® Modeling Material
Inkadinkado Mindscapes Clear Stamps (Amazon)
Inkadinkado Gem Stone Insects Clear Stamps (Amazon)
Inkadinkado Clear Stamps - Gem Stone Birds (Frantic Stamper)
Prima WIRE NET Finnabair Clear Stamp (Amazon)
Prima Marketing Art Alchemy-Sparks-Mermaid Sparkle (Amazon)
Prima Marketing Art Alchemy-Sparks-Iris Potion  (Amazon) 
Prima Marketing Art Alchemy-Sparks-Fairy Wings (Amazon)
Prima Marketing Art Alchemy Acrylic Paint, Metallique Steampunk Copper (Amazon)
Prima Marketing Art Alchemy-Metallique Wax-Bronze Age (Amazon)
Prima Marketing Art Alchemy-Metallique Wax-Aged Brass (Amazon)
Prima Marketing Art Alchemy-Metallique Wax-Vintage Gold (Amazon)
Prima Marketing Art Alchemy-Antique Brilliance Mystic Turquoise (Amazon)
Prima Marketing Art Alchemy-Opal Magic Wax-Turquoise Satin (Amazon)
Prima Marketing Art Alchemy-Antique Brilliance Lucky Emerald (Amazon)
Prima Marketing Art Alchemy-Antique Brilliance Amethyst Magic (Amazon)
Prima Marketing Art Alchemy - Metallique Wax - White Gold (SSS)
Prima Marketing Finnabair Mechanicals - Tin Hearts (Amazon)
Viva Decor Inka Gold (Amazon): Gold
Tim Holtz Ideology - Foliage (Amazon)
Faber-Castell GLASS BEAD GLITTER GEL (SSS)
Glossy Accents (SSS)
Aleene's Tacky Glue (Amazon)
Beacon 3-In-1 Advanced Craft Glue (Amazon)
E6000 Glue (Amazon)
Other:  small canvas panels, ribbon, word charms, jewelry pieces, gems, fasteners

Please see my video tutorial for full instructions to recreate this project:


I hope you enjoyed my project and learned some new ways to use Creative Paperclay® in your home decor. Thank you so much for stopping by the blog today. Have a great, creative day! -Patti


Friday, July 18, 2014

Simply Perfect Creative Canvas Layers with Rachel Whetzel


Hello, out there in Creativeland!! It's Rachel Whetzel, here. Once in a while, I feel like a project is so simple, it's probably TOO simple. Then I remember that simple can sometimes be totally AWESOME, and this is that kind of simple. My project today is part of a project I'm working for Gauche Alchemy, and it is the background canvas for a different piece of artwork. Today, I'll show you just how simple it is to use Creative Paperclay® as part of a mixed media canvas. This is the kind of project you can have your kids do. It's also great for beginners who want to amp up their art work, and make something they are pleased with. It's also perfect for projects with limited time. It's Simply Perfect. (see what I did there...?)

WHAT YOU'LL NEED to make your own canvas:

  • A sturdy canvas. I have plywood cut at my local hardware store, then I cover it with dictionary paper
  • Creative Paperclay®
  • Paints. I use Folk Art acrylic craft paints.
  • Stain. I used Valspar antiquing stain
  • Paint brushes
  • Embellishments. I used a butterfly wall cling I bought from the Dollar Tree years ago.
  • Texture. For this piece, I used a doily I bought at a yard sale.
Get your canvas surface wet, and layer your clay onto it. In order to get the right shape for my doily, I traced it onto the canvas before I started putting on clay. 
 Next, I pressed my doily into my still moist clay.
 Then I carefully lifted it out of the clay. If you find that clay has stuck to your cloth, rinse well with water while the clay is still wet, and it will come out easily. Allow your clay to dry, and then get to work painting on some layers!
I painted my colors on, and then used stain to add dimension to the doily. Topped off with a butterfly and some dotted swirls, and my canvas is ready to go!! Be sure to check in at  Gauche Alchemy in August, to see the completed piece I am creating using this background! 

Thanks for reading! If you'd like to keep up with me, and see more of what I'm up to, I'd also love it if you'd visit MY BLOG and Subscribe! You can also find me on FACEBOOK!

Tuesday, April 15, 2014

Easy Butterfly Spring Mobile by Gloriann Irizarry


Welcome Back to the amazing Creative Paperclay® 
Is me once more Gloriann Irizarry a great tutorial to celebrate the starting of the spring.


Spring is finally here so lets celebrate by crafting a cute little mobile.
With the help of my little one we decided on butterflies. These cute butterflies will fly around with the warm breeze and make you smile every time. Ready! Ok them, lets begin.  


Materials

1 bar Creative Paperclay®

(Pastel Blue, Green and Pastel Pink)

Acrylic Paints 
(Pearl pastel blue, Gold, Yellow, Purple)

Clay texture sheets


Flower Cutter

Lace Border Cutter 

1 Spool of  1/4 wide Ribbon 

Glass bowls 

Drill Tool

Needle Tool

Clay Roller

Flat Toothbrush

Solar night lamp

and the Top and drill template.


Sized to your desired mobile and print 2 to copies.

Cut one for the Top of the mobile and cut the other to know where to drill the holes 


Roll a clay sheet to a 1/4 thickness large enough for the template to be trace and cut off. 


After the template is cut use your border cutter to give a nice shape. 


Use your clay texture sheet and roller to give it some character.


Place your clay sheet over the glass bowl and give it a little shape and let it dry overnight.


Now choose your favorite butterfly style cutter.

Stamp and cut 15 mobile pieces.

\

Use your needle tool and open the holes. 
You can use a single hole or the double hole depending on your taste.


Fold them in half and let the butterflies dry over night.


Cut one of each size of the flower.


Lets now grab the dried mobile top and use the template to mark the placement of the holes.


Use your drill toll to mark each one and  drill the whole 1/4 thick sheet. 


Make you you clean the holes out.


Grab all yours dry clay pieces and it is time to pain.


I use the pastel blue to paint an even layer and let it dry.


To give it an aged look I watered down the gold tone paint and added  to the already
 painted blue mobile top and removed the excess with a damp paper towel.


I wanted to give the mobile top some texture so I watered down some of the acrylic purple.
Use a flat toothbrush and use the splatter technique all over the mobile top.


I used the bright yellow and painted all the butterflies and the purple for the flowers


I added some veins and details to the butterflies with the Sakura Crystal Lacquer 
3D Pastel blue and Pastel pink pens.

I added some accents to the button of each flowers with the green  3D crystal lacquer pen.


And used the Pastel Blue and Pastel Pink for detailed the tops of each flower.


I wanted to crate a contrast on the mobile top so i used a Purple Crystal lacquer
3D pen and started to free hand drawn on the border.


Cut 2 long pieces of ribbon for you to thread so your able to hand your mobile .


Now choose your desire length size so you can cut the ribbons out and tight the butterflies to each end. 


My little one is afraid of the dark so I decided to add a special feature to her to enjoy this mobile at night too. I purchase a outside solar power lamp to give her a ever after light. 


I removed the top were the light with the solar panel was located and discarded the rest. 

Place it on top of the mobile and feed the light down from a carved hole .


Now she will have a everlasting mobile night light.
It will go on automatically every night and will last enough to put her to sleep. 
Looks very good at night too. 


Now that this project is completed you are ready to have a nice piece that will guard
 any kinder gardener dreams. 

My friends thank you for reading this tutorial and feel free to leave us any comments,
 Questions or suggestions at the button of this screen


Have a bless day and like always happy crafting. 

Sincerely
Email Gloriann@byglori.com

Tuesday, May 14, 2013

Garden Basket of Flowers Shadowbox

Hello everyone, and welcome to the blog.  I am Barbara Rankin.  This is my first post as a new design team member for Creative Paperclay® and I could not be more excited to be here.  My first project that I want to share with you is a fun little garden basket full of flowers.  I had so much fun making this, and I love how it turned out.


Supplies used:

Creative Paperclay® air dry clay
Silicone Molds (Martha Stewart)
Garden Basket rubber stamp (Impression Obsession)
Secret Garden 8x8 print paper pad (Graphic45)
5-1/2" x 8-1/2" wooden shadow box (Dollar Tree)
Glue n' Seal (Ranger)
Acrylic Paints (Ceramcoat Purple, Tahiti Blue, Spice Tan, Lt Ivory) (Folk Art Spring Rose, Pure Orange, Sunflower, Basil Green, Leaf Green, Glazing Medium)
Peeled Paint Distress ink (Ranger)
Glue gun
Moss embossing powder

I like to first work the clay into a ball and push it into the mold  Allow it to dry a bit, maybe 30 minutes, before removing it from the mold.

In some instances, I prefer to work the Paperclay® into an oval shape, as I did for this leaf mold.  It seems to make it easier to push the clay into the mold and get better coverage.
Next, I inked up the basket stamp with archival black ink.  It is not necessary to ink your stamp first, but if you do, I recommend using a waterproof ink so it will not run.  I rolled out a piece of the Creative Paperclay® to approximately a 1/8" thickness.
I then stamped into the clay.
Using a craft knife, I cut the excess Paperclay® away and returned it to the package.
Here is what it looked like after trimming.  I used my fingers to smooth the edges and my fingernails to make tiny indentations along the bottom.
I wanted my basket to look more realistic, so I allowed it to dry over a piece of sponge.
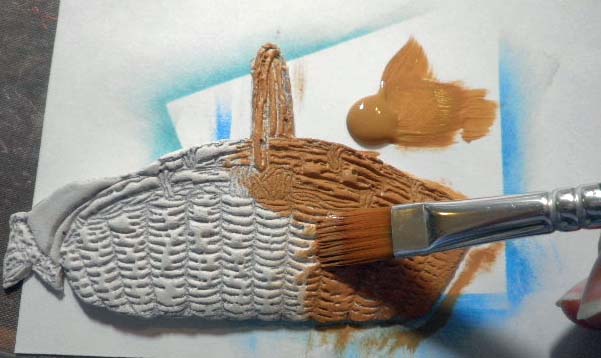
Paint basket with tan acrylic paint.  Allow to dry.
Make a charcoal acrylic paint wash and cover basket.  Allow to dry.  Dry brush tan acrylic paint over basket, just hitting the high spots.
I continued molding flowers, leaves, birds and butterflies, and here is a picture of my desktop filled with  Creative Paperclay® goodness.  It is so easy and so much fun to play with Paperclay® that I could do this for hours.
I painted each piece of Creative Paperclay® with a mixture of acrylic paints and glazing medium.  This helped blend my colors, as well as making the paint more translucent.  
The reason I wanted my paint more translucent is so that my second layer of paint would not completely cover up the previous color.  It would, instead, go into the crevices and darken the nooks and crannies perfectly. Then, after that dried, I could come back and hit the high spots with a dry brush technique.  

With all of my pieces painted and drying, I found a small wooden shadow box I had purchased from the dollar store.  I sanded it a bit, then painted the sides of box, inside and out, with my acrylic paint mixture of Basil Green, Light Avocado, and Glazing Medium.  When the paint was dry, I sprinkled Moss embossing powder here and there on the sides of the box and heat embossed it.   Then I sponged a bit of Peeled Paint distress ink on top of that to bring out the color variations.

I found just the right paper to use for the background, i.e., the Graphic 45 Secret Garden from the 8"x8" paper pad.  It fit perfectly inside the box with just a bit of trimming off the top and bottom. 
I then adhered printed Secret Garden paper to the inside bottom of box with glue n' seal.

Now that all of my Paperclay® embellishments are ready, I simply arranged them inside the box and glued them using a hot glue gun.  Oh my goodness, this was such a fun project.  Here are a few closeup  photos of the Paperclay® and the dimension I easily achieved with this product.


Thanks so much for joining me for my first project post for the Creative Paperclay® design team.  I hope you have been inspired to try out this fabulous and fun product.  There are so many ways to use it, and you will be amazed at how much fun you will have "playing" with this product.  So, I encourage you to visit the Creative Paperclay® blog often, because the other designers have so many wonderful creations to share with you.

Until my next post, I hope you will find some time to visit my blog to see how I continue to use this product.

Have a wonderful week, and happy crafting!

Barbara