Showing posts with label project for kids. Show all posts

Tuesday, June 9, 2015

Creative Paperclay Figure Pusheen The Cat Tutorial


Good Day everyone! Today I wanted to share with everyone a little project I made a very special little girl in my life. Yes!  My daughter Sam. She wanted a Pusheen The Cat figure for her birthday cake so why not make it out of Creative Paperclay®  instead of fondant so she can treasure it for ever. This is how my OOAK figure idea began . Now she was actually very specific and wanted the cute cat in the scooter like on the Book cover of I Am Pusheen The Cat By Claire Belton. The Fan art figure turned out so easy and cute I wanted to share with everyone. I hope you like it.


Materials
Creative Paperclay®
Sandits®
Roller
Water mist bottle
Brush
Acrylic paint
Acrylic glossy sealer
Printed Image


I like to cover the working area with a plastic sheet so you can remove the clay in one whole piece.


Use your roller and start rolling a clay sheet to a 1/4 even thickness. 


Print the image you have chosen to desired size.
Cut the image out and place it on top of the rolled out clay sheet.

 
Trace it with a needle to cut the base shape for your Creative Paperclay®  cat figure.


Smooth any rough edges out with a wet soft flat brush.

 
Add some more 3D details with the Creative Paperclay® like the little cat  paws, scooter chair, scooter wheels, eyes, mouth and cat markings. Set to dry over night or if in a hurry out it in the over tray for 170 degrees no more than 200 degrees for one hour.
 
 
You can sand any imperfections out. I found the use of Sandits® to be very
helpful to sand all the details out.  Sandits® give you  full control over the area your sanding.
Check them out you will wonder how your live with out them.
 
 
Once is dry we can do the base colors for the figure.
Use at least 2 coats for each color so the image will look nice and bright.
 
Cat and wheels was colored in Silver gray, Scooter in Aqua pearls, Seat and steering wheel in flat pink.  Let the paint fully dry in between each coat. I actually paint it the details in the front of the figure and the back too. Set aside and let it dry.


Now that is dry it will be easier to add the black detailed line with out messing the other colors.
It is more easier to do if you use a nice fine brush and thin the black paint a little so it will not cloth all over when your painting the lines.


I could not stop on the front so I also painted the details on the back of this piece.
 
Once the black paint dry your ready to protect your piece with the glossy acrylic paint sealer. Set it aside to dry and your piece will be done.
 
This can be use has a cake topper, Magnet or a tree ornament. The choice is all yours.
 
 
Now Todays OOAK Pusheen Creative Paperclay figure was a Fan Art inspire by my Sam's favorite book covers I Am Pusheen The Cat by Claire Belton 
 
 
 Have a bless fun day!


Sincerely,
Gloriann Irizarry


Friday, March 20, 2015

Kid's Project: Easter Egg Necklace

This is an easy-peasy project for kids of all ages. With a little help from the grown-up, even the youngest artists can create a OOAK Easter egg necklace.

Chloe and I used Creative Paperclay® to make several small eggs. Try to get them as smooth as possible when forming them in your hands, but don't be too concerned with small surface imperfections. They will magically disappear later in the process :)

After the eggs were formed, I inserted an eye hook in the narrow end of the clay egg.

Egg and eye hook
Inserting eye hook
Egg with eye hook inserted

Next, the eggs were set aside to dry. As the eggs dry, they may shrink a bit and the eye hook might loosen. If this happen, just use liquid adhesive to hold it in place and reinsert it. Allow the adhesive to dry thoroughly.

Now, to take care of those surface blemishes. We painted the eggs with slip to achieve a smooth, finished surface. Allow the slip to dry, then paint your eggs. We didn't even have to sand the eggs. The slip left a magically smooth surface.

The last step is to add the eggs to a chain, and enjoy!!
Finished Easter egg necklace

Carole

Chloe

Table Cell Table Cell

Friday, January 16, 2015

Stenciling on Canvas

I've been thinking about this project for awhile now, and decided to put the thoughts into action. I wondered if Creative Paperclay® could be used as a stenciling paste. Good new—it certainly can!! This can be a great project for an older child, but it was beyond what my five year old partner was able to manage. I think this would be a more appropriate project for an eight or ten year old.

I started with an 8" x 6" Artist's Loft canvas (available at any of the big box craft stores). I colored it with a wash of Purple Mist and Burnt Umber acrylic paints.


While the canvas was drying, I worked with the Creative Paperclay® to make a smooth paste. I added water—a little bit at a time—until it was the consistency of smooth cake icing. Remember: it's easier to add the water a bit at a time than to get the mixture too runny. This step did take a considerable amount of blending to get a smooth, creamy consistency with no random lumps of the Creative Paperclay®. When I reached the consistency I wanted, I added a couple drops of Mars Black acrylic paint.


Next, I used painter's tape to tape the stencil onto the canvas. It is important that the stencil stays securely in place when you are applying the Creative Paperclay® cream/paste. I started with the top, then taped the two sides, and lastly, taped the bottom.


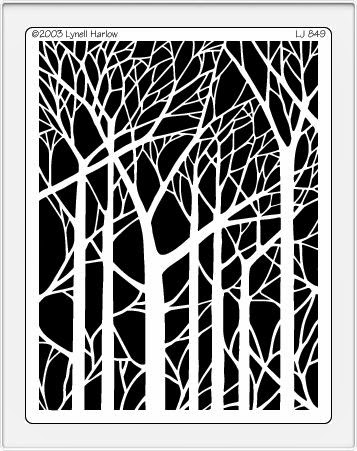
I used one of my favorite stencils—Bare Trees from Dreamweaver Stencils.


This is the tool that I used to apply the paste. Smooth a layer of the paste about 1/8" to 1/4" thick over the stencil. Next, scrape off the excess paste making sure all the openings are evenly filled and the stencil surface is smooth.

Next, carefully remove the tape and lift the stencil off the canvas. I removed the tape from the bottom, then the two sides, and then, every so carefully, lift the stencil, using the top piece of tape as a hinge. When the stencil is clear of the design, I peel the stencil and the tape off the canvas. Using the top piece of tape as a hinge insures that even if you do happen to drop the stencil, it will fall right back in place, and not damage your stenciled surface.

Immediately, wash the stencil or soak it in a shallow dish filled with water until you can properly clean it so that the clay doesn't harden on it. 

While the clay was still wet, I sprinkled fine onyx mica flakes on the surface. Here's my finished canvas. 


Carole

Friday, September 26, 2014

Kids' Project: Leaves of Clay Necklace

This project can easily be scaled in complexity depending on the age and attention span of the child you're working with. I'm working with a four (soon to be five) year old, so I'll share with you how we made this necklace.

We started with a ball of Creative Paperclay® about the size of a golf ball. Chloe rolled the ball flat to a thickness of about 1/8". We used these veined rose leaf embossing cutters.


I held the cutter in place while Chloe pressed it into the clay, cutting the shape and embossing the surface in one step. We made many leaves, so we could select the best ones for our finished project. These are a few of the leaves before drying and sanding.

You can pierce holes in the leaves for jump rings while the clay is still wet, or you can wait until they are dry and drill a small hole with a fine bit and Dremel.

After the leaves were dry, I sanded the edges and the reverse side. I found that an emery board worked great for sanding the jagged leaf edges.

Next, was painting the leaves. We used mica powders mixed with Gloss PPA. Mixing the colors was a combined effort, but Chloe did most of the painting. Then, another round of drying before one last finishing coat of Gloss PPA. Here's what our leaves looked like after the paint was dry.


Chloe had fun going through my stash to select beads to add to the final project. I did all the jewelry work, with Chloe handing me beads and jump rings. Here's our finished necklace—just in time for the crisp autumn weather.

Don't forget our Halloween Link Up Party!!


Carole

Chloe

Table Cell Table Cell

Friday, June 27, 2014

Kid-friendly Magnet Project

Today I have an easy-peasy project for kids of all ages. Magnets made from Delight™ air dry modeling compound. I like using Delight™ for this project because it is so light weight when dry that the strength of the magnet focuses on holding up the paper you're displaying (probably a child's artwork!!), and not keeping the magnet face in place.

Here are the supplies that Chloe, my grand daughter, and I used to create our magnets.

First, we used that cute pink and white rolling pin to roll a piece of Delight™ to a thickness of about 1/8 inch. Next, we used the canape cutters—3/4 inch and 1 1/4 inch diameter— to cut out our circles. First part of the project done!!

After the magnet faces were dry we stamped a small design on each one using StazOn Timber Brown ink. So far, Chloe's done all the work, but I did the resin coating on the top of each magnet face. This step is optional. I thought it added a professional finish to our magnets—plus I like working with resins.

Last, was gluing the magnets to the backs of each piece with liquid glue. Here is a sampling of our finished project.

Variations on this project include coloring the Delight™ with food coloring prior to rolling and cutting. Just knead a couple drops of coloring into the Delight™. You could also use stamp pad inks or acrylic paints.

For an older child (Chloe is four) you might want to use larger cookie cutters and let the child paint the magnet faces. Or, instead of cookie cutters, freehand cut the Delight™ with a clay tool or blunt knife. 

Note: When I showed Chloe the blog post featuring our last project, she was excited to see "her" creation online. She asked why my picture was at the bottom of the post. I explained that it was because I did the project for the Creative Paperclay design team. She thought for a moment, and then said, "I did the project, too. Where's my picture?" So, I've included a photo of my co-designer on this post. :)

Carole

Chloe

Table Cell Table Cell