Tuesday, April 3, 2012

Tiny Cupcake Charms with Delight Clay and Terri Sproul Mixers

Hi! It's Jingle here with my final post as a design team member! I have so enjoyed being a part of this team and I truly hope I have inspired you in some way with my fun projects! For today, I'm going to share with you an adorable tiny cupcake charm created using the Delight Air Dry clay and Terri Sproul Mixers!

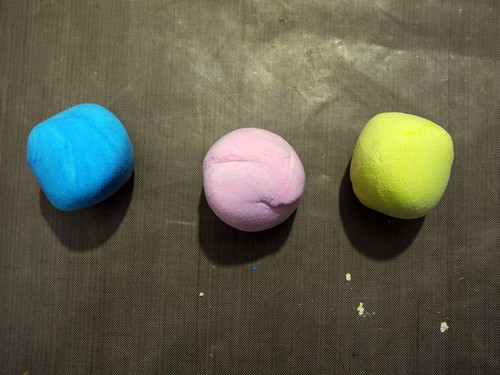
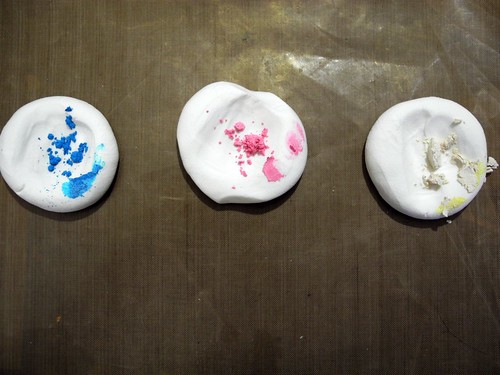
To begin, you will want to use the mixers to color your clay. Pull out three small balls of clay and flatten them slightly. Tap just a bit of the powder into the discs as shown.

Mixing Terri Sproul Mixers into Delight Clay


A little powder goes a long way! Also, be sure to have a rag handy to keep your hands clean between colors! Fold the clay over the powder and then simply work it with your hands until it is even in color throughout.

Delight Clay colored with Terri Sproul Mixers


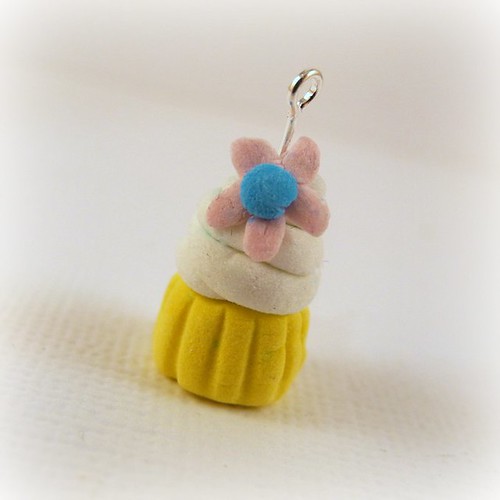
You can even create custom colors by mixing them! This is a great way to make the most of your clay! Now, simply pull small bits of the clay to form the base, frosting, and flower on the cupcake.

Tiny Cupcake charm


Once the cupcake is formed, cut a jewelry finding to the correct size and insert into the top of the cupcake. Allow the charm to sit until it has fully dried and you have your very own cupcake charm! I have added a photo with the charm in my hand so you can see the true size.

Cupcake Charm (size)


Store the remaining dyed clay in plastic bags or an airtight container to use later on another project! Thanks for reading!

Feel free to visit me on my blog, Just Jingle!

Jingle Out.

Sunday, April 1, 2012

House-warming Box Card with Creative Paperclay® and Terri Sproul Mixers

Photobucket

By Sandra Strait (aka molossus)


Recently, I received a free sample of Seattle’s Best coffee.  
Besides getting a pot’s worth of good coffee, the sample came in this cool box.  I immediately saw how I could use Creative Paperclay® and Terri Sproul Mixers to transform this box into an unusual house-warming gift card.

Supplies: 
   Sakura 3D Crystal Lacquer
   Tanzanite Pearl Mixer
   Red Pearl Mixer
   Citrine Pearl Mixer
12x12sheet Paper House ‘Distressed Grass’ scrapbook paper
12x12sheet BoBunny ‘Welcome Home’ scrapbook paper
12x12sheet Kaisercraft ‘Hunt & Gather’[ scrapbook paper
Seattle’s Best Coffee Shadow box
2 sheets Miracle sheets adhesive
Scissors
Pointed Clay Tool
Sandpaper block
Reference photo of a sitting cat
Slip (leftover bits of clay soaked in water)


The Box
The inset portion of the Seattle’s Best box had loose flaps, so I glued them down. 

Then I measured and cut the papers to the necessary size:
Welcome Home Paper-Front & Inset
Hunt & Gather Paper-the ‘frame’ around the ‘window’.
Distressed Grass paper-Sides and back of box. 

I set the pieces for the window frame aside, to add after I created the window.

Miracle sheets are sheets of two-sided adhesive.  I cut the exact size I needed for the surfaces of the box, and glued on the papers.


With a sandpaper block, I lightly sanded the edges of the paper so they were flush with the edges of the box.

With a Sharpie marker, I wrote my sentiments on the front of the box—‘May your new home be a happy one’ and on the inside flap, ‘With rainbows in every window.’


The Window

Terri Sproul Mixers are mica powders that you mix with 3D Crystal Lacquer to create a thick paint of metallic, pearl or jewel colors.


I mixed a little Citrine Pearl- enough for one stroke of the rainbow, and then repeated this step with the Red Pearl and the Tanzanite Pearl.  (Note:  I had unpainted clay pieces on hand, so I could use up the left-over color.  You won’t want to waste any of this paint!)

At this point, the colors were almost metallic and not very rainbow-ish.  But after letting the lacquer set for about 10 minutes, I squirted out thick ribbons of the 3D Lacquer into the top of the window, tilting the box to let it coat the entire area.

My rainbow colors turned into brilliant jewels.  They ran a little, taking on the shimmery look of a rainbow. 

You really can get a whole range of effects with these mixers—the amount of powder to the amount of lacquer determines the finish you’ll get.

One of the clay pieces I was painting with leftovers was a small flower, and on impulse, I stuck it in the corner of the window.
I let the window dry overnight and started working on the cat.

The Cat


I rolled out about an ounce of the clay into a pear shape, checking to see how it fit, scale-wise, in the window (I’m not much of one for actual measuring, lol!).

Then I rolled a rounded triangle for the head, two cylinders for the front legs, and a thicker one for the tail.  My reference picture didn’t have rear legs showing, but I decided to add a foot.

I’d made up a generous amount of slip (leftover clay soaked in water) and I used it to attach the head and   body.  I built up more slip for the neck and shoulders.  Then I attached the legs and tail.

For the ears, I rolled small pieces of clay and flattened them.  I used the tool to trim them to triangles and folded them slightly, attaching them to the head.


I used the pointed clay tool to carve out the facial features.

Then I rolled very small pieces of clay into cylinders, and molded them to the body with slip. 

I left the back of the cat flat, because it was going to be glued to the window.

I took the tool and started digging into the clay.  In some places, I impressed lines, and in some places I pulled bits of clay out.  I added more small pieces around the face and ears, and then to the tail, poking and pulling with the tool, until I had a very ‘fluffy’ cat.   


I sat the cat aside to cure.


Finishing

I used the Citrine Pearl and Red Pearl mixers to paint the cat’s fur. I used dollops of the lacquer over the Tanzanite Pearl for the eyes.

Once dry, I glued the cat to the window seat.


This is my last post for this term’s Creative Paperclay® Design Team.  I’m not certain yet whether I’ll be trying out for the next term, but I’ve sure had fun!  


I want to thank the Creative Paperclay® and Terri Sproul, the team leader, for giving me the opportunity to play!  You will be seeing more clay projects from me, whether as part of the team, or simply a devotee of the product!

You can find more projects and purchase the clay at the Creative Paperclay® website

Thursday, March 29, 2012

Baby Duckies and Creative Paperclay Delight®


I have been having fun making little duckies today! I also created a small gift/memory box for a baby boy. I happen to have a great-grandson on the way and thought now would be a good time to start making things for him. Smile…… I started out with an ice cube mold that had lots of duckies and filled each one with Delight Clay.

Paperclay post 3-28-12 001

Pretty neat little duckies aren’t they? I covered several of the ducks with yellow paint and they really looked cute. I then took a paper mache’ box and decoupaged some tissue on it. Hmm, didn’t like the way it was looking so I pulled out the trusty Crystal Lacquer and Terri Sproul Mixers and painted the bottom with Aquamarine. The top of the box was painted around the outside with Extreme Glitter Paint and the top had a piece of scrapbooking paper decoupaged on it. I then used some letters to spell out “baby boy” and glued some of my ducks onto the top of the box. I love how it turned out! I think I’m going to use some of the other duckies in my Easter decorating!

Paperclay post 3-28-12 002    Paperclay post 3-28-12 008

Creative Paperclay and the Delight Clay are just so easy to use and they are so versatile. What do you think? Do ya think you need to get you some? Hmmm? I think so and give it a try.

barbara

Tuesday, March 27, 2012

Creative Paperclay Butterfly Tile


Using Creative Paperclay with rubber stamps lets you create very cool embellishments for your paper projects. I used a stamp from Hampton Arts to stamp into a slab of Creative Paperclay to make this tile. After it was dry, I covered the entire piece with black Distress Stain, to get into the details. In the recessed butterfly area, I used Wow Embossing Powder in Bay Area Blue (which is a transparent powder). This gave kind of an enameled look. Finally, I rubbed Viva Gold Decor over the raised areas.

Sunday, March 25, 2012

Mosiac Tiles


Happy weekend!  Today I have a card I created by making Mosaic tiles with paperclay.  I pressed a rolled sheet of paperclay in an embossing folder and then cut the squares/tiles out.  While it was drying I had it pressed in between two boards...this helped it not to warp during the drying process. 


Once the tiles were dry.  I painted them and once the paint was dried I rubbed the raised surface design with Inka Gold paste.  I think the tiles give the card a very dramatic feel. 

I hope you get a chance to create some this weekend.

Hugs,
Lori


Friday, March 23, 2012

Yooper Trolls™

By Amanda Marks

I have been making these since 1996 I can honestly say I haven't thought about them in 15 years.  I found an old box of slides and was going through them and found my Yooper Trolls™.  I decided to revisit them with Creative Paperclay®.

Step 1:  Tin foil Base
Step 2:  Cover in Clay
Step 3:  Add Eyes
Step 4:  Add Nose
Step 5: Add Mouth
Step 6:  Add Ears, Legs and Arms
Step 7:  Add Hands and Feet
Step 8:  Add Butt
Step 9:  Add Hair and Facial Hair with a Modified Needle Tool
Step 10:  Allow to Dry.  Paint and Add to a Base.


Wednesday, March 21, 2012

Creative Paperclay® Altoid Shrine!

I love altering things... especially small tins.  Molding with Creative Paperclay® gives endless options when it comes to what ever you want to include in a shrine. If you can't find something your want to include MAKE IT!  Frozen Charlottes are my favorite object to use when altering.  Here I have taken one of the dolls and used it in an ALTOIDS  TIN!
Using Creative Paperclay® I molded Frozen Charlottes in an Articus mold.  

Once the she was dry I sanded her down and painted her with Terri Sproul Mixers Citrine & Crystal Lacquer. Attached a small heart made with Creative Paperclay® with the lacquer. 
I gathered anything I thought I might like to use... I didn't use half of it. The background papers are from my stash.  The images are from Graphic 45 Olde Curiosity Shoppe
The tag on the front of the the tin has a light coating of lacquer.

 The bird is Creative Paperclay™ molded from a paper casting mold I found art my local thrift store.  I painted it with Terri Sproul Mixers Tanzanite Pearl & Crystal Lacquer.


Add a few oddities and you have your own little curiosity shoppe!!

thanks for Visiting Creative Paperclay®
If you have a chance come by and visit my blog!
Thanks Lyneen