Thursday, March 28, 2013

Recycled Jar: Abstract Flower Vase

abstract flower vase
Items used for this project:
Acrylic craft paint
A jar
Gold Leaf
DSCN1127
I started by making the "lattice" part by rolling out some small snakes with the Creative Paperclay.
DSCN1128
Then I applied the snakes to the jar and flattened them out.
DSCN1132
Next I made some circles for the flowers.
Once everything was dry I painted the "lattice" green and added accents with some gold leaf.  Then I painted the flowers blue and pink and adhered them to the lattice once the were dry.
DSCN1139

Saturday, March 23, 2013

Wine List


Good morning Brenda here and welcome to another Creative Paperclay® post.

Before I share my project with you, I would like to remind you that there is a Design Team call going on here.  I believe you have until April 11th to sign up, but click on the link above and check out all the details.  This is my second term and I'm not sure I will be reapplying.  Not that I don't enjoy working with the products, but I may let some new talent step in.  It's going to be sad leaving the team as I have learned so much and enjoyed being a part of the team tremendously.  Creative Paperclay® is definitely a fabulous product and I will for sure continue using it...so now onto my project.

I had received a wine bottle holder for Christmas
yes, I am a Vikings fan and proud of it  :) 
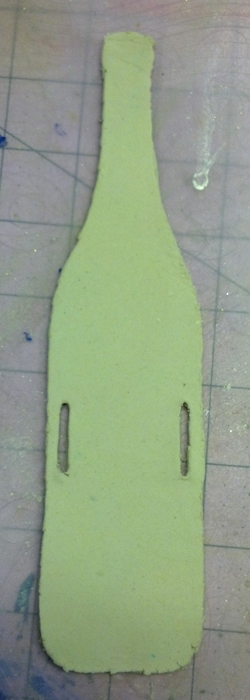
In this shoe there was this tag and I got the idea to use it as a pattern for a Wine List! 
So I laid it ontop of my Creative Paperclay® after I rolled it out about an 1/8 of an inch. 
I just used my craft knife and traced around the pattern of the bottle. 
laid it out to dry...Hindsight, I wish I had NOT cut out the holes, but I really didn't know where this project was going when I started it. 
Here are the holes I cut out. 
Then I painted the bottle silver with some acrylic paints and used some old style letter rubons and added the word WINE LIST to the top of the bottle. 
I added a mini clothespin so I could also use it as an actual list, but again, hindsight, I would have covered up the WINE LIST wording, so.... 
instead I used a transparency and used the template to cut the exact size out and now I have a dry erase wine list... 

see, dry erase...love it  
I really like the way it came together.  I added a magnet to the back and now it can hang on my refrigerator and when I finish a bottle I can just write what I am in need of...LOL  Thanks for stopping by and I hope to see you back soon.  Remember, you can always find me here and see what other projects I've come up with.  
As always, have a great day and God Bless.

Friday, March 22, 2013

Daruma Doll

I have been seeing more and more of these darling Japanese Durama Dolls.
Considered a toy, it is also used as a special gift of encouragement.
So I decided to use Delight ™, air dry modeling compound, to create my own!


Supplies:
Delight ™
acrylic craft paints: black, red, gold
fine tipped paint brush


First, form your head into a roundish, egg-shaped form. 
Be sure to give it a nose and a somewhat flat bottom
so that it can "Nana Korobi Yaoki!"  (Fall down 7 times, get up 8!)
Allow sufficient time for your doll to dry.


Then, paint your doll.
The traditional colors are red, black, and gold.
Red is for good luck in Eastern Cultures.
Again, allow sufficient drying time in between colors so you can get
a fine contrast between colors.


By using Delight ™, you will already have a white face.
Leave the eyes blank.
Then, once you decide on a goal, fill in one eye.  Place the Daruma 
in a key location so that when you see it, you will recall the goal that you 
are working on!


Be sure to leave the back of your doll blank.
When you have completed your goal, fill in the 2nd eye
and write the finished goal on the back of your Durama!


This was an enjoyable project...and I am thinking that it would be fun
for kids to make as well.  Just think...crafting, playing...and goal setting! All rolled into one!

Thanks for stopping by today!
Dawn Mercedes, Sunnyside Up


Thursday, March 21, 2013

Jess B's - Spring Bunny is coming!

Hello Everyone

Here is a fun little Easter wall decor
I made with DelightTM

making beautiful colors of spring
anticipating Easter eggs, baskets, and oodles of candy
 
with latex gloves, I cut DelightTM into 5 sections
placed a dollop of paint and mixed together

rolled out the DelightTMand used mini cookie cutters 
 they dry instantly with a soft foamy texture
I applied to a wooden petal shaped wall hanging
from the dollar store

I also used Creative Paperclay®
for the bunny to give it more dimension

The girls asked me to hang this on their bedroom
door. It made them smile!

This is a great easter basket stuffer
You have to try DelightTM
it's a wonderful product and the children can also
have fun making their own craft.

WAIT!!!
One package has mysteriously disappeared...
I wonder who took it? 

Happy Easter


Wednesday, March 20, 2013

Paper clay eyeglass holder

Hi everyone
My project with paper clay
It is a Holder for eye glasses

"Creative Paperclay® modeling material"

http://creativepaperclay.blogspot.com
 Have a look great project to make.


Supplys
Paper Clay
Paints
 I use Creamcoat by Delta
(I think is covers the best)
Ink Pen
Waterbase Varnish

                                                                             I like the colors
They could match your room.
 My next is going to match my kitchen yellows and blue
Pick your colors
I base coat all color them add dots and trim, then ink around all
Seal with water bace varnish
I hope you enjoy and make many


Friday, March 15, 2013

March Tip from Rachel Whetzel

It's no secret. I have a love affair with sandpaper. I use it all the time on my projects with Creative Paperclay® modeling material, and then I tried my hand at using Delight TM air dry modeling compound. So naturally, I had to try sandpaper with that too!! Sanding on Delight TM modeling material is totally doable! It sands similarly to a very tight grained styrofoam would. Not as smoothly as Creative Paperclay. I recommend using a fine grit sandpaper when sanding Delight TM modeling material. So there you have it! Now you too can feel the pull of the packages of sandpaper as you walk the isles at your local hardware store. I mean, I shouldn't be the only person with a sandpaper collection, should I?

Thursday, March 14, 2013

Annie's Quick Tip for March

Did you know that you can use rubber stamps to stamp into Creative Paperclay? Before the Creative Paperclay is dry you can stamp into it with rubber stamps to add letters, designs or texture to your project.  You can also make some pretty cool embellishments for just about any project using this technique.