Tuesday, June 9, 2015

Creative Paperclay Figure Pusheen The Cat Tutorial


Good Day everyone! Today I wanted to share with everyone a little project I made a very special little girl in my life. Yes!  My daughter Sam. She wanted a Pusheen The Cat figure for her birthday cake so why not make it out of Creative Paperclay®  instead of fondant so she can treasure it for ever. This is how my OOAK figure idea began . Now she was actually very specific and wanted the cute cat in the scooter like on the Book cover of I Am Pusheen The Cat By Claire Belton. The Fan art figure turned out so easy and cute I wanted to share with everyone. I hope you like it.


Materials
Creative Paperclay®
Sandits®
Roller
Water mist bottle
Brush
Acrylic paint
Acrylic glossy sealer
Printed Image


I like to cover the working area with a plastic sheet so you can remove the clay in one whole piece.


Use your roller and start rolling a clay sheet to a 1/4 even thickness. 


Print the image you have chosen to desired size.
Cut the image out and place it on top of the rolled out clay sheet.

 
Trace it with a needle to cut the base shape for your Creative Paperclay®  cat figure.


Smooth any rough edges out with a wet soft flat brush.

 
Add some more 3D details with the Creative Paperclay® like the little cat  paws, scooter chair, scooter wheels, eyes, mouth and cat markings. Set to dry over night or if in a hurry out it in the over tray for 170 degrees no more than 200 degrees for one hour.
 
 
You can sand any imperfections out. I found the use of Sandits® to be very
helpful to sand all the details out.  Sandits® give you  full control over the area your sanding.
Check them out you will wonder how your live with out them.
 
 
Once is dry we can do the base colors for the figure.
Use at least 2 coats for each color so the image will look nice and bright.
 
Cat and wheels was colored in Silver gray, Scooter in Aqua pearls, Seat and steering wheel in flat pink.  Let the paint fully dry in between each coat. I actually paint it the details in the front of the figure and the back too. Set aside and let it dry.


Now that is dry it will be easier to add the black detailed line with out messing the other colors.
It is more easier to do if you use a nice fine brush and thin the black paint a little so it will not cloth all over when your painting the lines.


I could not stop on the front so I also painted the details on the back of this piece.
 
Once the black paint dry your ready to protect your piece with the glossy acrylic paint sealer. Set it aside to dry and your piece will be done.
 
This can be use has a cake topper, Magnet or a tree ornament. The choice is all yours.
 
 
Now Todays OOAK Pusheen Creative Paperclay figure was a Fan Art inspire by my Sam's favorite book covers I Am Pusheen The Cat by Claire Belton 
 
 
 Have a bless fun day!


Sincerely,
Gloriann Irizarry


Monday, June 8, 2015

The Imperfect Heart

 
 Hi,

Today I am showing a few mixed media techniques to make your creative paperclay piece pop.

I have heard that black wings symbolize imperfections. Showing that everyone makes mistakes and its okay to make mistakes.This was my inspiration for my mixed media piece "The Imperfect Heart"


The Supplies

Creative Paperclay®
5x7 canvas
Heart and wing mold
Sandits®
Cheese cloth
E-6000 glue
Water mister
Golden® matte medium
Tim holtz distress stain (wild honey, vintage photo, chipped sapphire, broken china)
Americana multi-surface satin paint (black tie, red barn)
Americana crystal gloss glitter paint (black)
Dylusions ink spray (post box red)
Pearlescent liquid acrylic (galactic blue)
Various sizes of paint brushes
Hair dryer 


Let's get started

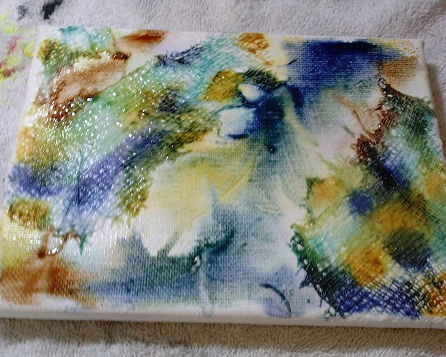
Cut off a few small pieces of cheese clot.Spread a small amount of matte medium on the canvas, then lay the cheese cloth on top of it. Next add matte medium on top of the cheese cloth to secure it into place.


Dot  several colors of the distress stain on the canvas. 


Use a water mister and spray on the canvas. Pick up with canvas and tilt it in different directions to create a unique flowing look. 


While still wet you can spray on Dylusions and  Pearlescent liquid acrylic.  
Time saving tip:Use a hair dryer to dry your paints, stains and mediums in between steps.


I create the heart and wing piece from a candy mold.
Note: When using these kind of molds with your paperclay be sure that the clay does not spill out over the edges of the mold. Let it dry some before you try and remove it from the mold.


Clean up the dried paperclay mold using Sandits®.
These are the best products that I have found to clean up small detailed areas of your paper clay.


Finally paint your piece using the Americana multi surface and crystal gloss glitter paint. Attach it to the canvas using E-6000 glue.


I am so glad you decided to stop by and take a peek at my tutorial.  

Shari

I have been creating art for as long as I can remember. I studied graphic design in Portland, Oregon before moving to Denton, Texas and putting all my focus on creating mixed media art. In addition to being on the Creative Paperclay design team, I am a contributor for the Robin's Nest Design Team, an article writer for Mixed Media Art, and a blogger and outside artist for DecoArt.
I strongly believe in giving back. I volunteer at Scrap Denton Creative Reuse Center where I teach workshops, art camps, and perform art demos. I am very passionate about mixed media art and enjoy helping and watching others discover their creativity.

Sunday, June 7, 2015

June Tips from Lynda -

Hello everyone,

I have learned so much since being on this design team, I couldn't be happier, let me tell you!  A few things that are helping me to create fun - one of a kind projects:

  1. Water truly is my best friend when creating with Creative Paperclay product!  
  2. When you are making your product flat for things you are creating, cut a piece a bit bigger than you really need so you can flatten it to one size all the way around.  
  3. Create a few pieces ahead of time, or when you create other pieces.  This way you have them ready when you need them!  
  4. Have something you can use to keep track of ideas you want to make, such as a sketchbook or notebook.  Make sure to jot down specific details for use later on!  
  5. Find something you can keep all of your tools, finished up pieces, and things you use when you work with the product.  Having it all in one place is much better than having to find it all!  
Thank you so much for stopping by!  Look back at all the fun tips, and add them to your Pinterest page or notebook somehow!  See you in two weeks with my fun idea for the month!  
Lynda Jeffs
Creative Paperclay Design Team 

Thursday, June 4, 2015

June First Friday Fan Day


Need some inspiration for your next Creative Paperclay® project? Check out what folks are making with Creative Paperclay™.


Paper clay hearts
Nursery rhyme dish and spoon sculpture
Art doll
Moon and stars
Autumn dragons paper clay lamp
Hands and fingers tutorial
Backgrounds and embellishments
Cosplay lightweight armor
Toadstools, mushrooms, and thimble gardens

Transform a Barbie doll into a mermaid
Make a dagger and sheath

HELP US FIND YOU!!
  1. Use the hashtag #CreativePaperclay on all your social networks.
  2. When using Facebook, be sure the your posts and images using the #Creative Paperclay hashtag are set to public, otherwise we won't be able to find you.
  3. Share your projects on the Creative PaperClay® Facebook page.
I'm always trolling the web, looking for great Creative Paperclay® projects. If you find something, post it on our Facebook page.

Carole

Tuesday, June 2, 2015

Summer Fun - Mermaid Balancing Toy

Although Summer hasn't officially started yet, the temperatures are rising, school is out, and people are heading to the beach.  On my last trip to the beach I noticed a group of mermaids playing in the waves, and was inspired to make this balance toy.  It is based on the old fashioned balance toys made from carved wood & metal, so, not a whole lot of detail, just fun and kind of soothing to watch her swing back and forth.


This mermaid is fun just to balance on a shelf, door frame, or table edge, but I've included the pattern and instructions for a stand you can create for her if you want her to have a resting "hang out".

To make your own mermaid you'll need:

Delight™ Air Dry Modeling Compound
corrugate cardboard
1 round wooden toothpick cut to 1 3/8" long
white glue
craft knife
two round glass decorative vase filler pieces (the kind with a flat bottom and rounded top, about 1/2" to 5/8" diameter.  These can be found in the "floral" section of most major craft stores)
acrylic paints in your choice of colors
paint brushes
acrylic varnish in your choice or choices of finish - you may want to use gloss for the tail and hair, and matte for the body.
1 2" x 3/8" strip of watercolor paper (90 to 120lb) or card stock
double stick tape

pattern


 Transfer the red outline and markings to cardboard.


Measure the width of your cardboard and mark it along the center length of the watercolor strip.  Score along those lines.  Fold and sharply crease strip in the center, then fold edges in along the score lines.  Cut tabs along the length of each side as shown.


Cut out figure, carefully pierce through each side of the cardboard with the tip of your craft knife blade, where the small hole is indicated at the shoulder area.

Glue watercolor strip along lower tail fin as shown.

Use small pieces of double-stick tape to attach glass pieces to each side of figure where indicated from pattern.


Push toothpick through hole at shoulders, center on each side, and glue in place.

Set the figure on a ledge or the end of your finger and see how it balances :)


Mix clay with acrylic paints in your choice of colors, then sculpt figure.  The toothpick is used as a gauge for the shoulder area.


Sculpt the flesh color onto the cardboard first, tapering onto the tail.


Add colored clay for tail and sculpt tail.
This is a good use for those credit card sculpting tools I talked about in the tips post!  I used two credit cards and made a set of 4 double-ended tools with graduated scale sizes.


One of the nice things about the credit card tools is that they bend to fit!


When you've finished sculpting the tail, sculpt a pair of arms and add those to your figure.

Add hair and whatever embellishments you choose.

Paint on facial features.

Finish with several coats of acrylic varnish.


If you'd like to make the stand for your mermaid, you'll need:
corrugated cardboard
white glue
craft knife
Creative Paperclay® modeling material
acrylic paints, paintbrushes
varnish
pattern


Transfer pattern to cardboard and cut two side pieces.  Cut one base piece and two triangle pieces in dimensions indicated on pattern.

Glue side pieces to base, and pre-bend triangles while the glue on the base and side pieces dries.


Glue triangle sections in place as shown, starting from base.  You may not need to go all the way to the tip, so trim if necessary.


Cover cardboard with clay, then add extra clay to sides and sculpt into wave forms.

Allow to dry, then sand and paint as desired.


Thanks for visiting the blog, and I hope your summer is starting off with a splash!

I'd love for you to join me for more projects & art adventures on my personal blog
Find me on Facebook, or peruse & ponder pics with me on Pinterest

Thursday, May 28, 2015

Deer Me with Creative Paperclay®

 While in Tucson I went to this museum full of stuffed real animals (the guys voted on going to this museum). And, gawd, there was even a room with my last name. The idea came to me to create a friendlier, happier version of what I saw. This could be great for a boy's room.

SUPPLY LIST
Creative Paperclay®
styrofoam
acrylic paints
brown paper
tree branches


 Cut your styrofoam to form the deer's head and start adding the Creative Paperclay® to shape the face.


Add eyes and nose then start adding detail.


Paint the face with as much or as little detail as you wish. Add ears cut out of brown paper and you are done.Next drill holes in the top of the head to add the tree branches whether real or fake. You could even change out the branches with the season.

Dream in color and play with your whole heart.

—Darlene Olivia McElroy


Monday, May 25, 2015

Shari's Tip of the Month

Hi!
 Thanks for stopping by to view my tip of the month.

I was cleaning out my studio and came across some packaging from some metal keys I had purchased. I was ready to put it in the recycle bin when an idea struck me. I wonder if these flimsy plastic packaging molds could be used with Creative Paperclay? The answer was YES!!

I cleaned it with soap and water just to make sure there was not any reside from shipping on them.
I packed in the paperclay leaving it clean around the edges of the mold. I  found that leaving clay in the mold till it was slightly dry made it easier to remove. (The paperclay will shrink slightly as it dries leaving a space around your piece.)Once removed I laid them on my drying table to finish drying.


This worked perfect! Now I will be looking at packaging a little differently on the products I purchase. What is even better than having a new mold? I am helping save the environment by reusing and re-purposing an item instead of just tossing or putting it in the recycle bin.

Shari

I have been creating art for as long as I can remember. I studied graphic design in Portland, Oregon before moving to Denton, Texas and putting all my focus on creating mixed media art. In addition to being on the Creative Paperclay design team, I am a contributor for the Robin's Nest Design Team, an article writer for Mixed Media Art, and an Outside Artist and blogger for DecoArt.
I strongly believe in giving back. I volunteer at Scrap Denton Creative Reuse Center where I teach workshops, art camps, and perform art demos. I am very passionate about mixed media art and enjoy helping and watching others discover their creativity.