Monday, March 28, 2016

Trinket Box


In today's lesson, I recreated a simplified version of a project I made in art school. My original box was very large and made from terra cotta clay. The Creative Paperclay version is very light, but still very durable, and only takes a fraction of the time to make. I hope you enjoy it!

Day One:
  1. I start by rolling out a slab of clay 1/4" thick.
  2. Cut out your desired shape for the base. I made a round box.
  3. From another slab of clay, cut a strip that will become the sides of the box.
  4. Fit the strip around the base to determine the length and trim accordingly.
  5. Using a serrated metal rib, score the edges to be joined. If you don't have this tool, you can use a needle tool or even an old fork.
  6. Add water to the scored edges and attach.
  7. Press the seams together.
  8. Roll out another slab of clay. This will be the lid of the box, but you can trim it to size later once it's dried.
  9. Allow to dry overnight or until completely dry.
Day Two:
  1. Sand everything smooth and trim and sand the box lid.
  2. Cover the box edge with a layer of aluminum foil and a piece of masking tape. (This prevents the new clay from sticking to the dried box as you make an edge for the lid.)
  3. Allow to dry overnight or until completely dry.
Day Three:
  1. Remove the foil and masking tape and check the fit of the lid.
  2. Sand the box if necessary to improve the fit.
  3. Use a craft knife to trim the edges of the lid.
  4. Sand everything lightly and add a coat of gesso (optional).
  5. Paint the box and allow to dry completely
  6. With a small brush, add areas of Paverpol in your desired pattern. (If you don't have Paverpol, you can use any white craft glue that dries clear.)
  7. Allow the Paverpol to dry.
  8. Add a handle to the lid. Small drawer pulls work nicely, but you could also use old jewelry, large beads, buttons... let your imagination guide you!


About Kerrie
I am a mixed media sculptor working primary in clay. Though clay is my passion, at the core, I'm simply a maker, a builder, a creator. Making things makes me happy.


I make videos about making things and post them on my channel KerrieLeeArt on YouTube and on my website KerrieLee.com.

Thursday, March 24, 2016

Adding the Narrative with Creative Paperclay®

 As a narrative mixed media artist, I love the story telling elements that I can create with Creative Paperclay®. Most of my work starts out as abstract paintings until I start adding the narrative to it. This piece, Man on the Edge of a Big Decision, is one example. It takes so little to add a lot of impact.

SUPPLIES

Silicone mold
Creative Paperclay®
Stamp
I made my little man using a push mold made from a figurine and Creative Paperclay®. I prefer to clean up my edges when dry by using a dremel. However, you can trim the edges before it dries with an exacto knife.

Have fun with art & dream in color.

Darlene Olivia McElroy

Monday, March 21, 2016

Sandee's suggestions

Well, it's time for...what have you learned Sandee that another beginner might enjoy?

I have been learning and enjoying how flexible and forgiving Creative Paperclay really is. When I was working on my Book of Life canvas, I used a cookie cutter mold to make the bunny rabbit in ...which is when I ( by accident mind you ) discovered that Paperclay is quite flexible. 

Originally I made 2 rabbits from the mold ( just to make sure I had an extra in case I messed one up ) and when they both looked good enough to use I decided to stack them together to create some dimension and that's when I discovered I had pulled an ear slightly off when removing it from the mold.
 
(The bunny on the left has the "pulled ear" and I drew a line where the other ear goes so I would know where to put my glue, except I decided to stack them differently but you get the idea.)

But joy, joy, it looked great because that gave him a 3-D appearance!
( I love accidents, don't you?)

Next, I noticed that one of the feet had warped a little while it was drying and I love how wet glue just softens up the Paperclay enough so that you can clamp them together and it straightens itself out.

A little sanding and painting and he was ready to hop down the easter trail!

Hope everyone has a "hoppy" Easter!

Sunday, March 20, 2016

Altered Organizer Box With Creative Paperclay Accents

I am a completely organized/disorganized mess!  Right now it is what it is - and I look forward to a bit more in the future, where I will be able to spread out and have my own space to create in!  In between time, I am going to have some fun in getting READY for that day, and today's project...well, lets just say it will really look great in my imagined space I am planning for!


Supply list:
Creative Paperclay and Delight products
Box
3 cans
Paper
Border tape
Mod Podge
Glue gun
2 sheets paper
White paint

This is the type of project that needed a video, instead of directions on how to create it!  I am really happy with how it turned out, and can't wait to see what I end up making next using the same "recycled" products!  I have a few things I am working on, including a bulletin board with decorated push pins made out of Creative Paperclay, and a few gift items for special ladies for Mothers Day coming up


For the title - check out the video on my Memories in Tyme blog that will show you how to use scrapbook templates and the Creative Paperclay productAs for the inside - you can see how I have everything from scissors to my trimmer to paint brushes...all inside this box!  I might even have to make a few others to match this one!  


So many things I am working on - and now a really nice thing to put my creative supplies in!  I am starting to create again, so having a nice place to put my supplies in - is perfect for me!  I hope you have enjoyed this project, and I hope you share with me YOURS!  

Thanks for stopping by,
Lynda Jeffs
Creative Paperclay Design Team 2016  

Friday, March 18, 2016

Three Dimensional Dragonfly

This three dimensional dragonfly started as a flat slab of Creative Paperclay®.

I began by rolling out a ball of clay about 1/8" thick, and large enough to cover my embossing folder. I pressed the folder into the clay, leaving impressions on the clay slab.

Next, the pieces were put aside to dry. I've discovered that drying the clay on a kitchen cooling rack helps to reduce warping. Using a cooling rack allows the clay to dry on both the top and the bottom at the same time. This also eliminates the need to turn the clay.

When the slab and pieces were partially dry and still flexible, I cut out a second set of dragonfly wings, and used wide rubber bands to secure them in place around a jar until they were completely dry and firm.

When the slab was dry, I cut out the dragonfly shape using scissors. Any rough edges were buffed with an emery board and Sandits.

Next step was to paint the pieces. I began by sealing all the surfaces with PPA, an acrylic medium. When the sealing coat was dry, I layered several colors of mica powders mixed with PPA Gloss to achieve the luminous colors.

I used E6000 adhesive to attach the second set of wings to the front of the body and to attach a filament for hanging. I chose to use the filament rather than a jewelry bail, because when the dragonfly is hung I wanted it to appear to be hovering midair.


Carole

Tuesday, March 15, 2016

Tori's Tip - Dimensional Drawing


Hi, it's Tori again, still experimenting with and learning new things about Delight™ air dry modeling compound.  When I started on the Design Team more than a year ago, I had very little experience with this material, but I am finding new uses for it all the time.  My tip for this month is to try your hand at drawing on dry clay.  You may fall in love, though it takes a bit of getting used to.

As you can see in the work-in-progress flower drawing, the technique consists of layering the pencil(s) very gently at first, a little bit at a time, then varying the pressure to create a dimensional drawing.  Fill in larger areas with the a dull pencil tip or the side of the pencil.

I particularly love this for black and white doodles, using pencils of various hardness.  A kneaded eraser works well for making changes or correcting mistakes in the early stages, but of course won't restore the clay once it has been pressed firmly.  You can also use blending tools as in drawing on paper, but again, start with a light touch and apply pressure when you want to indent areas of the image.

Here is a close-up of the doodle in the picture - which I will probably use for a pendant at some point.  For now, I'm just having fun with the process and seeing how far I can take the medium.  I can foresee many uses such as scrapbook page embellishments, jewelry, decorative objects (because you can still draw on it even if it isn't flat!), etc.


Thanks for joining me here again!


I'd love for you to join me for more projects & art adventures on my personal blog
Find me on Facebook, or peruse & ponder pics with me on Pinterest


Monday, March 14, 2016

Kerrie's Tip: Paperclay Slurry

What is Paperclay slurry?
It is a mixture of Paperclay and water. 

Okay, so what can I do with it?
Lots! You can join two pieces of wet clay. You can use it to smooth imperfections in an already dry clay project. You can coat a piece of clay with slurry and make some really cool textures. You can put Paperclay slurry in a small bottle or syringe and draw designs on your project. You can use it like a glue to attach embellishments to clay.

Sounds cool! Where do I get it?
Great news! You can make your own Paperclay slurry with the dried scraps you have leftover from your other projects.


Really? Tell me how!
Okay!

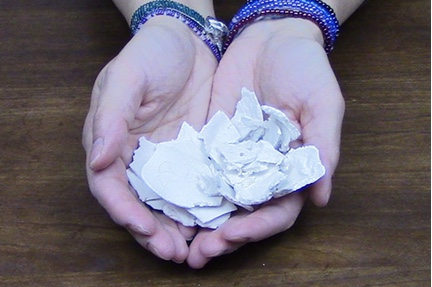
First, collect dried scraps of Paperclay. When I have Paperclay dust from sanding a project, I usually put this straight into my slurry container. Add the scraps to a large container with a lid and add water.


Close the container and store away. The water will break the Paperclay down in a liquid clay. After a few days, you can use the slurry right from the container. Or, once you've collected a lot of slurry, you can separate the smoother slurry from the lumpy slurry.

Using a sieve, strain the lumpy slurry into a separate container.


This is my smooth working slurry.


And this is my lumpy slurry where I store the scraps with water and wait for it to soften into a liquid.


Keep both jars closed tightly, and add more water as needed. 


How are you using Paperclay slurry in your projects?

--- 
About Kerrie
Dreamer. Dabbler. Noodler.

I am a mixed media sculptor working primarily in clay. Though clay is my passion, at the core, I'm simply a maker, a builder, a creator. Making things makes me happy.

I make videos about making things and post them on my channel Kerrie Lee:Dream Up on YouTube and on my website KerrieLee.com.