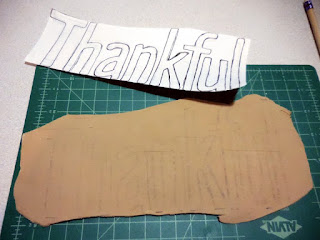
To make a "thanks giving" box like this one you will need:
a cigar-type box with clasp/closure
craft knife
Kraft paper or similar brown packing paper
Delight™ Air Dry Modeling Compound
sandpaper
acrylic paints; golden brown, spice tan, burnt umber & burnt sienna
gesso
white glue
corrugated cardboard
a paper cutter is helpful, but not necessary
brown marker or pencils
optional: stamp & ink
pattern
 |
| Click here for PDF pattern |
Start by removing the clasp hardware from the box, then measure and cut an opening 2 1/2" x 1/4" in the center front (what will now be the top of the box). Next cut one piece of corrugated cardboard to the outline of the pattern, place the cardboard on the front of the box and mark where you would like divisions for the paper slips and pens. Cut 5/8" strips of corrugated cardboard and glue to the box as shown, matching the height of your marks.
Test fit the front piece of cardboard, but don't glue it on yet.
Cover the front piece of cardboard with gesso and set aside to dry. While you're waiting for the glue and gesso to dry, prepare your brown paper strips. Cut the paper to various widths and lengths from about 1/2" x 2" to 1 1/2" x 3" When the glue and gesso are dry on the box and cardboard, apply paper strips to cover the entire box, and the inside of the cardboard piece, overlapping the top edge and leaving some of the strips on the section pieces sticking out as shown.
Glue front piece on and cover with more paper strips. Be careful when covering the panel on the back of the box to make sure that is doesn't get glued shut.
Draw or print the words you'd like to include and glue those to the box as well. To make the words I chose, I printed them out, then traced them onto the Kraft paper with a brown marker, then cut them out in strips and glued them to the box.
Mix paint with about 1/3 package of modeling compound to make a color closely resembling the color of your brown paper. In my case, it was mostly spice tan, with a little bit of burnt umber and burnt sienna, and golden brown mixed in.
Roll the clay out to approx. 1/8" thickness between 2 pieces of plastic wrap or plastic bag. To transfer the texture, place the bag on top of the box and roll slightly.
Cut off excess around clay, set the extra aside in an airtight container, and allow the clay to dry flat.
When the clay is dry, transfer the pattern and cut out lettering. Glue letters to the box front, sand edges and/or add more colored clay as necessary to fit them to the box.
I chose to fill in some of the areas between the words with a small decorative stamp and brown ink that matched the marker. Add some pens or pencils and some paper to the box sections and you're done!
Thank You for joining me again!
I'd love for you to join me for more projects & art adventures on my personal blog


1 comment:
Your blog provided us with valuable information to work with. Thanks a lot for sharing. Keep blogging.
designer wallpaper suppliers in india
Post a Comment