Friday, July 24, 2020

How to Make a Dr Plague Mask


Hello everyone, Cinnamon here and I am going to show you how I 
created this Dr Plague mask, obviously inspired by current events.


Materials: Creative Paperclay®, cling wrap, masking tape, Exacto
Knife, Sand paper, E600 Craft Glue, Acrylic paint, Sealer, Varnish


I made a mold of this doll's head a while back and created a series of 
ornaments with it. I sculpted on top of the ornament version of my 
doll in this case since the head is the same. As long as you cover 
your piece with cling wrap, you can sculpt a mask on top of whatever 
you would like to customize. I took the easy way out since I normally 
man handle my work.


Take your cling wrap and wrap it as tight as you can over the 
surface of your piece so that you can get a good fit for your mask. 
Tape it in place in the back so that it is nice and snug.


Add your first layer of clay on top of the cling wrap. At this stage, 
worry about the basic shape of the mask and not the details. 


If you plan to have the eyes out for your mask, press into where the eyes of 
your face is to expose them while the clay is still moist. It took me a few tries 
to find them, but keep pressing and shaping the clay around them in this stage.


After you are happy with the shape of the eye cutouts you can start to build
up the nose here. I wanted to build the nose of the mask gradually, so I started
it out pretty small with intentions of adding more after it dries. When the clay starts
to dry while you are still trying to work with it, just dab it with water as I did here.


If you plan to add string to the sides of the mask to tie it onto your piece,
add the holes to it while the clay is still moist. It is a lot harder to add 
them after it dries, you will risk breaking the mask in the process.


Sit the mask out to dry. The top of the mask will dry but the bottom 
layer that is sitting on top of the cling wrap will take longer to dry. 


When the mask is completely dry, try it on your piece to check the fit. 
If it is too big, you can add a little more on the inside of the mask and
sand it away as needed. In this case the mask shrunk a little while
drying, so I had to sand a bit of it off to get a good fit on the doll's face.


I went back to revisit the nose, it's much easier to work on top of
dry paperclay when you are adding to your work. Just add a few
drops of water to the dry clay to attach the new clay to it.


I added a little definition to the eye sockets on the mask using the
same method as I did for the nose. 


Set the mask aside and allow the new layer to dry. Once it dries
you can rework it as much as you like. At this stage I decided to
finish it off by sanding it smooth. I used a mix of rough sand paper
to sand down the rough parts and fine grit sand paper to get 
the piece nice and smooth. I left a little bit of grit on the piece so 
that it didn't look perfectly smooth. I wanted it to look a little worn.


Use your paint and varnish at this point and you're done. The fit for this
mask was snug enough for me to just snap it on to the doll, rare for me!


Thank you all once again for stopping by, and I hope that you 
enjoyed today's tutorial! You can find Creative Paperclay® at 
the following retailers Creative Paperclay® Online Store,

See more of my work at Melandolly.com and be
sure to catch updates on my Instagram page


Friday, July 17, 2020

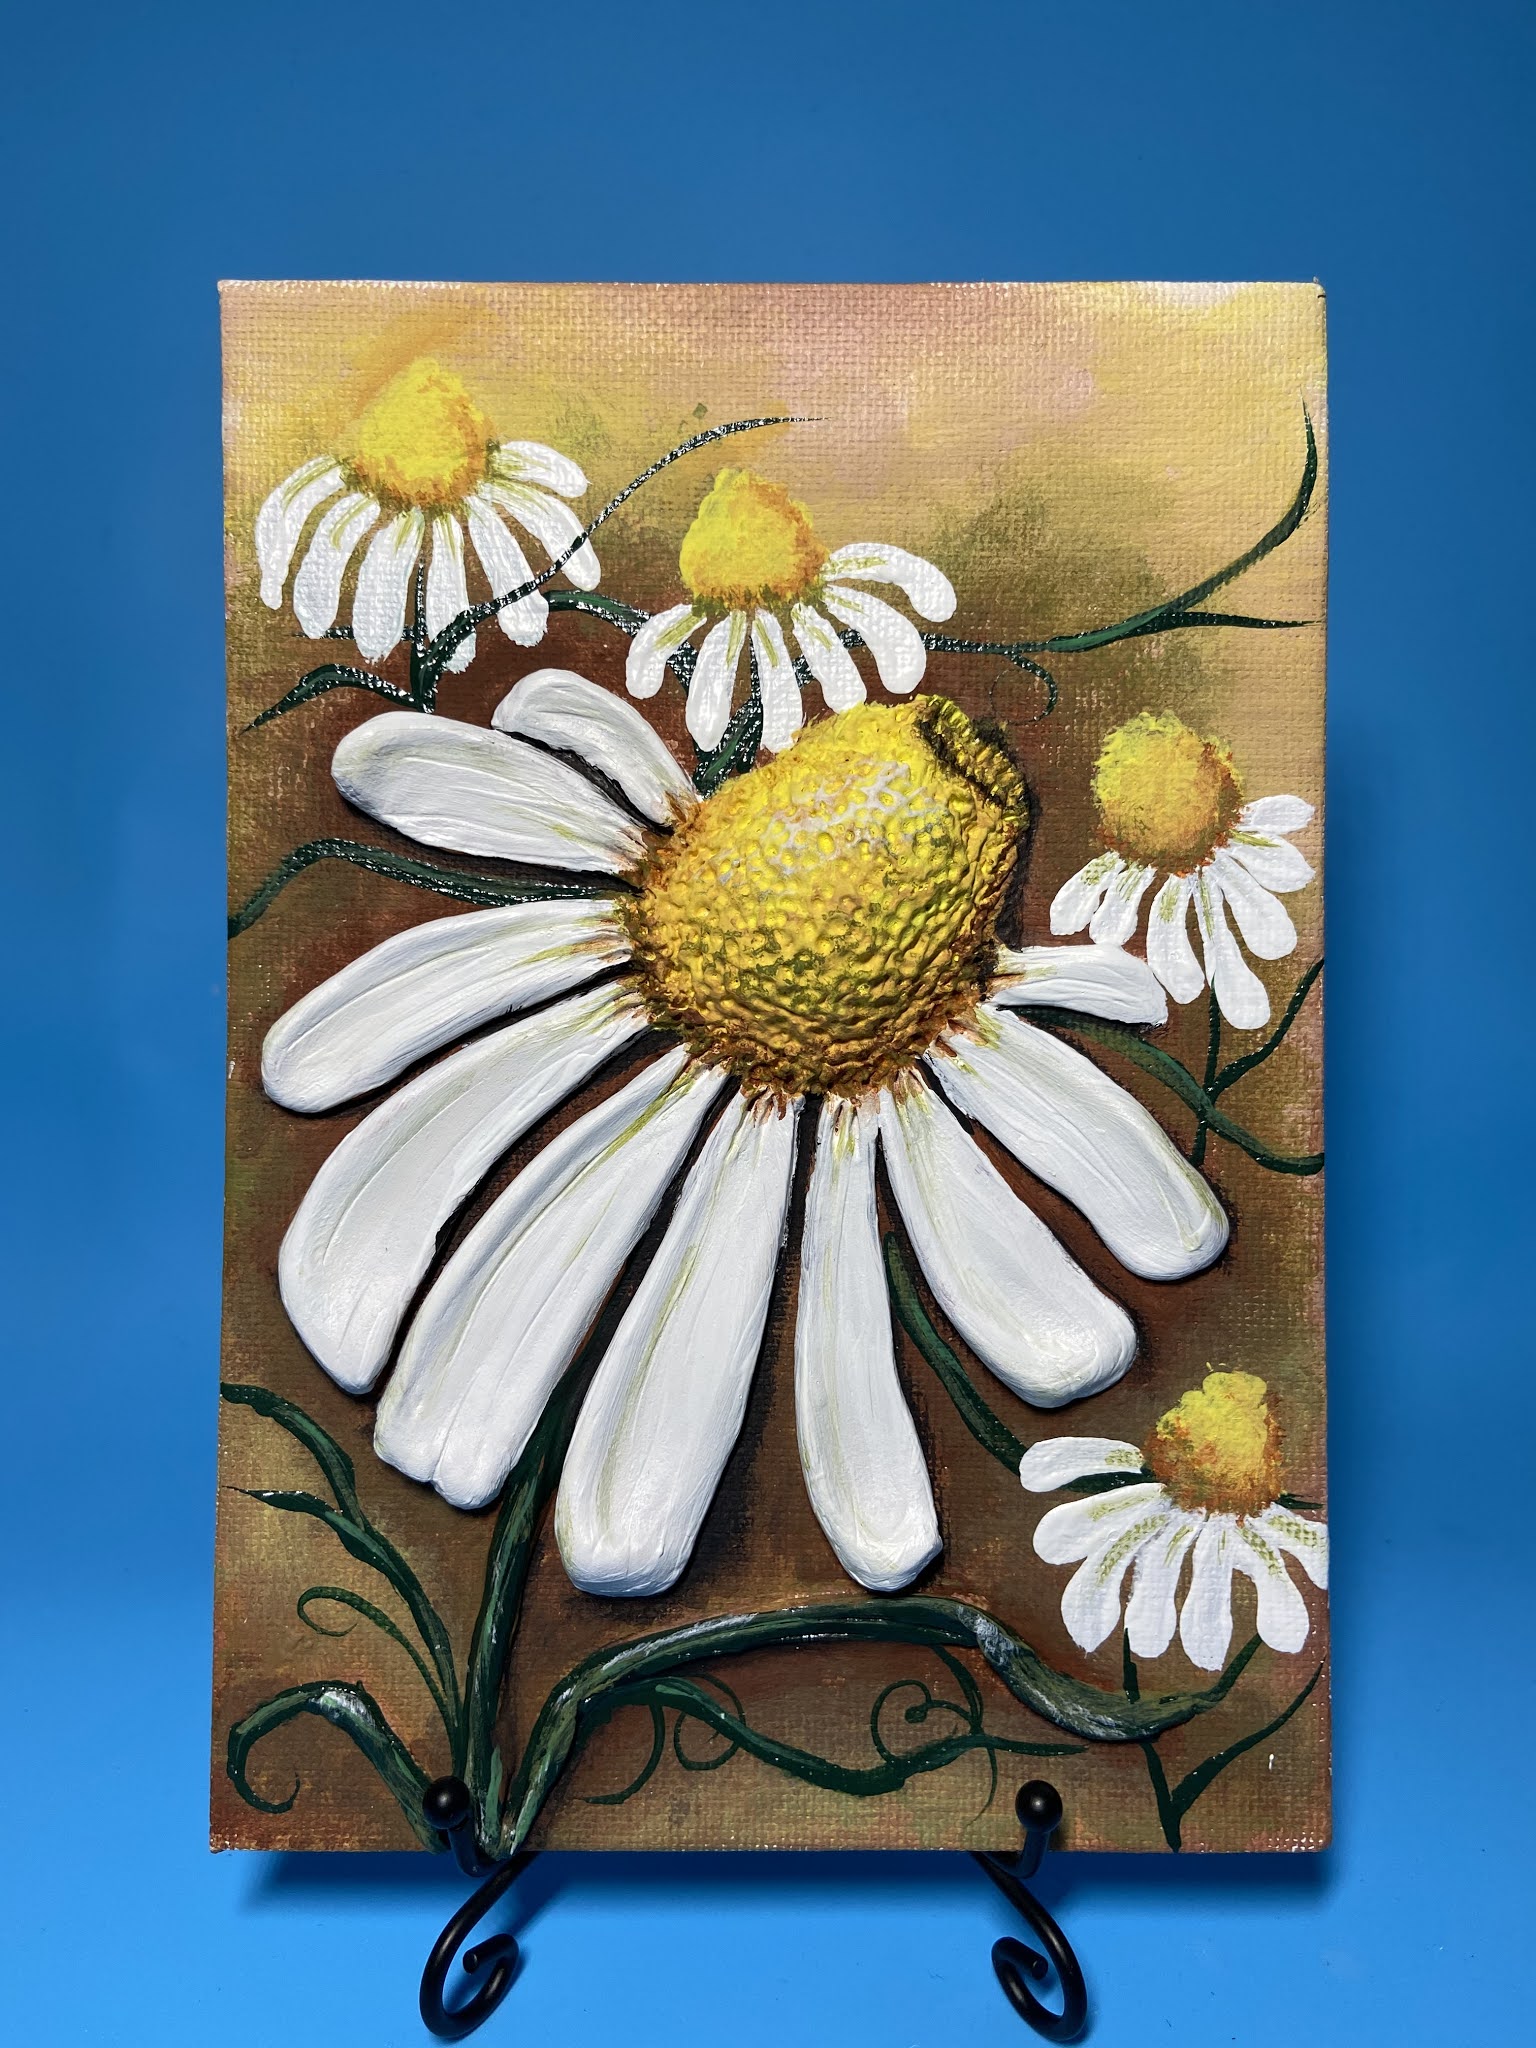
Chamomile 2D Sculpt Part 1


Here's a quick and easy little project with Creative Paperclay®


Hi everyone, it's Susie from Art by Susie K with a fun quick little project that you can build off of.
I just did a kitchen redo and medicinal plants are my latest inspiration for my space. I want to add some healing herbs and flowers as part of my decor. Bringing the herb garden inside.

Part One is all about the sculpt. Part two will post on Saturday to show the painting process.

Supplies: Mini canvas board (I found a great stash at the Dollar Store!) Creative Paperclay® Water Clay tools Pencil to sketch your herb/flower Acrylic Paints to finish


Part 1 - The Sculpt


Part 2 - The Painting


Let me know if you like having the video to watch or would rather have pictures posted here with the step by step. What works best for you?


**TIPS*** Before you apply clay, dampen but don't over saturate the surface are you are working on. If too much water is used, your clay will have a hard time sticking and your board could warp. The next day after drying, the clay was firmly stuck to the board no glue needed.


Feel free to comment or contact me with any questions or additional tips. I would love to see your ideas and what you come up with.


EMAIL:  ArtbySusieK@gmail.com
Facebook and Instagram accounts:

o    @artbysusiek For Peculiar and Halloween

o     @WillowHollowWoods  for Earthy Characters and Magick

o     @FloorArtbySusieK  Art for your floors and other home décor

WEBSITE: https://artbysusiek.com

Sign up for my Creative Breakfast Club 🎨 for exclusive offers and updates on website
ETSY: www.artbysusiek.etsy.com
PINTEREST: https://www.pinterest.com/susiewhc/
CREATIVE PAPERCLAY® Design Team Member https://creativepaperclay.blogspot.com


Monday, July 6, 2020

A Whimsical Snail

Did you miss Clay Talk last week Thursday? We made a cute whimsical snail!


Isn't he adorable? I used Delight Clay™ to make it. I pre-colored the clay with Pearl Ex Powders and added a few highlights when it was dry. If you don't have Pearl Ex, not to worry. I also went over what else you could use.

Here is is in my garden.


And here is the video showing you how to make him.


For those of you who don't know, Clay Talk airs on the first Thursday of every month at 8pm EST/5PM PST on Facebook Live. Here is the link to the Creative Paperclay Modeling Material Page where the show is hosted. I usually host the show but sometimes another fabulous design team member fills in for me. Don't forget to mark your calendars!

Thank you so much for stopping by! You can share your creations with us on our Facebook page. We would love to see them! For more inspiration have a look around the blog. There are tutorials for many levels using Creative Paperclay®. You can also visit my blog https://suzettehussey.com/blog/


You can find Creative Paperclay® online at Creative Paperclay Co and also at MichaelsHobby LobbyDickblick, and Amazon. 

Thanks for stopping by!

Suzette

Skillshare: https://skl.sh/2QyIn93

Friday, July 3, 2020

July 2020 First Friday Fan Day


Need some inspiration for your next Creative Paperclay® project? Check out what folks are making with Creative Paperclay™.


Plaited Planter
Funny Face Planter/Bowls
Clay Mushrooms
Hanging Flower Vases
Sculpt Planter without a Kiln
Fairy Garden Mushroom Gnomes
Bird Brooch
Kid's Project: Clay Puppets

HELP US FIND YOU!!
  1. Use the hashtag #CreativePaperclay on all your social networks.
  2. When using Facebook, be sure the your posts and images using the #Creative Paperclay hashtag are set to public, otherwise we won't be able to find you.
  3. Share your projects on the Creative PaperClay® Facebook page.
I'm always trolling the web, looking for great Creative Paperclay® projects. If you find something, post it on our Facebook page.

GOT QUESTIONS???

Find the answers to your paperclay questions. See what other folks are creating. Stop by our Facebook group and say, "Hi!" Creative Paperclay Q&A
Carole

Friday, June 26, 2020

Learning From Our Past, Creating a Sankofa Bird Sculpture


Hello everyone, Cinnamon here and I am going to show you how
I created this piece. The “Sankofa” is a symbol used by the Akan people
of Ghana, which translates to "Go back and get it". It's depicted as a
bird with its head turned backward taking an egg from its back. It is
 the importance of going back to our roots to learn from our past so
 that we can achieve our full potential as we move forward in the future. 

Materials: Creative Paperclay®,Wire 16 guage, Masking tape, Exacto 
Knife, Sand paper, E600 Craft Glue, Acrylic paint, Sealer, Varnish


Begin by shaping out the frame for the piece which would be the armature. 
This gives the piece a  solid structure to be able to build on top of.


When you are done with the wire portion of the armature, you 
can begin to bulk it out with either masking tape or aluminum foil. 
I use masking tape because I always have an issue getting clay 
to stick the foil. Use what ever you feel comfortable with.


Here I am putting the first layer of paperclay. I always have a
rough start with the first layer so I'm not looking for detail at this 
stage. Set it aside and allow to dry for roughly 24 hours.


After the piece dries, go on to working up the second layer. On this
 layer you want to smooth the clay out while you work so that you'll 
have less sanding to do after it dries. It helps to smooth a drop of water 
on while the clay is still moist to get some of the wrinkles out.


After setting the piece out to dry again, it is time to sand it smooth. 
I am using an 800 grit sheet of sand paper to get it nice and smooth.


This is a reference photo that I made of the Sankofa bird. I wanted to add
 my own twist to it and not necessarily copy one that someone else created. 
The first one is a popular one that is often used and the other ones I drew 
myself in illustrator. I took pieces from the first and gradually made 
changes to it in each version that followed.


I added a bump to the bird's neck so that it would establish the head of the bird.


I had a few details to work out with the the tail feathers so I used some
 of this product that was sent to me to try out from Creative Paperclay®. 
I don't know what it's called but the texture is a little thicker then modeling
 paste and it dries really hard. I was able to mush it into those hard to 
reach places in between the feathers without disturbing them. When it dries,
 it is just as sandable as the paperclay. I wish I could tell you what it is!


Here I am just painting the piece black so that it could look like 
some of the African wood sculptures that I have in my collection.


I decided to paint the egg gold since it represents knowledge
 and knowledge is golden. I just stuck a small sewing needle into
 the egg so that it would be easier for me to paint it. You can do 
what ever works best for you.


I decided to lay the egg on the back of the bird instead of putting
 it into it's mouth like I originally planned. You can use glue to
 put it in place, I just used Aleene's Tacky glue.

Thank you all once again for stopping by, and I hope that you 
enjoyed today's tutorial! You can find Creative Paperclay® at 
the following retailers Creative Paperclay® Online Store,

See more of my work at Melandolly.com and be
sure to catch updates on my Instagram page


Saturday, June 6, 2020

June 2020 First Friday Fan Day


Need some inspiration for your next Creative Paperclay® project? Check out what folks are making with Creative Paperclay™.


Miniature Village
Rustic Clay Tags
Clay and Driftwood Spoons
Chandelier Mobile
Clay Birdhouse

Trinket Box
Yarn Bowl
Magnets: Kid-friendly Project
Gift Boxes

HELP US FIND YOU!!
  1. Use the hashtag #CreativePaperclay on all your social networks.
  2. When using Facebook, be sure the your posts and images using the #Creative Paperclay hashtag are set to public, otherwise we won't be able to find you.
  3. Share your projects on the Creative PaperClay® Facebook page.
I'm always trolling the web, looking for great Creative Paperclay® projects. If you find something, post it on our Facebook page.

GOT QUESTIONS???

Find the answers to your paperclay questions. See what other folks are creating. Stop by our Facebook group and say, "Hi!" Creative Paperclay Q&A
Carole

Monday, June 1, 2020

A Coral Canvas

Hello and welcome to another tutorial. Summer is in the air so I decided to do a lovely mixed media piece using corals and shells that I had made in previous tutorials here on the Creative Paperclay blog. I have linked both lessons for you below.


Isn't that amazing?

To see how I made the corals go here. 

To see how I made the seashells go here. 


The supplies I used in this canvas are below:


  • Corals made from Creative Paperclay and Delight Clay
  • Seashells made from Delight Clay
  • Art Anthology Shine Dimensional Medium - Kelly and Canary
  • Art Anthology Velvet Dimensional Medium  - Marigold and Gecko 
  • Sorbet Dimensional Paint  - Carnation and Flamingo 
  • Spray Varnish
  • 5.5” x 12” canvas
  • Folk art  Acrylics  - Blue Cayman,  Turquoise, 
  • Apple Barrel Acrylics - AB Bimini Blue,  yellow flame and white
  • Gel medium
  • Sand
  • Crushed eggshells 
Follow along in the video below:


I do hope you enjoyed this tutorial. You can share your creations with us on our Facebook page. We would love to see them! For more inspiration have a look around the blog. There are tutorials for many levels using Creative Paperclay®. You can also visit my blog https://suzettehussey.com/blog/

You can find Creative Paperclay® online at Creative Paperclay Co and also at Michaels, Hobby Lobby, Dickblick and Amazon. 

Thanks for stopping by!

Suzette