
You may have noticed our team was challenged this month to use Creative Paperclay® with Viva Las Vegastamps! I love rubber stamping so this was a fun challenge for me.

Here is the Christmas tree I created using both Creative Paperclay® and Viva Las Vegastamps! The stamps I used are from the Swirl Plate #1333!


I gathered my supplies (see list below). The base of my tree is a Styrofoam cone. To plan the sizes I needed I precut paper into three layers for the size of cone I was using. Using straight pins to help, I pinned each player to the cone. Make sure to have a little extra length on the top layer to create the point at the top.


I roll my clay out on transparencies, this way I can leave them on the sheet and move them around easily. The Creative Paperclay® was rolled between spacers, about 1/8th of an inch thick and cut to a 4-1/2 inch strip for the bottom of the tree (depends on the layer working on). Then carefully stamped with swirls over and over until the piece of clay is filled with swirls. Then cut the clay into strips. There are: eleven 4-1/2 x 1-1/2, nine 4 x 1 and seven 3 x 1, finally on angel. Set aside the clay to dry, usually 24 hours, maybe more depending on humidity.


While waiting for the clay to dry give the Styrofoam cone a quick coat of paint. Once all the clay pieces have dried paint each one green. Set aside to dry.


After the first coat of paint is dry cover with gold paint be sure to get it in all the crevasses, then wipe the excess with a rag or paper towel. Set aside to dry.


Now liberally apply tacky glue to the back of each strip of Creative Paperclay® attach to the Styrofoam cone, overlapping the strips and holding in place with straight pins. When you get to the top layer you will need to trim the top so the strips are tapered. Use a rubber band or twist tie to hold the top together at a point. Add the angel, cover with gold Stickles. Allow to dry overnight or longer.
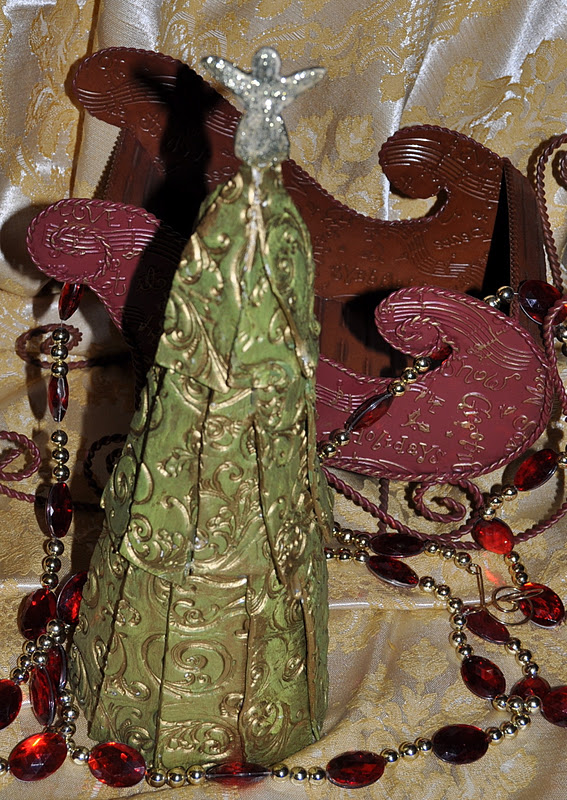
Touch up an edges that may be exposed with gold paint. Now you are ready to add your tree to your holiday decor.

Supplies:
Styrofoam cone - 10 inch
Roller
Transparencies
Craft Paint - green and gold
Paint Brush
Tacky Glue
Ruler
Paper to create demo
Angel Cookie cutter
Straight pins
Stickles for Angel - Gold

Visit me at Dreaming of Castles!
Here is
wishing you and yours a
VERY MERRY CHRISTMAS!
Lyneen
4 comments:
Wonderfully done!
Beautiful tree! Great job on your project.
Hugs XX
Barbara
This tree is just fantastic!
Very cool, Lyneen!
Post a Comment