
By Amanda Marks

Halloween is just around the corner meaning I need to start making some Halloween items. I have been concentrating on Christmas that I completely forgot about my favorite time of year. Since I am on the Paperclay Design Team and part of my job as a design team member is to experiment with new methods of using clay. I decided to add paint to my clay and see how it would work. I have done in the past a similar technique with porcelain clay and dry pigments but I had never tried it with liquid paint. I was concerned that the paint would make the clay mushy and unusable but it did not.
 Materials:
Creative Paperclay
Balloon
Pencil or Dowel
Fondant Roller (Rolling Pin)
Sculpting Tool
Acrylic Paint (I used PLAID Apple Barrel Apricot #20764*)
*I went with a lighter color because it is easier to make something darker than to lighten it up.

1. I took a piece of clay and flatten it out and added a little paint. Taking the clay and kneading it to make the paint mix thoroughly throughout the clay. This is a messy job your hands will be whatever color you decide to use.


2. Once the clay is an even color you are ready to roll the clay out. Using my fondant roller I rolled out an even piece of clay.

3. Then wrap the clay around the balloon and smooth out the edges.

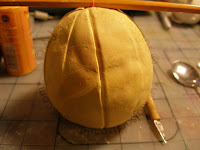
4. Add lines with a sculpting tool. Taking water smooth out the lines to make the lines more refined. Once the pumpkin is to your liking sit it standing up (you may have to gently push on the pumpkin to flatten the bottom) and let dry for 8-12 hours (it has to be dry enough to pop the balloon and not have it collapse onto itself).

5. Once dry to the touch pop the balloon and let the pumpkin dry.

6. Sand the pumpkin to make it smooth. Remember if you want your pumpkin more realistic you will not need a lot of sanding. Brush with a soft bristle brush to dust the pumpkin to prepare it for painting.


 The stem was a lump of clay that I pushed onto the pumpkin and created lines with a sculpting tool.


I took a small piece of Paperclay and wrapped it around a sculpting tool and added the vines with a little water.
7. Add the stem and vines to the top of the pumpkin (see above for step by step). Let dry for 24 hours.


I painted the lines on the pumpkin with Orange Apple Barrel # 20561 to help give the illusion of depth. I then too the Apricot that I used earlier and applied it over the orange. Making the pumpkin look more natural.

 For the stem I took Hunter Green Apple Barrel #20754 as a base. I dry brushed Fresh Foliage Folk Art #954 and some Raw Sienna on to the stem.
8. Paint (see above for a step by step) and seal pumpkin with your favorite sealant.
**Please note I did not purchase the Paperclay - I am on the Design Team and it was given to me. All the other supplies I purchased.

Halloween is just around the corner meaning I need to start making some Halloween items. I have been concentrating on Christmas that I completely forgot about my favorite time of year. Since I am on the Paperclay Design Team and part of my job as a design team member is to experiment with new methods of using clay. I decided to add paint to my clay and see how it would work. I have done in the past a similar technique with porcelain clay and dry pigments but I had never tried it with liquid paint. I was concerned that the paint would make the clay mushy and unusable but it did not.

Creative Paperclay
Balloon
Pencil or Dowel
Fondant Roller (Rolling Pin)
Sculpting Tool
Acrylic Paint (I used PLAID Apple Barrel Apricot #20764*)
*I went with a lighter color because it is easier to make something darker than to lighten it up.

1. I took a piece of clay and flatten it out and added a little paint. Taking the clay and kneading it to make the paint mix thoroughly throughout the clay. This is a messy job your hands will be whatever color you decide to use.


2. Once the clay is an even color you are ready to roll the clay out. Using my fondant roller I rolled out an even piece of clay.

3. Then wrap the clay around the balloon and smooth out the edges.


4. Add lines with a sculpting tool. Taking water smooth out the lines to make the lines more refined. Once the pumpkin is to your liking sit it standing up (you may have to gently push on the pumpkin to flatten the bottom) and let dry for 8-12 hours (it has to be dry enough to pop the balloon and not have it collapse onto itself).

5. Once dry to the touch pop the balloon and let the pumpkin dry.

6. Sand the pumpkin to make it smooth. Remember if you want your pumpkin more realistic you will not need a lot of sanding. Brush with a soft bristle brush to dust the pumpkin to prepare it for painting.


I took a small piece of Paperclay and wrapped it around a sculpting tool and added the vines with a little water.
7. Add the stem and vines to the top of the pumpkin (see above for step by step). Let dry for 24 hours.


I painted the lines on the pumpkin with Orange Apple Barrel # 20561 to help give the illusion of depth. I then too the Apricot that I used earlier and applied it over the orange. Making the pumpkin look more natural.


8. Paint (see above for a step by step) and seal pumpkin with your favorite sealant.
 |
| Top of pumpkin |
 |
| Side of Pumpkin |
 |
| Other Side of Pumpkin |
**Please note I did not purchase the Paperclay - I am on the Design Team and it was given to me. All the other supplies I purchased.
3 comments:
I tried to leave a comment on your post last night Amanda but I don't think I ever got it to go thru. I love your little pumpkin! And your tutorials just get better and better. WooooooooooOOOOOOOOOoooooooOO!
Hugs XX
Barbara
Can you cut a hole in the pumpkin to make it into a votive candle holder?
This is absolutely awesome. You are so creative. I just love seeing what you will come up with next.
Hugs
Brenda
I would be honored if you came to see my blog here
Post a Comment