Tuesday, December 27, 2016

Figure Sculpting with Creative Paperclay (part 3 of 3)

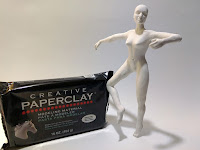
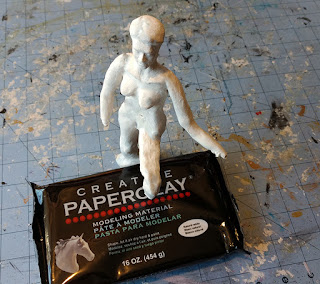
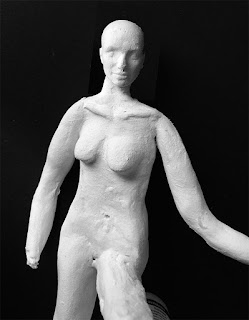
kevin whitham ballerina sculpture

air dry clay sculpting You can read part one here and you can find part two here.


By the time I reached this point in the sculpture, I had changed the figure's arm and leg positions several times.

If your clay is not completely dry when you decide to change a pose, you can just bend the clay to the new position and  smooth out the surface cracks. 

If your piece has fully dried, which mine had, then you have to break it at the joint, re-position the arm or leg and then use fresh clay to cement it back together.

 It sounds worse than it is and only takes a couple of minutes. 

 My original idea was for a figure climbing a hill, but as it progressed, I pictured a dancer on the edge of a knife.
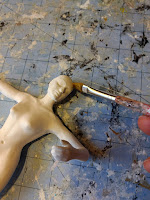
creating art with new materials Once you decide on your final pose (and, of course, you can always change it again) you can add the final details to the face, hair, hands, feet, muscles, shoulder blades, etc. 

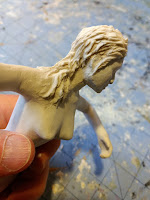
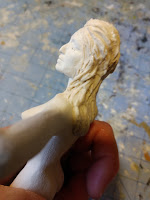
 I thought it would be fun to show how I like to work on hair.

With every detail I follow the same procedure, which is to add a small bit of clay, carve in the detail, look at it closely from every angle and make adjustments. 

Often, the part I'm working on looks perfect from one angle and completely screwy from another angle.

If I can work on it, by making adjustments, so that it looks good from most angles, then I'm satisfied.

To get fresh clay to stick to dry clay, brush on a little water.

For adding hair, I take a bit of clay and squish it to about the thickness I would imagine my figure's hair would be.  Add a bit of water to the figure's head and press on the clay.

For shaping, I mainly use silicone-tipped shapers (these are usually called color shapers).  These tools work beautifully for carving fine details in paper clay.  The silicone tip doesn't stick much to the clay. 

I usually have a clump of fresh paper clay on my work table.  If I'm working on fine details and the clay sticks to the silicone tip, I just dip it in water and wipe off the excess clay onto the clump of fresh clay.

figure sculpting detailsadding details to figuressculpting with silicone color shapers


 When carving fresh clay, if it is too firm, add a little more water.  I just brush some across it with a watercolor brush.

 The consistency of the clay I want to use for details is soft enough to carve with a slight resistance against the tool I'm using.

 Once I am happy with that part of the hair, I add a new piece of clay and continue working around the figure's head, adding small bits of clay and shaping them.  I don't know a lot about hair styles, so I just go with what I feel like doing.


side view detail sculpting hairfront view of ballerina figureclose up of sculpture hair details


If you add too much water, the clay will become too soft so that every touch of your tool results in digging into the clay too deeply and blowing out the details.  I guess this could be used for a special effect.


sculpting details on 1/8 scale figureworking with creative paper clayair dry clay tutorial human figure


If there is one thing that I have had to develop as a sculptor, it is to have more patience.  Building up small details over several days and making adjustments is not something that sounds appealing to me, however, I have found that I really enjoy the process and it has helped me find patience in other situations.


close up details of ballerina figureballerina profile final stages ballerina figure showing hair detail


After taking pictures of this figure, I am not completely satisfied with her hair and I'm thinking of making it longer and more flowing.  Using paper clay makes it very easy to add more hair later to the existing sculpture.


ballerina on knife edgecardboard creative paper clay and paintballerina dancing on kitchen knife edge

For me, the final bit of a figure is to create an environment that adds interest or reflects an idea about the figure.   For this piece, I created a knife from a cardboard cutout that I covered with a smooth layer of paper clay and painted.  I like the contrast between the knife (which looks dangerous to me) and the lyrical dancer.


link to kevin whitham saatchi art online


You can visit me on Facebook.

Simplicity of Nature in Clay

I like to have a personal touch on any gift that I give. One easy way to create personalized hang tags with Creative Paperclay® using nature as my stamp. These were given to a friend who has a passion for anything blue. I used these as hang tags but they could be converted to wrap around a napkin or hang from a window/

SUPPLIES
Creative Paperclay®
Blue acrylic paint
Raffia
Leaves & flowers
Brayer


I started with two wads of clay that I had flatten. I placed the flower and pine needles on top of the clay then brayered them flat.


This is how they looked when I pulled the flower and needles off the clay.


I placed a glass over the clay making the circle cutout and then made little holes for the raffia.

After removing the clay outside of the round shape, I smoothed the edges of the circle shape with a little water on my fingers.

I like simple things that have multiple uses. Plus this is a kid's perfect project.

Dream in Color.

Darlene Oliva McElroy

Tuesday, December 20, 2016

Tori's Tip - Cookie Decorating Fun for Kids of All Ages


For my tip this month I'm reminding you that Delight™ Air Dry Modeling Compound retains color well when mixed with acrylic paint, it is very light weight, and can be easily rolled out and cut with cookie cutters!

For a fun way to make ornaments,  mix up a batch of gingerbread or cookie dough colored clay, cut out shapes with cookie cutters and allow the pieces to dry.  When the clay pieces are dry, decorate them with puffy "shiny"fabric paints to create the look of icing.

This will be my last post of the year, so I'll wish all of you a HAPPY NEW YEAR! - looking forward to the new year ahead and creating more projects with Creative Paperclay® and Delight™


Thanks for joining me here again!  As always, play, experiment, and have fun!

Tori
Find me on Facebook, or peruse & ponder pics with me on Pinterest

Monday, December 19, 2016

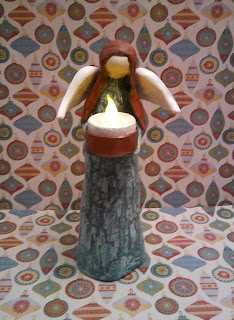
Holiday Angel Tealight Candle Holder

Hi!


 For my last project of 2016 I thought I would try using modeling metal mesh with paperclay.

I wanted to create a holiday candle holder. I don't have any angels, and I decided it would be fun to have my first one be one that I designed and created myself.


If you would like to create one yourself here is what you will need:

 Materials
Creative Paperclay®
Metal mesh
Container of water
Damp paper towels
Clay shaping and rolling tools
Sanding tools
Wing mold
Cardboard
Hot glue and gun
Acrylic paint
Gesso
Matt varnish
Weather wood paint product
Crackle paint
Antiquing paint
Glamour Dust
Paint brushes
Tea light

Instructions 

1. Cut a gumdrop shape of wire mesh.
2. Roll it to form a cone shape.


3. Roll out a thin sheet of paperclay.
4. Place the cone on the clay and roll it onto the form.


5. Roll a ball for the head and two tubular shapes for the arms.

6. Attach the head and the arms to the body form.

7. Roll out a small flat piece for the tray.

8. Attach the tray to the arms using more clay so that the tray, the arms, and body form one piece. (see image below)


9. Roll out several strips of clay for hair and lay it on the head. Let it drape over the arms and attach at the ends. Separate the hair in the back leaving room for the wings to attach to the body.


10.Use a wing mold or cutter and create the wings.

11. Trace the bottom of the tealight in the clay. Cut out the circle and a small strip to wrap around the circle to form a cup.

12. Set everything aside to dry.( Because parts of the angel might collapse during drying I suggest making cardboard props.)

 11. When the pieces are 50% dry, remove the cardboard and finish drying them in a 250 degree oven. Time will vary. When your piece appears white they are ready to remove. Let cool. Caution: Pieces may be hot.

12. Sand down all your pieces. Wipe down with a damp paper towel to remove any sanding dust.

13. Apply a coat of gesso to all of the pieces.

14. Paint the candle holder and wings. While the wings are still wet, sprinkle Glamour dust on the them. 


 15. Paint the angel hair brown, and the body with a cream colored acrylic paint. (I used titan buff).

16. Paint the body ( not the face) and tray with weathered wood and let dry.

17. Apply a coat of crackle paint.


18. Apply a coat of antiquing paint on the body and the tray. When dry, wipe off the excess with a damp paper towel until you have reached the desired effect.


19. Apply a coat of matt varnish on all of the pieces.

20. Attach the wings to the back and the candle cup to the tray using hot glue.


The wire mesh was really helpful in this project. I will be using it again.

I hope this tutorial helped inspire you to to make a one of a kind, handmade by you, holiday candle holder.

Happy creating,
Shari

Tuesday, December 13, 2016

Lost & Found Drama with Creative Paperclay®

Mixed media artists and their friends are scavengers. A friend found a bunch of frames in the trash. They were good condition and ready to become an art project and what could be better for a mixed media painting but a mixed media frame. Easy, breezy, beautiful.

SUPPLIES

Creative Paperclay®
Stamps
Texture plates
Gold paint
Red oxide paint


Started by applying Creative Paperclay® to the frame by hand then brayering it flat before adding texture. I worked in sections.


Added final details.


The Holbien mat gold matched the frame perfectly. I could have left the frame painted gold but ....


I ended up apply a wash of red oxide paint. A wash is paint diluted with water. This wash sank into the recessed areas giving the frame's texture depth.

Dream in Color!

Darlene Olivia McElroy

Wednesday, December 7, 2016

Figure Sculpting with Creative Paperclay (part 2 of 3)


You can read part 1 here.


creative paper clay tutorial figure sculpting
In this part, we will add a second layer of paper clay, which will bring together all of the elements of our figure.


The first part was making the armature and preparing it for sculpting.  In this step, we want to start adding detail, showing musculature, bone structure, etc.


Once the first layer of clay is dry, we can start adding a second layer of clay.  I know that adding thin layers takes a lot of time, because you have to wait for each layer to dry.


air dry clay figureIf you are impatient, like me, you can invest in a basic food dehydrator, which will dry your pieces in minutes instead of hours.   A cheaper alternative is to use a fan, but it does not work as fast.


This is the time to consult anatomical reference material.  Try to find photos from different angles to get a clear picture of the details you want to add to your figure.  Any internet search along these lines will yield more images than you could possibly want.

If you want free e-books of art reference materials, you can find a bunch here.

using creative paper clay to make figurines
It is easy at this point to get caught up in trying to show every muscle and bone, but if you look in the mirror, you will see that many of them don't show (unless you are a weightlifter or something).

Also, feel free to show humans with all of their imperfections.  The ancient Greeks liked to show perfect human bodies, but most of us didn't turn out like that.  It's good to show figures that are overweight, aged, damaged or even part mythical beast. 

making human figures with paper clay
While the glue and first layer of clay added strength to the paper craft armature, I find that is is still a bit wimpy for piling on lots of clay for the second layer.  Often, what I do is work on the second layer of the back, let it dry at least partially, then work on the second layer of the front.  In this way, the added weight of the wet clay doesn't deform the armature.


creative paper clay over a cardstock armature  Adding the second layer of clay will not only give strength to your figure, but should reveal to you what direction you want to take.  Often, artists like to sketch how they want their finished piece to look, but I like to wing it.  It's more fun and often reveals new directions that I otherwise might not have considered.


You can make all the "mistakes" you want, but you can't ruin your finished piece, because you can always make changes.  With that in mind, remember these basic concepts.


If you are working on part of a piece, and you get that part of it perfect, but another part looks weird, let it dry first.   You can always go back and rework the weird part, but if you keep working on it to get the entire piece just right, you'll end up messing up the perfect part.


the secret winged creature and womanWith paper clay, it is much easier to add to a sculpture than it is to take away.  A good approach is to build up the clay to the shape you want and let it dry.  Then, go back to finalize the texture and finish.  It is okay to repeat this process multiple times until you get your desired effect.


Work on several figures at a time.  While one is drying, you can work on part of another.


In part 3, we will add a final layer of clay and put in details and also look more closely at sculpting hair.


Click here to go to part 3.


link to kevin whitham saatchi art online


You can visit me on Facebook.

Tuesday, December 6, 2016

Holiday Spinners


The year has gone by so quickly!  I am getting ready to celebrate the holidays and so happy to be back in Arizona where I belong.  Don't have my tree up yet but decided to try making some ornaments to hang in the windows or wherever they seem to fit.

If you'd like to try creating some of your own, you will need -
Delight™ air dry modeling compound
pattern
scrap piece of board or cardboard, about 4" x 8"
acrylic paints
a fishing swivel
plain paper
white glue
rolling pin
plastic wrap
masking tape
pliers
monofilament or thread
round toothpick
craft knife
decorative bead or beads, as desired

Here is the pattern I designed for this project:
if you click on the image it should take you to a page where you can print it.


Print the pattern, but out the semicircular shape with the tabs.  Use the guide at the edge to mark 2 pairs of parallel lines onto cardboard, then mark line perpendicular to those at approximately 2" intervals, as shown.


Roll clay out to 1/16" thickness.  place circular pattern cutout lightly on clay and trace around it with a craft knife.  Gently lift out the cut out piece and place it onto the cardboard, aligning the top tab with the top line as shown.  Press the tab portion onto the cardboard just enough to make it stick, then add a piece of tape to hold it in place.


Now carefully lift up the bottom edge and turn it to the other side, creating a twist in the piece.  Align it with the marks on the cardboard, press and tape into place.


Repeat the process for the next piece -


you will need two for each ornament (or, you can try adding one or more extras onto a single ornament if you like).
Set the clay curves aside to dry.

Remove the clip on the fishing swivel, if there is one, and use pliers to pinch one of the end loops on the swivel to make it smaller than the ball in the center, as shown.


Cut a strip of paper the width of the top tabbed section on the pattern and about 1" to 1 1/2" long.  Roll the strip around a toothpick, then place the swivel inside and tighten or loosen the strip so that it fits snugly onto the swivel.  Glue the paper roll into a tube, but do NOT glue it to the swivel.  Make another paper tube for the bottom tab.


Prepare the string for your ornament by putting a stop bead on the end.
cut a strip of paper the same size or just slightly smaller than the hole in your bead.


Fold the paper in half, tie the end of a length of monofilament around the paper (12" to 14" of monofilament should be more than enough - it's better to have it longer than you need it at this point, so you have room for tying off the ends later).  Fold the paper in half again, keeping the monofilament in the fold.  Pull both ends of the monofilament up through the bead, put glue on both sides of the paper and pull it up into the bead to hold the monofilament snugly.  (clip off the ends of the paper if it is sticking out below the bottom of the bead.  Trim the extra "tail" off the monofilament so you have a single strand coming from the top of the bead.


When the clay pieces are dry, trim the tabs off in line with the marks on the cardboard.  Glue a paper tube to each end of the curved clay as shown, making sure that the tubes are in line with each other.


When the glue is dry, attach another clay twist to the other side.


It should appear to be a figure eight when looking through the lined-up tubes from the top or bottom of the ornament.


Allow the glue to dry, then paint as desired.

To string the ornament, put the monofilament with the bead on the end that you prepared earlier up through the bottom tube.  If desired, add a center bead in the center of the ornament by either knotting the monofilament where you want the bead to sit and gluing the bead in place, or by wrapping a piece of tape around the line and securing the bead to it with glue.

Thread the monofilament through the top tube of the ornament, through the bottom (squished) end of the swivel, then back through the top tube of the ornament.  Pull the swivel snugly into the tube, then make a knot in the monofilament to hold it in place.

Hang it up and blow on it gently to watch it spin, or place in a breezy doorway or window.

I hope each of you have Marvelously Happy Holidays, whichever ones you celebrate!

Thanks for joining me here again!  As always, play, experiment, and have fun!

Tori
Find me on Facebook, or peruse & ponder pics with me on Pinterest