Showing posts with label tip. Show all posts

Tuesday, May 16, 2017

Cindy's tip for May

Hi everyone, and welcome to the Creative Paperclay® blog.

It's my turn to share with you a tip or technique.... today I have chosen to share a quick tip....  this is something I came up with while trying to make sure I keep my paperclay in new condition after I have opened a new pack...

Being that I enjoy scrapbooking along with many other creative endeavours, I was searching around for the best way to store my opened Creative Paperclay® when I spied my Fuse tool.  For those unfamiliar with this tool, it was designed with the pocket page scrapper in mind, to seal off the small pockets on the multi pocket pages, a great little tool that I have found many fabulous uses for, and now I can add one more to that list - re-sealing my Creative Paperclay® packets.

So we begin with an open packet of paperclay.

next you need to push all the air out of the packet


Then you start to roll the Fuse tool (as close as possible to the clay) across the package.


Now I did learn that the Creative Paperclay® packaging requires more pressure and several runs across on both sides, but the Fuse tool did seal the package just like new, so my paperclay will stay as fresh as the day I first opened the pack.


I do hope this little tip is helpful and you can enjoy many good times with that new pack feeling right down to the last speck of your Creative Paperclay®.

You can get your Creative Paperclay® here.
and you can find the Fuse tool here.

Until next time, 
Happy Creating  


Tuesday, September 6, 2016

Tori's Tip - Bones, Horns, & Teeth - Painting Surface Finishes

Hi friends! Last month I gave tips for painting on Creative Paperclay® modeling material, and mentioned how the surface texture makes a big difference in the paint absorption.  This month, in preparation for my project at the end of the month, I want to show you an example of some of the surface texture finishes as it relates to making realistic bones, etc.  These techniques are great for adding dimension and texture to other projects as well, of course.


In the example above, some bands of a burnt umber wash have been painted over clay that was dried then sanded to various levels of surface finish.  I used the sandpaper in one direction only to create the grooves of various sizes - this is how the growth lines (and rings) are created on horns. It is also a good technique for adding texture to leaves, flowers, etc.

For bone finishes, what you choose will depend on whether or not you want the bones to look worn, what age and level of decay you want them to appear as, and what area of bone you are creating.  I may have said this a few (hundred) times before, but I'd like to say again that Creative Paperclay® modeling material is great for making bones, horns and teeth of all shapes and sizes!  Often, you don't need to do anything to the clay at all after sculpting it, other than give it a wash of acrylic or watercolor paint to bring out the sculpting details.


 In these photos of a miniature dragon skull, you can see the different finishes between bone, horns, and teeth.  The horns have lines made from the sandpaper, and have also been rubbed with paper to make them slightly shiny.  The teeth have been polished.


   To polish the clay, use fine grit sandpaper, then a piece of torn paper bag to buff the surface, and finally a piece of newsprint or packing paper.  Paint a wash over the clay, then polish again after the wash is completely dry- repeat as necessary until you have the desired effect.


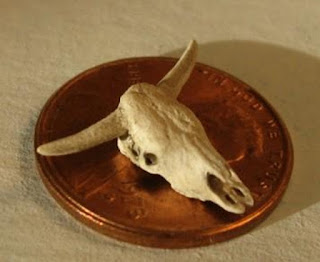
For the miniature cattle skulls, you can see that the lines along the horns follow the shape, and the teeth are polished.  The skull bones were lightly sanded with 320 grit sandpaper stuck on a shaped toothpick.  I think the dirty greenish yellow cow teeth took three or four washes of various tints, polished in between.


This little (less than 5.5" tall) skeleton
was shaped with files and lightly sanded


and this one is a life-size pose-able hand - the clay was only lightly sanded to shape it, and it was painted with a light coat of gesso, then washes were added.  This is a good technique to use if the piece is going to be used in an area that is not well lit, as it will make the "white" of the bones stand out a bit.   This was one of my Halloween projects for the Design Team last year.  If you want full directions, including a pattern, click here  (The project is easier than it looks!)


Thanks for joining me here again!  As always, play, experiment, and have fun!

Tori
Find me on Facebook, or peruse & ponder pics with me on Pinterest


Friday, September 25, 2015

How To Save Some Time

Hello, it is Ann here today with a quick tip.  I like to have "play" sessions where I pull out some Creative PaperClay® and my box of moulds and just make a whole batch of embellishments.  It is fun, therapeutic, and gives me some extra time.  It is kind of like Batch Cooking!  Except I call it Batch Claying!


Working this way gives me some extra time to focus on other aspects of my projects , and also means I have some ready made embellishments to just add to my creations.


By working in Batches I make a mess once, and clean up only once too.


I let my clay embellishments dry over night.  The following day I just gather up my pretties and store them in a container, to be used at a later date.

Just a quick tip to save you some time.  I hope that you find this useful and enjoy making more projects.  For more tips and How To's, please come over to my blog at:  http://annmakes.blogspot.com.

Thank you for stopping by.

Tuesday, August 18, 2015

Transferring Patterns - Tori's Tip for August

This month I made a short video on how to transfer a pattern to Creative Paperclay® modeling material.  It is an easy technique better demonstrated than written out :)


If you have a light box or you are able to see your design from the reverse side of your pattern paper, you can skip step 1 and just trace the pattern in reverse the first time.

I'll be using this technique for my project in September, when I'm going to share with you how to make an "antique" chalk/slate board.

For transferring a pattern to dry clay, follow the same tracing method, but then place the traced pattern onto the clay and go over it with a pencil while it is on the dry clay.

Thanks for visiting the blog!

I'd love for you to join me for more projects & art adventures on my personal blog
Find me on Facebook, or peruse & ponder pics with me on Pinterest


Friday, October 10, 2014

Tip: Cut Down on Sanding

I love working with Creative Paperclay®, but I must admit that I'm not a fan of the sanding process. I've discovered a couple ways to eliminate some of the sanding.
  1. After I have a shape cut out, I dip my finger or a soft artist paint brush in water and gently smooth the edges. The paint brush is great for getting in small or intricate area of the clay design.
  2. For the larger surface areas I coat the clay piece with slip. I use a wet artist paint brush to apply the fairly runny slip. Here's a great blog post about slip—how to make it and what it does. 
When I do have to do finish sanding, I've found that jeweler's files and an emery board work on most of the small projects that I create. Every once in a while I need to break out the Dremel for serious sanding, but the two tips from above always cut down on the sanding time.
Carole

Friday, September 12, 2014

Tips for Working with Creative Paperclay®

Here are a few of my favorite random tips for working with Creative Paperclay®.

  1. Keep the material damp. Work with the smallest amount that you need, and keep the remainder in the packaging and then in a sealed zip-lock bag.
  2. Work on a non-stick surface such as a Teflon craft mat or freezer paper. Some folks use waxed paper, but I find that it isn't strong enough, and eventually wilts. Baking parchment will do in a pinch.
  3. Allow ample time for your project pieces to dry. Overnight is usually good for smaller, thinner pieces. Thicker, larger pieces will take longer.
  4. You can speed drying time by placing your project pieces in a very low oven, around 225°F.
  5. To get your pieces as smooth as possible, use your finger or a small paint brush dipped a into water, then gentle smooth the surface of the piece.
  6. Don't be afraid to work with the clay!! Knead it in your hands. Let it "talk" to you. Enjoy the creative process.
Carole

Friday, August 15, 2014

Storing Creative Paperclay®

Creative Paperclay® needs to be kept moist after the package is opened.  Here’s how I store my unused Creative Paperclay. I keep the material in the original bag, but before reclosing it, I mist it with a few spritzes of water. I keep a mini-mister filled with water right on my worktable so it’s always handy. Then, I squeeze out as much air as possible, and put the package in a food saver bag and vacuum seal it.  [My food saver is similar to this one: http://www.samsclub.com/sams/foodsaver-v4800-machine/prod11060612.ip] I love getting double duty out of my food saver!!

If you don’t have a food saver, then I recommend following the preceding instructions, but instead of vacuum sealing, put the Creative Paperclay package into a ziplock bag. Again, squeeze out as much air as possible. Then, put this into a tight-sealing plastic container. Give the inside of the container another spritz of water, and you’re all set. Your Creative Paperclay will remain moist and pliable, ready for your next creative session.
Carole

Thursday, May 15, 2014

Tip to create thin pieces of Creative PaperClay® by LuLu Lancaster


Hello there! this is LuLu Lancaster and I have a tiny Tip to share with you. Something I recently discovered as I needed a piece of thin clay to use as a sheet of paper.

I use a pasta machine to condition my polymer clay. I tried to use it with my Creative PaperClay® and ended up in a sticky mess, not only the clay was a mess but so was my pasta machine.
I decided to use wax paper and the clay mostly stuck to the wax. I went into the kitchen and grabbed my parchment paper. Success! 

Between 2 sheets of parchment paper I placed some clay. I then squished it flat with my hands, you could use a roller ;) to the point it would fit in the largest setting on my machine. I found I had to take the clay out of the paper on the 4-5th pass and use a new piece of parchment as the paper started to get damp and the clay would stick. After passing though each setting and 2 changes of paper I had a thin sheet of clay. Perfect. And my pasta machine was still clean ;)

Sheet of thin clay

Cut to resemble a tiny piece of paper

curled edge ;)

All painted and looking good :)

Thank you so much I hope you found this tip helpful.
LuLu


Thursday, March 20, 2014

Creative PaperClay® March Tip using pencils with LuLu Lancaster


Hello This is LuLu Lancaster with a quick little Tip to color your Creative PaperClay®
I have been using watercolor pencils and Derwernt Inktense Pencils for years to add color to my dolls. But recently discovered a little brush that makes this all the easier :) 

A water paintbrush is fantastic little tool to keep with you. I use the AquaStroke watercolor brush, they come in many different sizes :)
I am also using here Derwent Inktense pencils. They really are inktense and the colors are extremely vibrant :) These are all available on Amazon and at Jerry's Artarama.


You will simply draw on your subject, here I am using 2 face cabochons.


Next using the water brush you will "paint". start with the lighter colors and work into the darker ones. Your brush can be wiped off with a paper towel.


The great thing about using the pencils is you can keep adding more and still maintain a translucent look.
Have fun and Thank you for following along :)
LuLu


Friday, March 7, 2014

March Tip by Rachel Whetzel

My tips for you today involve this cold and snowy or wet weather so many of us are having. I myself live in Oregon. It's beautiful and GREEN, but being green means it's also WET. Wet doesn't really help when you're drying clay, and you don't want to wait a week for that to happen. A lot of times, I use my oven to help speed up the process, but there are some tricks to doing that without mass amounts of cracking.
  • LAYERS Don't try and dry one huge project in one fell swoop. Dry one thinner layer at a time. Use water on your dry piece and apply new clay to the wetted dry one. This creates a good bond between your layers. 
  • LOW HEAT Keep your oven at THE LOWEST temperature you can. My stove only goes down to 170 degrees, but I have a small toaster oven that goes down to 150 degrees. Set your oven as low as you can. 
  • AIR CIRCULATION This is huge. I have a convection toaster oven, and cracking has become nearly non existent with the low temps, and hasn't lost dry time because of the air circulation! If you don't have a convection, putting a fan in front of a cracked oven door, or using a dehydrator work also. So does placing a space heater facing shelves with your project on them. 
  • CRACK A DOOR If your oven only goes to 180, or 200 degrees, you can help reduce heat by cracking the door on your appliance! 
  • FILL IT IN Of course, if you bake a piece to speed up your dry time, and you still have cracking, you can wet your dry piece, and smear some Creative Paperclay® into the cracks. Once your piece has dried again, and you sand it, there will be no telling it was cracked. 
Thanks for reading! If you'd like to keep up with me, and see more of what I'm up to, I'd also love it if you'd visit MY BLOG and Subscribe! You can also find me on FACEBOOK!

Friday, February 7, 2014

Jan Creative Paperclay Tip from Rachel Whetzel

One of my favorite ways to use Creative Paperclay®, is in my mixed media art work. You can use clay on projects and cover it with paper! I love using it to create dimension on canvases.
Leave me a comment and let me know what you'll be using Creative Paperclay® for next! CLICK HERE to visit me at my "house" too!! Thank you so much for reading!! ~rachel

Don't MISS IT!! We're hosting a Valentine Link Party on Feb 8th!! 

Friday, January 3, 2014

Jan Tip: Kid Friendly Inspiration and Reminder from Rachel Whetzel

Hello, Creatives!! For a few years now, I have taken part in the idea to choose a word to keep in mind and "live by" for the year. It's a sort of "instead of New Year's Resolutions" kind of a deal for me. Usually, I create a journal, or something else along the lines... but this year, I've decided to create something to hang in the window, to help remind me of the word I chose for 2014. My word this year, is Focus.
My TIP:
Don't forget how SIMPLE it is to use Creative Paperclay®!! This piece was created in less than an hour... Only about 15 minutes of that time was put into actually creating/stamping/painting the piece! The rest was in drying time in the oven. When you stamp, make sure your clay's surface is slightly dry. It helps keep the clay from sticking to your stamp. In order to get my word on the piece, I used individual letter stamps. They left a square mark around each stamp, so I just lightly brushed my fingers over the edges until the lines were gone.
KID FRIENDLY:
This  project is SO easy! That also makes it a great project for kids! When you paint your pieces, paint your piece the main color you would like it to be. (in this case: teal) and then when that layer is dry, paint a second color or age your piece with browns. Paint the piece working the second color into the crevices of your stamp detail well, and then using a damp cloth, wipe that color off of the surface, leaving it in the cracks. Once your piece is done, string it up with some beads and hang it in the window as a sun catcher, or put it in your rear view mirror! Kids love having their work hanging out and about!

Let me know if you and your kids create a project using this idea! Leave me a link so I can come see too! I would also love for you to visit me at my "house"!! Thank you so much for reading!! ~rachel

Friday, December 13, 2013

Tip: Look Beyond the Usual

Hey, there!! Carole here with a tip for you. Consider all possible sources when looking for your clay crafting supplies. Look beyond the clay aisle at your favorite big box craft store. Venture into the cake and candy making aisles!!Look beyond the art supply stores—what about the toy store, the hardware store?? And my personal favorite—local thrift and resale shops.

I found this gem of a princess castle at the thrift shop. It has molds everywhere—each side has a princess gown and there are accessory pieces bordering the bottom.


This couldn't be any easier!! Remember: it was originally made for a kid!! Here you can see I've loaded this gown mold with clay.

The  clay released from the mold beautifully. I'll have a bit of sanding and final touch-up, but very little. Here is the molded princess gown laid out to dry. 
Princess Gown
I'm intrigued by the bitty accessory pieces. They each could hid behind a dime.

Princess Fan

Rosebud

So--tell me where do you look for your alternative art supplies? What do you find?

Visit my Create & Craft blog to see what else I'm working on.

Friday, July 19, 2013

July Tip from Rachel Whetzel

I've shared before, that water is your friend... and today, I'm going to tell you that sometimes, it can be your enemy! When you are using Creative Paperclay® to create texture, and especially when you are using stamps or found items for this purpose, it's helpful to allow your clay to dry just a bit before you stamp. Allowing your surface to dry a bit helps keep your stamps and textured items from grabbing and lifting clay!

Friday, June 14, 2013

Dawnmercedes' June Tip...

Let's talk a bit about adhesive/glue.  
Nothing is worse than creating a piece of art work out of Creative Paperclay ®, and when you go to glue it to something else/onto another piece of dry Paperclay, your piece doesn't stick or is damaged!

Recently, I used adhesive on two Creative Paperclay ® products.

I found that a hot glue gun and glue dots did not work to secure this shell sculpture.
The hot glue peeled off and tore off some of the paint/modge podge finish.  
(Luckily, it is on the underside...Shhhh.)  Glue dots were not strong enough.


I made some thin embellishments for paper crafting that I needed to 
secure on a card base.


For both of these projects, I found that two liquid glues worked well for my needs.

Helmar's 450 Quick Dry Adhesive
and
UHU's Twist & Glue


Both dry fairly quickly, but you still have some wiggle room time to set
your Creative Paperclay ® pieces at just the right place.  I really like how both of these products
adhere different combinations of materials together.

While a glue gun might seem quick, take the time to play around with other adhesives to see what works best for your designs.  You may also want to practice on pieces that are not intended for a work of art! 

Thanks for stopping by the blog today! 
Hope your day is enjoyable!!

Dawn Mercedes, of Sunnyside Up

Friday, May 24, 2013

Dawnmercedes' May Tip


I learned this tip the "hard way."  
When I was creating these organic balloons earlier in the month, I didn't make any extras.  
One of my balloons deflated before the Creative Paperclay © was dried...
and the shape lost its form.

TIP:
If you are creating a project that involves repeated forms or shapes,
make a few extras.  Planning ahead for "just in case" will keep your artistic endeavors running smoothly!


Thanks for stopping by today!!


Dawn Mercedes, of Sunnyside Up


Wednesday, May 15, 2013

May Tip by Rachel Whetzel

Hello!! Rachel Whetzel here. I have a tip for you! That guy above is my newest art doll I created using Creative Paperclay® modeling material. My tip today is about painting. When you paint things with a lot of texture, like Mad Hatter's hair, you can achieve the best dimension by painting in more than one color to add shading and highlight areas. 
For the Mad Hatter here, I used a light blue paint as my base coat, and then added a darker blue. Before the darker blue was dry, I wiped it off to expose the lighter shades underneath, and left the darker blue in the crevices of the hair. For the last layer, I used antiquing stain and then rubbed it off as well, leaving it in the deepest parts of the hair. Using the technique allows you to let your sculpting to the work for you! 

Friday, April 26, 2013

DawnMercedes' April Tip

Here's my quick tip for today.  

Nails...

Cut them off... Super quick, right?


I have found that if I keep my fingernails trimmed, I am better able to manipulate my Creative Paperclay © without getting "fingernail" marks embedded in my wet paperclay!  So, today, I trimmed my nails.  Once I get caught up on housework and my craft work, I am going to break out some Creative Paperclay ©.  

Be sure to scroll through this blog. There are so many fabulous craft ideas and tutorials that you will be eager to try.  I know I do!!

Thanks for stopping by!
Dawn Mercedes, of Sunnyside Up