I am really excited to be a part of this amazing Creative Paperclay® design team. With the holidays approaching it is time for celebrations, parties and gift giving. I thought I would share a few of my tricks while making holiday charms that could be used at your own party drink charms, given as a gift, decorate a gift bottle or gift. Be sure to give yourself plenty of time to make these to allow for drying times.
CUTTING CHARMS
To start gather supplies: See list at the end of this post. Note: Once you use items from the kitchen with clay the tools should be used exclusive for clay or other craft projects in the future!
Work on a flat surface, a glass surface seems to work the best. Tip: I place a transparency on the glass surface to allow easy moving. Sorry you can't see the transparency, believe me it is there! Work with small amounts of Creative Paperclay®, first roll it into a smooth ball, then between the spacers roll out the clay. For spacers I used 3 pieces of chip board taped together with Miracle Tape, making them about a 1/4 of an inch thick. The spacers help keep my clay a consistent thickness. While working with Creative Paperclay® be sure to keep the unused portion of the clay sealed or covered in plastic so it doesn’t dry out!
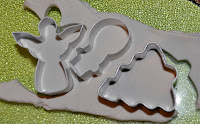
Cut your charms, press hard so that you feel the glass surface below the cutters. Tip: Gently pull the extra clay from around the cutters while the cutter is still in the clay.
Repeat the cutting process.
Add dimension to your charms with really small cutters. For the Christmas tree add ornaments and star topper.
Using an inexpensive paint brush add water to the surface of the charm and to the back of the piece being added to the charm. This creates an area that the clay will adhere to itself. You can use glue if you prefer.
If it is difficult to remove the small pieces from your surface, use a tool to remove them. Tip: Leave the cutter imbedded in the clay while lifting from the surface. This helps the clay keep its form.
Using the end of the paint brush put a hole in each charm.
Set aside to dry, this could take from 24 to 48 hours depending on the humidity and temperature. Mine took 48 hours as we do not turn up the heat in our house. I like to let it dry naturally. If you're in a hurry, you may put your unpainted pieces in a 200 degree oven for 20 minutes or until dry. Watch CLOSELY!
Halfway through the drying time turn your charms over.
PREPARE CHARMS FOR PAINTING
Sand the rough edges gently with an emery board. For a sealed surface paint charms with a matte medium or gesso and set aside to dry.
PAINTING
Paint your charms with acrylic paints. Gold was used here. The acrylic paints can be any that you may have around. Set aside to dry.
For a little sparkle, add glitter using Ice Stickles and a bit of red Stickles for a splash of color. Seal the paint and glitter with 3D Crystal Lacquer set aside to dry overnight.
For a little sparkle, add glitter using Ice Stickles and a bit of red Stickles for a splash of color. Seal the paint and glitter with 3D Crystal Lacquer set aside to dry overnight.
WIRE WRAP
Check out the TIPS FOR CREATING WITH CREATIVE PAPERCLAY®
by clicking HERE!
The sky is the limit
with what you can create using this amazing product.
Visit my blog HERE
to see what other projects I am up to!
Until next time.... Lyneen
Visit my blog HERE
to see what other projects I am up to!
Until next time.... Lyneen
Supplies:
Creative Paperclay®,
Small cookie cutters,
Cutting surface-Glass cutting board
Transparencies
Roller
Spacers
Thin tool to lift
Paint brush
Water
Emery-board
Gesso or Matt medium
Acrylic Paints
Stickles - Ice and Red
Sealer - 3D Crystal Lacquer
Sealer - 3D Crystal Lacquer
Wire
Wire tools
Beads


5 comments:
These are just wonderful!
Hi Jingle,
I have been making Paperclay Christmas Decorations with my Visually Impaired Art Group, they just love them. We have a 'production line' going when we make them. We have made over £300 in the last year,especially this time of the year. Like your idea of 'Charms' perhaps will try that for Easter Time...
Julie
This is so awesome. I love the idea of having everyone's glass personalized. I love using the crystal lacquer also
Hugs
Brenda
I would be honored if you came to see my blog here
Wonderful charms Lynette! What a clever idea for the Christmas holidays!
Hugs XX
Barbara
Great charms! Nice tutorial :)
Post a Comment