Thursday, May 26, 2016

Going Baroque with Creative Paperclay®


There is magic in mixed media. Old objects get a new life and are given a new story. I have drawers full of cast objects, charms and beads that I use as finishing elements in my art. I find boxes with broken jewelry and odd stuff on my doorstep often. People in town know I use these second hand interesting things (S.H.I.T.) in my art. As a mixed media artist, you never throws ANYTHING away.

SUPPLIES
Creative Paperclay®
Stamps
Old jewelry
Beads
Stencil
Polymer medium

This piece started by laying out shapes of Paperclay on an old painted, cradled panel. I stamped into the clay then went through my drawers full of objects I had previously cast with left over pieces of Paperclay. After selecting the lucky pieces, I glued them down on the dry butterfly shape. Then I coated everything with polymer medium to seal the clay before painting it.


Then I started the painting process using several shapes of purple, gold and buff colored paints. I dry brushed the gold over the purple to pick up the highlights in the texture.


I went through my drawers full of small objects, jewelry, keys, and whatever that I keep in muffin tins. I always search these treasures to finish off a piece of art.


Now I add my small treasures to my art to embellish it. Some I painted just a little and, of course, I added some stencil work.

There is nothing like the pleasure of creating.

Dream in Color.

Darlene Olivia McElroy

Monday, May 23, 2016

Wonderland Looking Glass


Alice in Wonderland is a theme I haven't explored much during my journey as an artist. But with the new movie Alice Through the Looking Glass debuting in theatres next week, I was inspired to try my hand at this Wonderland Looking Glass.

An old mirror works great for this project. Or, if you don't have an old mirror, you can make a faux mercury glass mirror using an old picture frame and some spray paint. (I'll put a link to my faux mercury glass mirror tutorial here soon.)

  1. I start by rolling out a slab of clay 1/4” thick. It’s always a good idea to try to rotate the clay and roll it in different directions. This prevents it from developing a grain and helps promote uniform shrinkage as the clay dries.
  2. Next, I cut my shapes out from the clay. I chose a clock, a mushroom, a hat, a rabbit, a teapot, and some hearts for my images.
  3. Once my basic shapes have dried, I go back and build up some details. It’s really easy to add wet Paperclay to dry Paperclay with just a little bit of water and your finger.
  4. Once all the pieces have dried completely, I sand, paint, and varnish all the individual pieces.
  5. Using a good quality glue, I attach the pieces to the mirror.
  6. I add some finishing touches, and my Wonderland Looking Glass is finished.


About Kerrie
I am a mixed media sculptor working primary in clay. Though clay is my passion, at the core, I'm simply a maker, a builder, a creator. Making things makes me happy.

I make videos about making things and post them on my channel KerrieLee:DreamUp on YouTube and on my website KerrieLee.com.


Friday, May 20, 2016

Travel Tic-Tac-Toe Game

My grand daughters are soon going to be flying cross country from Ohio to California. I thought maybe a new game might be just the thing to help keep them occupied during the long flights, so I made this travel tic-tac-toe game.

I started by rolling out a ball of Creative Paperclay® into a slab. I used square dowels on each side of the clay as gauges so the entire slab was a uniform thickness.

Next, I used canape cutters that I use exclusively for craft projects to cut discs that would become the playing pieces.

Note: I thought the crowns would be cute since this set was going to be for girlie girls, but as it turned out they were too small.

I dried the discs on a drying rack similar to this one that Kerrie tells how to make. After they were dry, it was time to paint them. I used acrylic paints in the girls' favorite colors. When the paint was dry, I sealed the discs with PPA Gloss, an acrylic medium. I just couldn't help myself—I had to add the bling :) which I placed on each disc while the PPA was still wet.

Right now this travel game is packed and ready to go!! California here we come!!

Check out the Tiny Tool Time blog to see how I made the game board.

Carole

Tuesday, May 17, 2016

Tori's Tip - Create Lightweight Jewelry with Clay

I like making fun earrings for myself and others, and of course my medium of choice is clay!  Creative Paperclay® modeling material is my first choice for detailed scale miniatures that are to be worn as earrings.

Artsy earrings - 1:12th scale miniatures of a few of my favorite things!
Made with  Creative Paperclay®, mixed media

Garden goods - 1:12th scale miniatures
Made with  Creative Paperclay®, mixed media

For someone who likes to wear larger earrings, pendants, etc., Delight™ air dry modeling compound is sometimes a better choice because it is extremely lightweight.  The items shown below, created by my daughter and her son, show a variety of clay types and embellishments

Earrings and pendants with both types of clay -
finished with paints,  decopauge, transfers, rubber stamps, paints, embedded objects, etc.


A search of this blog for "jewelry" or "earrings" will show you many inventive ways to use clay for jewelry!


One of my previous posts shows how to embed the chain for hanging earrings
- and a really fun way to make jewelry :)
 http://creativepaperclay.blogspot.com/2015/03/hot-craft-crayon-art-jewelry.html

Thanks for joining me here again!  As always, play, experiment, and have fun!


I'd love for you to join me for more projects & art adventures on my personal blog
Find me on Facebook, or peruse & ponder pics with me on Pinterest

Thursday, May 12, 2016

Treasure Hunting with Delight

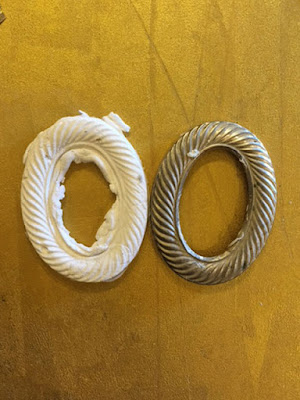
 I have a lot of found vintage pieces in my studio that usually find their way into a painting but, often, they make great casts. When I buy them at flea markets, junk stores or garage sales I try and think of all the ways I can use them. Here are some examples I made from things I had lying around. I have not gotten around to cleaning up the edges yet.

SUPPLIES
Found metal objects
Delight or Creative Paperclay®


So easy. Delight was pressed into vintage religious metal ornamentation. Because the metal pieces may end of in a painting, I will often make a silicone cast of it for the future.


 I love this vintage pin. The wings are so beautiful and were easy to cast. If I had wanted to use the whole pin, I would have made a silicone cast of it.


 A metal charm also makes a great cast.
Anything with wings
Metal frame cast will definitely go into a painting today!

Open your eyes to the possibilities around you!

Dream in Color!

Darlene Olivia McElroy


Monday, May 9, 2016

Kerrie's Tip: DIY Drying Rack

My favorite way of drying my Creative Paperclay projects is to let them air dry. I feel air drying my pieces yields less cracking and warping than when I speed up the drying process in the oven.

To help my pieces dry evenly, I built a drying rack out of an old picture frame, some hardware cloth, and duct tape.


I removed everything from inside the frame and cut the hardware cloth to fit the back of the frame. Then I taped the hardware cloth* around the entire perimeter being careful to cover all the sharp edges.

(*Hint: If you're having a hard time finding hardware cloth in your garden supply center, ask an associate where they keep the chicken wire. It will probably be in the same area.)


The drying rack elevates my projects above the table and allows air to circulate around the entire piece. And unlike a cooking rack used for baking, the hardware cloth allows me to dry very small pieces without fear of them falling through the gaps.


--- 
About Kerrie
Dreamer. Dabbler. Noodler.

I am a mixed media sculptor working primarily in clay. Though clay is my passion, at the core, I'm simply a maker, a builder, a creator. Making things makes me happy.

I make videos about making things and post them on my channel Kerrie Lee:Dream Up on YouTube and on my website KerrieLee.com.

Friday, May 6, 2016

May First Friday Fan Day


Need some inspiration for your next Creative Paperclay® project? Check out what folks are making with Creative Paperclay™.


Love Birds
Southwest Themed Pendants
Pebble Faces
Whimsical Birds
Paperclay ATCs
Graphic45 Stamps to Make Embellishments

How To Make a Paperclay Art Doll
Sculpting a Doll Head

HELP US FIND YOU!!
  1. Use the hashtag #CreativePaperclay on all your social networks.
  2. When using Facebook, be sure the your posts and images using the #Creative Paperclay hashtag are set to public, otherwise we won't be able to find you.
  3. Share your projects on the Creative PaperClay® Facebook page.
I'm always trolling the web, looking for great Creative Paperclay® projects. If you find something, post it on our Facebook page.

GOT QUESTIONS???

Find the answers to your paperclay questions. See what other folks are creating. Stop by our Facebook group and say, "Hi!" Creative Paperclay Q&A
Carole

Tuesday, May 3, 2016

Make a Sweet May Basket


Traditionally, May baskets are left on doorsteps or hung on door knobs on May first, but this May basket filled with goodies could be a sweet treat for Mother's Day or any time!

To create the basket you will need:

Creative Paperclay® modeling material
plastic snack container
paper bag
plastic wrap
rolling pin
masking tape
scissors
craft knife
acrylic paints
varnish

First create the form for your basket as follows -

Cut a strip of paper bag about 3 inches wide and long enough to go around the snack container with some overlap.  Fold the long edge of the strip down far enough to fill the rim of the space between the top of the snack container and the "lip" that the lid snaps on to.   Continue folding the strip over until it is thick enough to be flush with the lip of the container.  (If it starts to get too wide from folding, use a fan fold for the remainder).  Attach the paper strip to the top of the container with masking tape.


Cut a second strip of paper about 2 1/2 times the height of the container and long enough to go around twice.  Fold the long edge of the strip down about 1" wrap the strip around the container twice, taping the folded edge flush with the edge of the container, over the thin strip you applied in step 1.  Make a cut from the top edge of the strip to about half way down the container, about every inch along the strip as shown.


Fold the outer layer of strips outward, and roll/fold and tuck the inner layer into the space where the edge of the container slants towards the bottom.


After all the inner strips are folded in, fold one of the outer strips towards the center of the container and trim just slightly longer than the length to the center.  Trim the rest of the outer strips to approximately the same length, then fold and tape the strips to the center all the way around, pulling them taught over the inner strips, and overlapping and smoothing the outer strips as you go.  Trim strips if necessary to avoid large bumps or hard edges.


When all of the strips are folded down and taped, add a layer of plastic wrap and set the completed form aside.


Next roll out a layer of clay to 1/8" thickness or less.  Cut the clay into 3/8" strips, then cover the strips with plastic wrap to keep them pliable as you work. You'll need about 20 strips, 10" long.
Place the form upside down on the work surface and wrap the first strip of clay around the bottom.   Trim off the excess and smooth the seam.

Next lay one strip across the the width of the form in the center, and the next strip over top of that one, making a cross in the center of the form.  Lay one strip on each side of the center cross.


Fold back one side of the cross and lay another strip lengthwise, then lay the strip back down over that one to to create the weave pattern.  Lift the other side of the strip and repeat the process.  Continue alternating the pattern (next time you will be lifting the two long strips, etc.).  When you come to the edges of the container, adjust the strips if necessary to insure that you will be able to complete an over/under wrap around the container - you should have an odd number of strips in each direction.  In my case, 5 strips for the long side, and 7 for the short side.  Use the remaining strips to go completely around the container, lifting the strips in an over/under pattern and alternating the pattern for the next row.


Set the basket aside to dry.  When the clay is dry, carefully remove the form, then remove wrapping from the plastic container.  Put this back in the form, use fresh clay to fill in the spaces around the weaving, and add a strip to the top edge, but make sure you leave enough room around the edges to be able to remove the plastic later for cleaning.


Allow the clay to dry again.  Remove plastic insert, then paint and varnish the clay as desired.
Replace the plastic and fill with goodies!!!  Give it to someone you love.


Thanks for joining me here again!

Find me on Facebook, or peruse & ponder pics with me on Pinterest


Monday, May 2, 2016

Fairy Garden accessories


I love my Fairy Garden and creating accessories for it is the most fun. I decided that my Fairy needed a friend so I created a darling little snail all dressed up in sparkles and flowers to sit with her in the garden and keep her company.

I began my rolling out a coil of Creative Paperclay with my hands. I found I got a smoother roll by using the palm and heel of my hand versus my fingers. Both of my projects use this method.

Then I simply wound the rope shape into a spiral. ( I should have smooshed it together a bit more, you can see in the above picture a gap between the clay because it didn't make full contact and separated a little when it dried. )  While the clay was still damp I made indents for the eyes and holes for the antenna. I removed everything and let it dry. 

I also made her some flowers using a flower mold for the sides of her shell and a larger one for her hat and brushed on some water to adhere them to her body and left them attached to dry.

Next, I wanted to make a base for the gazing ball which is really a broken lamp finial. I've had it in the fairy garden but the darn thing kept rolling around and never stayed put, so I thought a base would be the ticket.

First, I made a ball of clay and pressed the globe into it to create the concave surface for it to properly rest upon and then used another rope to wind around the base and added a flower. Removed the crystal to let everything dry.

Once they were dry I coated both pieces with Paverpol to harden them up and even though they would sit outside on my covered balcony they would still need some protection from the elements.

Then the fun part of painting them, which really brings them to life.
 Creative Paperclay takes very well to acrylic paints.

Thank you so much for stopping by and I would love to see you fairy creations on my Facebook page