Sunday, December 6, 2015

Lynda's Beginner Tips

I am so sorry for this post being late - between my hand being incapacitated and starting work again, I am always a bit behind!!!  Being a part of this team, has really helped me expand my horizons a bit - and create one of a kind things for my friends and family AND my house!  I have learned a lot from my team mates and the things they have created!  As you can tell, I do not do large projects - mine are more beginner related, to show you some of the fun things you can make as you are just starting out!  
That said - I have a few tips for those of you who are wanting to start to play a little bit, but are more scared than anything!  
  • Do not start on a large project, start with something a bit more easy and manageable!  Check out Pinterest pages, this blog for easy projects, the Creative Paperclay website for inspiration!
  • Look at your own home and craft box for what you need in order to create something - BEFORE spending a bunch of money on supplies.  As you grow with this - your supply list can grow too!
  • Have a sketch pad - or something that will help you to plan out your project.  This way - all the details can be in one place!  
  • Keep your stuff in one area - it makes it a lot easier to grab your supplies and create than to find everything all over the place!
  • Find some of your existing craft supplies that you can use along with this - such as stamps, paints, molds, etc., and simply have fun!
  • For all of your leftover Creative Paperclay and Delight product - put them (with the packaging) in a container with a lid on it that is air tight!  It keeps it really fresh if you make sure to wrap it up as well!    
Thanks for stopping by, see you in 2 weeks!  I am working on ornaments for each of my family members - to put on their trees!  Each one of a kind - and made special just for them!  I can't wait to share them with you!  
Until next time,
Lynda Jeffs
                                   Creative Paperclay Design Team
   

Friday, December 4, 2015

December First Friday Fan Day


Need some inspiration for your next Creative Paperclay® project? Check out what folks are making with Creative Paperclay™.


Snowman décor piece
Mushroom fairies
Sacred hearts
Holiday decorations
Making a doll (tutorial)

Donuts for a doll house
Paperclay snowman (tutorial)

HELP US FIND YOU!!
  1. Use the hashtag #CreativePaperclay on all your social networks.
  2. When using Facebook, be sure the your posts and images using the #Creative Paperclay hashtag are set to public, otherwise we won't be able to find you.
  3. Share your projects on the Creative PaperClay® Facebook page.
I'm always trolling the web, looking for great Creative Paperclay® projects. If you find something, post it on our Facebook page.

GOT QUESTIONS???

Find the answers to your paperclay questions. See what other folks are creating. Stop by our Facebook group and say, "Hi!" Creative Paperclay Q&A
Carole

Wednesday, December 2, 2015

Winter Snowman Picture Frame by Tamara Dozier


Hello everyone! This is Tamara Dozier and I've rejoined the Design team. I'm trying something new ... Videos!  This first one covers the sculpting process to create your own Winter Snowman picture frame. Hope you enjoy!


Supplies for Winter Snowman picture frame

Creative PaperClay®
Dollar store picture frame
Xacto knife
Various sculpting tools
paint brushes
Rolling pin
white glue
Acrylic paints in your choice of colors
Glitter


Tuesday, December 1, 2015

Easy Holiday Lights by Tori West


I've always loved the look of candle lights, especially for winter holidays, and with the advent of LED tea lights just about any material can be used for decorative displays without the worry of them catching fire!

This month I'll be showing you how I created an easy votive candle holder using:

a jar
plastic wrap
tape
scissors
craft knife
thin cardboard
Creative Paperclay® modeling material
transparency film (for printing transparencies on an inkjet printer)
Delta Ceramcoat gloss varnish
Rust-Oleum® "Hammered Gold" spray paint
gesso
paintbrush
sandpaper
paper, pencil, tracing paper


I had a set of small mason jars so I decided to use those, the jars are slightly tapered, and had a decorative textures, so I created a cardboard collar to straighten and smooth the sides.


Next I covered the jar with plastic wrap, including the bottom.


I designed a pattern based on the measurements of my jar, rolled clay out to and even 1/8" thickness and wrapped it around the covered jar, than transferred the pattern.

  (for information on transferring patterns click here)


(for information about smoothing seams click here)


Next I cut around the pattern lines, using the knife in an up and down motion.  The pieces were left in place so the edges wouldn't curl up during the drying process.

oops ---I accidentally stuck my thumb on the edge when I moved the piece.  Thankfully, Creative Paperclay® is so easy to fix I'll just let that dry and then add fresh clay later to repair it, rather than trying to smooth it out now and risk stretching out the clay at the top.


When all the clay was dry, I finished cutting out the design, repaired an dings or dents, and sanded as necessary.   I covered the entire piece inside and out with white gesso, and when that was dry, sprayed on two coats of  hammered gold spray paint.


While I was waiting for the spray paint to dry, I created a frosted lining for the inside of the light cover.  I started by dribbling gloss varnish over the surface a sheet of transparency film.


Next I textured it by using a piece of wadded-up plastic wrap and dabbing gently to spread the varnish.  When using this method, the texturing needs to be done fairly quickly before the varnish starts to dry, or dabbing the sheet will result in the varnish sticking to the plastic wrap instead of the transparency film.


When the entire sheet was mottled I set it aside to dry.


Once the sheet was dry I cut strips to the length and width necessary to fit inside my light cover, placed it inside with the shiny/smooth (untextured) side facing inward to reflect more light, then added the LED light - Done!


This project was so quick and fun I decided I needed more lights for a holiday display.  Happy Holidays, friends!


I'd love for you to join me for more projects & art adventures on my personal blog
Find me on Facebook, or peruse & ponder pics with me on Pinterest

Friday, November 27, 2015

Tip Time

Hello, it's Ann from The Design Team and from Annmakes with a quick tip.  Did you know that Creative Paperclay® is very much like paper when it cures!  Well, if you make it thin it can be cut with scissors.


 I love doing this when working on a project, and then finishing off the piece to make it look like hard clay or marble, even metal.  You can use this Creative Paperclay® to achieve so many faux finishes.


So, back to the paper quality.  Not only can you cut Creative Paperclay® with scissors, or a craft knife, but you can also punch holes right through it with a regular hand held paper hole punch!  How neat is that?  Imagine all the possibilities.


In a previous post I talked about how you can color on Creative Paperclay® just like you can on paper. I have used many different mediums to color my projects from: colouring pencils,


crayons, pastels, paints, inks etc.


The properties of this awesome product are, well, awesome!  Once Creative Paperclay® dries it is so light weight and easy to alter into just about anything your heart desires.  Go on give it a try.
To see more of my other projects visit my blog at:  http://annmakes.blogspot.com.

Thanks for stopping by.

Thursday, November 26, 2015

Fun with Texture and Delight


I like being prepared and one way I do it is to create 4" x 4" masonite boards with different textures. I do these when I have a break in time and I am not working on a specific project. These are texture ideas for future pieces of art.

SUPPLIES
masonite boards
Delight (or Paperclay)
found objects
texture rollers


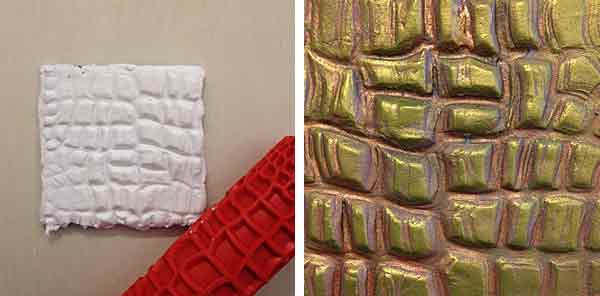
I used a textured roller to achieve this alligator skin look. When the Delight was hardened, I applied a metallic bronze paint to the surface. When that had dried, I rubbed a green metallic rub. I felt in love with this sample.


When through my kitchen drawers and found this silicone hot pad that I thought would make a great texture.
I started by stamping the Delight with a stain of light brown then did a wash of silver when the brown had dried.


A scrap of lace also made a great texture on the Delight. This had a wash of red oxide paint on it.


I used a volcanic rock from my yard to get this real natural moonscape type texture on the Delight. When it hardened I painted it grey then did a wash of bronze. I dripped alcohol on it while it was wet.


Years ago I picked up some laser cut plexiglas that I use with spray paint and decided to try it with the Delight. I applied red oxide paint then did a blue metallic rub when it had dried.


Reticulated metal also makes a great for Delight or Paperclay. Multiple washes were applied.

So get out your textures and have fun.

Dream in Color and have fun!

Darlene Olivia McElroy


Saturday, November 21, 2015

The Dangling Snowman


The Dangling Snowman
Tutorial
By
ImagiMeri's Creations


Hello there, this is Meri of ImagiMeri's Creations with another fun tutorial for you.  I wanted to do a video, but I've been sick with bronchitis and sinusitis and have lost my voice.  Please pardon my crude images, too.  Anyhoo, I hope you enjoy this tutorial and I look forward to comments and questions.

The Dangling Snowman
Here's your list of supplies;
1. Creative PaperClay
2. 18"X 2.5" piece of fabric for scarf
3. 2" styrofoam ball
4. 2.5" styrofoam ball
5. 3" styrofoam ball
6. 16" piece of wire, either 20 or 22 gauge
7. 4"piece of wire, either 20 or 22 gauge
8. 5"piece of wire, either 20 or 22 gauge
9. 6"piece of wire, either 20 or 22 gauge
10. Wire cutters
11. Round nose wire pliers for creating loops in wire
12. Clay roller
13. Oven set to 230 degrees Fahrenheit
OPTIONAL:
Rubber stamps for creating texture
Bamboo skewer
Acrylic paints
Gilding paste
Glitter
Sandpaper
Shaping tool or knife


Fig 1. some of the supplies, Fig 2. starting with the smallest
piece of wire (4") create a loop on one end.
Fig 3. insert 4" wire through the smallest styrofoam ball
(2").  Fig 4. leave space between loops and styrofoam ball
for 1/8" thickness of clay, and create second loop on
opposite end.
Fig 5. Proceed  with steps 3-4 for remaining styrofoam balls.
Fig 6. You can now roll out your clay to the 1/8" thickness
for covering the styrofoam balls.
Fig 7. Apply a uniform layer of 1/8" clay over each
styrofoam ball.  Fig 8. here all the balls are covered.
Fig 9. Insert a bamboo skewer or other tool for the hole,
which will house the "arm" wire (16"), through the middle
size clay covered ball (2.5")
Fig 10. continue pushing skewer all the way through.
Fig 11. This step is totally optional.  I used rubber stamps
to create texture on the surface of each clay covered ball.
Fig 12. Closeup of texture.
You can now place your clay covered balls in the
230 F oven for about one hour.  Remove from oven and move
on to step 13.
Fig 13 & 14. Take fabric, with right sides together, and
sew a 1/4" seam down the length, leaving ends open.
Turn fabric inside out and iron flat.  Take a sharp knife
blade and "scratch" at the ends to fray them.You may also
just cut a piece of felt into a length for a scarf.
Fig 15. Using small balls of clay, create carrot nose and
eyes, and mouth.  Attached balls together to create the
dangling snowman. Fig 16. Insert (16") wire through the
hole you created for arms.  Bend ends of wire into branch
shapes or hands (use your imagination).  Re-cook
your snowman for about one half hour to set the nose
and face features.
When done cooking you can then move onto painting
and decorating your snowman.  I first covered him
in a layer of gesso, then painted him white.  I painted
the facial features and then I applied silver gilders
paste all over for a highlight.  I wrapped his scarf
around his neck a few times and tacked it in place
with a needle and thread and a jingle bell.  I also
added glitter highlights all over.  With the bottom
wire loop you can either add something to dangle
or bend over the loop so it doesn't show.  I then
created a wire hook to hang him from.
The snowman is now complete and can be hung
on a tree or elsewhere in your house for a primitive
look for your Holiday decor.

If you have questions, please contact me at 
meriw@cox.net.  You may also leave a comment
question and I'll answer as soon as possible.
I hope you enjoyed this little tutorial
and may you all have a lovely Thanksgiving!

Hugs,
Meri