
Good morning and welcome to another Creative Paperclay® post. Today I am showing you a follow up from two weeks ago when I created some paperclay charms from "non" molds. If you don't know what I am talking about go here.
So I started with one of the charms I created while it was still a bit wet.

When the clay is not yet hardened all the way
I took the original charm

and laid it onto the clay and gently pressed
it into the clay

it gives the clay some definition

see.

After the clay piece was completely hard
I painted it with Metallic Pure Gold
Acrylic paint.
Then I used the Shimmering Garnet from
Terri Sproul's Mixers and you can get
those here. Not only does this give the
crown a glitzy effect, but it also seals the
piece when you mix it with the 3D
Crystal Lacquer.

I wanted to add some glitz to my crown and remembered a purchase
I recently made from my favorite "Dollar Tree".
In the health and beauty aisle I came across these
nail art bottles. I knew I needed them for
my altered art projects and they came in
handy for this project.

I added some rhinestones and these itty bitty
pink balls from the nail art with the 3D Crystal Lacquer
and covered them again with it to seal it.

Then I took an unfinished crown, (yes I
usually make more than 1 piece at a time
in case of mishaps) and traced it onto a scrap
of soft faux leather.

I cut it out just a bit bigger than the piece itself.

I also bought these elastic headwraps at
the Dollar Tree that day, (but not knowing
what I would be doing with them).
I might have a buying problem lol.

I added some glue to the backside of the crown

and glued a part of the headwrap to it.

Then I glued the faux leather piece on top
of the elastic ribbon onto the crown.

and now I have a gorgeous headwrap charm.

Close up (it's hard to take a picture of yourself)
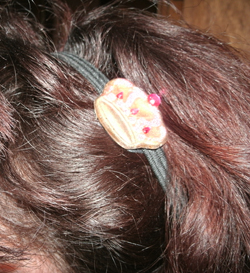
So...what do you think? I think I might be making some of these for my granddaughter for Christmas.
Thank you for joining me again today and I hope I've inspired you to use some Creative Paperclay® and make your own hairwrap charms.
As always, have a great day and God Bless.
2 comments:
Very cute idea!
Hello I just wanted to say you're right dude about this scripts. Your blog give very nice information to reader about this scripts.
Rinoplasti
Post a Comment